
Operation Manual
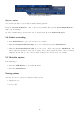
6.3 Timezone
1. Press the Menu-Button to open the main OSD menu.
2. With the Navigation-Buttons (NH) choose the option “Setup” and press the OK-Button.
3. With the Navigation-Buttons (NH) choose the option “System” and press the OK-Button.
4. With the Navigation-Buttons (NH) choose the option “Timezone” and press the OK-Button.
5. With the Navigation-Buttons (JI) choose your timezone and press the OK-Button. Alternatively
press the green Options-Button to save the setting or the red Options-Button to discard them.
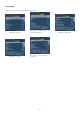
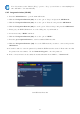
6.4 A/V Settings
1. Press the Menu-Button to open the main OSD menu.
2. With the Navigation-Buttons (NH) choose the option “Setup” and press the OK-Button.
3. With the Navigation-Buttons (NH) choose the option “System” and press the OK-Button.
4. With the Navigation-Buttons (NH) choose the option “A/V Settings” and press the OK-Button.
Video output
This option selects to which output the video signal will be sent to.
HDMI If you have connected your TV to the HDMI output of your Dreambox set the “Output type”
option to “HDMI”.
Modus
Use the Navigation-Buttons (JI) to select the desired screen resolution
Display 4:3 content as:/Display 16:9 content as:
Pillarbox 4:3 shows will be shown in full height on a 16:9 screen and you will have black bars on both sides.
Pan&Scan 4:3 shows will be shown in full width on a 16:9 screen and a bit will be cut off on the top and
bottom.
Just Scale 4:3 shows will be shown in full height on a 16:9 screen and are stretched to fit the width of your
screen.
Nonlinear Only the outer parts of the picture are stretched to prevent the center from being distorted. You
will still have a full screen picture.
AC3 default If a program is transmitted with an AC3 audio track (e.g. Dolby Digital), the Dreambox
switches automatically to this audio track. Volume control of AC3 signals only works if “AC3 downmix”
is activated. Please keep in mind that AC3 downmix will disable the output of real AC3 signals on
every audio out, even on the S/P DIF output.
50