VSX_94TXH.
VSX_94TXH.book Page 2 Friday, April 27, 2007 8:21 PM CAUTION – TO PREVENT ELECTRIC SHOCK, DO NOT USE THIS (POLARIZED) PLUG WITH AN EXTENSION CORD. RECEPTACLE OR OTHER OUTLET UNLESS THE BLADES CAN BE FULLY INSERTED TO PREVENT BLADE EXPOSURE. ATTENTION – POUR PREVENIR LES CHOCS ELECTRIQUES, NE PAS UTILISER CETTE FICHE POLARISEE AVEC UN PROLONGATEUR, UNE PRISE DE COURANT, OU UNE AUTRE SORTIE DE COURANT, SAUF SI LES LAMES PEUVENT ETRE INSEREES A FOND SANS EN LAISSER AUCUNE PARTIE A DECOUVERT.
VSX_94TXH.book Page 3 Friday, April 27, 2007 8:21 PM IMPORTANT CAUTION RISK OF ELECTRIC SHOCK DO NOT OPEN The lightning flash with arrowhead, within an equilateral triangle, is intended to alert the user to the presence of uninsulated "dangerous voltage" within the product's enclosure that may be of sufficient magnitude to constitute a risk of electric shock to persons. CAUTION: TO PREVENT THE RISK OF ELECTRIC SHOCK, DO NOT REMOVE COVER (OR BACK). NO USER-SERVICEABLE PARTS INSIDE.
VSX_94TXH.book Page 4 Friday, April 27, 2007 8:21 PM Thank you for buying this Pioneer product. Please read through these operating instructions so you will know how to operate your model properly. After you have finished reading the instructions, put them away in a safe place for future reference. Contents 01 Before you start 05 Listening to your system Checking what’s in the box . . . . . . . . . . . . . . . . . . . . . . . 6 Ventilation. . . . . . . . . . . . . . . . . . . . . . . . . . . . . . . . .
VSX_94TXH.book Page 5 Friday, April 27, 2007 8:21 PM Using XM Radio . . . . . . . . . . . . . . . . . . . . . . . . . . . . . . . 51 Connecting your XM Radio receiver . . . . . . . . . . . . . 51 Listening to XM Radio. . . . . . . . . . . . . . . . . . . . . . . . . 52 Using XM HD Surround . . . . . . . . . . . . . . . . . . . . . . . 52 Saving channel presets . . . . . . . . . . . . . . . . . . . . . . . 52 Using the XM Menu . . . . . . . . . . . . . . . . . . . . . . . . . . 53 Using SIRIUS Radio. . . .
VSX_94TXH.book Page 6 Friday, April 27, 2007 8:21 PM 01 Before you start Chapter 1: Before you start Checking what’s in the box Please check that you’ve received the following supplied accessories: • Setup microphone (cable: 5 m (16.4 ft.)) • Remote control unit • AA/IEC R6P dry cell batteries x2 • AM loop antenna • FM wire antenna • iPod control cable • Warranty card • These operating instructions Installing the receiver • When installing this unit, make sure to put it on a level and stable surface.
VSX_94TXH.book Page 7 Friday, April 27, 2007 8:21 PM 5 minute guide 02 Chapter 2: 5 minute guide Introduction to home theater Home theater refers to the use of multiple audio tracks to create a surround sound effect, making you feel like you're in the middle of the action or concert. The surround sound you get from a home theater system depends not only on your speaker setup, but also on the source and the sound settings of the receiver.
VSX_94TXH.book Page 8 Friday, April 27, 2007 8:21 PM 5 minute guide 02 Automatically setting up for surround sound (MCACC & Full Band Phase Control) The Auto MCACC Setup measures the acoustic characteristics of your listening area, taking into account ambient noise, speaker size and distance, and tests for both channel delay and channel level.
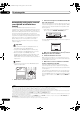
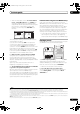
VSX_94TXH.book Page 9 Friday, April 27, 2007 8:21 PM 5 minute guide 02 • With error messages (such as Too much ambient noise! or Check Microphone) select RETRY after checking for ambient noise (see Problems when using the Auto MCACC Setup below) and verifying the mic connection. If there doesn’t seem to be a problem, you can simply select GO NEXT and continue. DVD /L D 1. Auto MCACC N ow A n a lyzing … Enviro n ment Check A m b ient Noise M icro phone Sp eaker Y E S /NO 0.
VSX_94TXH.book Page 10 Friday, April 27, 2007 8:21 PM 02 5 minute guide 3 Press S.DIRECT (STREAM DIRECT) to select ‘AUTO SURROUND’ and start playback of the source.1 If you’re playing a Dolby Digital or DTS surround sound DVD disc, you should hear surround sound. If you are playing a stereo source, you will only hear sound from the front left/right speakers in the default listening mode. • See also Listening to your system on page 28 for information on different ways of listening to sources.
VSX_94TXH.book Page 11 Friday, April 27, 2007 8:21 PM 5 minute guide 02 Using Full Band Phase Control The Full Band Phase Control feature calibrates the frequency-phase characteristics of the speakers connected.
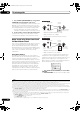
VSX_94TXH.book Page 12 Friday, April 27, 2007 8:21 PM Connecting your equipment 03 Chapter 3: Connecting your equipment This receiver provides you with many connection possibilities, but it doesn’t have to be difficult. This page explains the kinds of components you can connect to make up your home theater system. Rear panel This illustration shows the VSX-94TXH, however connections for the 92TXH are the same except where noted.
VSX_94TXH.book Page 13 Friday, April 27, 2007 8:21 PM Connecting your equipment 12 Audio/video source inputs/(outputs) (x6) Use for connection to audio/visual sources, such as DVD players/recorders, VCRs, etc. Each set of inputs has jacks for composite video, S-video1 and stereo analog audio. See Connecting a DVD/HDD recorder, VCR and other video sources on page 16. 03 When making cable connections • To avoid hum, do not lay connected cables over the top of the receiver.
VSX_94TXH.book Page 14 Friday, April 27, 2007 8:21 PM 03 Connecting your equipment Connecting your TV and DVD player 2 Connect a composite or S-video output on your DVD player to the DVD/LD VIDEO or DVD/LD S-VIDEO input. Connect using a standard video cable or an S-video cable. TV VIDEO IN 3 Connect a coaxial-type1 digital audio output on your DVD player to the COAXIAL IN 1 (DVD/LD) input. Use a coaxial cable designed for digital audio.
VSX_94TXH.book Page 15 Friday, April 27, 2007 8:21 PM Connecting your equipment The diagram shows a basic setup of this receiver together with a Blu-ray disc player, with S-video or composite video connections. See also Using the component video jacks on page 16 if your Blu-ray disc player has component video inputs/outputs. If your Blu-ray disc player offers multi-channel analog audio outputs, see Connecting the multichannel analog inputs on page 56.
VSX_94TXH.book Page 16 Friday, April 27, 2007 8:21 PM 03 Connecting your equipment • For a second recorder, use the DVR/VCR2 outputs. Connecting a DVD/HDD recorder, VCR and other video sources This receiver has two sets of audio/video inputs and outputs suitable for connecting analog or digital video devices, including DVD/HDD recorders and VCRs.
VSX_94TXH.book Page 17 Friday, April 27, 2007 8:21 PM Connecting your equipment 03 • Since they are assignable, it doesn’t matter which component video inputs you use for which source. After connecting everything, you’ll need to assign the component video inputs—see The Input Setup menu on page 67. 2 Connect the COMPONENT VIDEO OUT jacks to the component video inputs on your TV or monitor. Use a three-way component video cable.
VSX_94TXH.book Page 18 Friday, April 27, 2007 8:21 PM 03 Connecting your equipment About the WMA9 Pro decoder This unit has an on-board Windows Media™ Audio 9 Professional1 (WMA9 Pro) decoder, so it is possible to playback WMA9 Pro-encoded audio using a coaxial or optical digital connection when connected to a WMA9 Procompatible player. However, the connected PC, DVD player, set-top box, etc. must be able to output WMA9 Pro format audio signals through a coaxial or optical digital output.
VSX_94TXH.book Page 19 Friday, April 27, 2007 8:21 PM Connecting your equipment 03 Installing your speaker system To take full advantage of the receiver’s surround sound capabilities connect front, center, surround and surround back speakers, as well as a subwoofer. Although this is ideal, other configurations with fewer speakers—no subwoofer or no center speaker, or even no surround speakers—will work. At the very least, front left and right speakers only are necessary.
VSX_94TXH.book Page 20 Friday, April 27, 2007 8:21 PM 03 Connecting your equipment Bare wire connections Make sure that the speaker cable you’re going to use is properly prepared with about 10 mm (3/8 in.) of insulator stripped from each wire, and the exposed wire strands twisted together (fig. A). To connect a terminal, unscrew the terminal a few turns until there is enough space to insert the exposed wire (fig. B).
VSX_94TXH.book Page 21 Friday, April 27, 2007 8:21 PM Connecting your equipment 03 The diagrams below show suggested surround and surround back speaker orientation. The first diagram (fig. A) shows orientation with one surround back speaker (or none) connected. The second (fig. B) shows orientation with two surround back speakers connected. Connecting antennas The supplied antennas provide a simple way to listen to AM and FM radio.
VSX_94TXH.book Page 22 Friday, April 27, 2007 8:21 PM 03 Connecting your equipment FM wire antenna • Connect the FM wire antenna to the FM UNBAL 75 Ω in the same way as the AM antenna. For best results, extend the FM antenna fully and fix to a wall or door frame. Don’t drape loosely or leave coiled up. Connecting external antennas To improve FM reception connect an external FM antenna to the FM UNBAL 75 Ω.
VSX_94TXH.
VSX_94TXH.book Page 24 Friday, April 27, 2007 8:21 PM Controls and displays 04 DIGITAL VIDEO SCALER indicator – Lights when Resolution is set to a setting other than PURE (for example, when the video input signal is upscaled) (page 71). HDMI indicator – Blinks when connecting an HDMIequipped component; lights when the component is connected (page 55). 7 Listening mode buttons HOME THX – Press to select a Home THX listening mode (page 29).
VSX_94TXH.book Page 25 Friday, April 27, 2007 8:21 PM Controls and displays 04 Display 1 2 3 45 6 7 8 9 10 11 12 13 L C R 2DIGITAL 2HD FULL BAND PHASE CONTROL DNR TUNED RDS DTS WMA9 Pro MULTI-ZONE DIALOG E ATT OVER STEREO EON MONO SL S SR AAC DSD PCM S.RTRV SOUND Hi-Bit/Sampling V.SB dB HDMI SBL SB SBR DIGITAL SIRIUS VIDEO HMG USB XM SR+ CD DVD TV TUNER LFE ANALOG [2] AUTO PCM CD-R PHONO iPod BDP DVR HDMI [1] [3] [4] STREAM DIRECT Neo : 6 2PRO LOGIC THX ADV.
VSX_94TXH.book Page 26 Friday, April 27, 2007 8:21 PM 04 Controls and displays Remote control Illustration shows the VSX-94TXH remote control SYSTEM OFF INPUT SELECT RECEIVER 1 2 SOURCE 12 CD XM RADIO CD-R DVD TV DVR2 HOME MEDIA GALLERY BD DVR1 i Pod TV CTRL SIRIUS ZONE2/3 TUNER RECEIVER SLEEP DIMMER SR+ GENRE 14 ANALOG ATT CLASS CLEAR +10 ANALOG ATT – Attenuates (lowers) the level of an analog input signal to prevent distortion (page 74).
VSX_94TXH.book Page 27 Friday, April 27, 2007 8:21 PM Controls and displays 7 TV CONTROL buttons These buttons are dedicated to control the TV assigned to the TV CTRL button. Thus if you only have one TV to hook up to this system assign it to the TV CTRL input source button. If you have two TVs, assign the main TV to the TV CTRL button (see page 77 for more on this). TV – Use to turn on/off the power of the TV. TV VOL +/– – Use to adjust the volume on your TV.
VSX_94TXH.book Page 28 Friday, April 27, 2007 8:21 PM 05 Listening to your system Chapter 5: Listening to your system Important • The listening modes and many features described in this section may not be available depending on the current source, settings and status of the receiver. See Listening modes with different input signal formats on page 93 for more on this. Listening in surround sound Using this receiver, you can listen to any source in surround sound.
VSX_94TXH.book Page 29 Friday, April 27, 2007 8:21 PM Listening to your system • Neural THX – Up to 7.1 channel sound, especially suited to music sources1 • XM HD Surround – Up to 7.
VSX_94TXH.book Page 30 Friday, April 27, 2007 8:21 PM 05 Listening to your system • SPORTS – Suitable for sports programs • CLASSICAL – Gives a large concert hall-type sound Using Front Stage Surround Advance • ROCK/POP – Creates a live concert sound for rock and/or pop music The Front Stage Surround Advance function allows you to create natural surround sound effects using just the front speakers and the subwoofer. • UNPLUGGED – Suitable for acoustic music sources PHOTO T.
VSX_94TXH.book Page 31 Friday, April 27, 2007 8:21 PM Listening to your system • AUTO SURROUND – See Auto playback on page 28. • DIRECT – Sources are heard according to the settings made in the Surround Setup (speaker setting, channel level, speaker distance, acoustic calibration EQ, and X-curve), as well as with dual mono, the input attenuator, and any sound delay and hi-bit/hi-sampling settings. You will hear sources according to the number of channels in the signal.
VSX_94TXH.book Page 32 Friday, April 27, 2007 8:21 PM 05 Listening to your system Using surround back channel processing • Default setting: SBch ON You can have the receiver automatically use 6.1 or 7.1 decoding for 6.1 encoded sources (for example, Dolby Digital EX or DTS-ES), or you can choose to always use 6.1 or 7.1 decoding (for example, with 5.1 encoded material). With 5.1 encoded sources, a surround back channel will be generated, but the material may sound better in the 5.
VSX_94TXH.book Page 33 Friday, April 27, 2007 8:21 PM Listening to your system SBch Processing / Virtual SB mode Type of source DTS-HD Master Audio/DTS-HD/ DTS-EXPRESS/WMA9 Pro (88.2 kHz/96 kHz) encoded 5.1 ch sources Dolby Digital Plus/Dolby TrueHD/WMA9 Pro (44.
VSX_94TXH.book Page 34 Friday, April 27, 2007 8:21 PM Using the tuner 06 Chapter 6: Using the tuner Using Neural THX Listening to the radio The following steps show you how to tune in to FM and AM radio broadcasts using the automatic (search) and manual (step) tuning functions. If you already know the frequency of the station you want, see Tuning directly to a station below.
VSX_94TXH.book Page 35 Friday, April 27, 2007 8:21 PM Using the tuner 06 Tip Saving station presets If you often listen to a particular radio station, it’s convenient to have the receiver store the frequency for easy recall whenever you want to listen to that station. This saves the effort of manually tuning in each time. This receiver can memorize up to 30 stations, stored in three banks, or classes (A, B and C) of 10 stations each.
VSX_94TXH.book Page 36 Friday, April 27, 2007 8:21 PM The System Setup menu 07 Chapter 7: The System Setup menu Making receiver settings from the System Setup menu The following section shows you how to make detailed settings to specify how you’re using the receiver (for example, if you want to set up two speaker systems in separate rooms), and also explains how to fine-tune individual speaker system settings to your liking. SYSTEM OFF RECEIVER INPUT SELECT D.
VSX_94TXH.book Page 37 Friday, April 27, 2007 8:21 PM The System Setup menu 07 Important • Make sure the microphone/speakers are not moved during the Auto MCACC Setup. • Using the Auto MCACC Setup will overwrite any existing settings for the MCACC preset you select.1 • The screen saver will automatically appear after three minutes of inactivity. Caution • The test tones used in the Auto MCACC Setup are output at high volume. 1 Select ‘Auto MCACC’ from the System Setup menu then press ENTER.
VSX_94TXH.book Page 38 Friday, April 27, 2007 8:21 PM The System Setup menu 07 3 Connect the microphone to the MCACC SETUP MIC jack on the front panel. Make sure there are no obstacles between the speakers and the microphone. AUDIO SPEAKERS PHONES PARAMETER (TUNE) VIDEO TUNER EDIT BAND USB MCACC SETUP MIC MULTI – ZONE & SOURCE/REC SEL CONTROL ON/OFF SIGNAL SELECT SB ch STEREO/ PROCESSING F.S.
VSX_94TXH.
VSX_94TXH.book Page 40 Friday, April 27, 2007 8:21 PM 07 The System Setup menu • For some of the settings below, you’ll have to connect the setup microphone to the front panel and place it about ear level at your normal listening position. Press SETUP to display the System Setup menu before you connect the microphone to this receiver. If the microphone is connected while the System Setup menu is not being displayed, the display will change to the Auto MCACC setup menu.
VSX_94TXH.book Page 41 Friday, April 27, 2007 8:21 PM The System Setup menu 07 Fine Speaker Distance • If you want to go back and adjust a channel, simply use / to select it. • Default setting: 10’00’’ (all speakers) For proper sound depth and separation with your system, it is necessary to add a slight bit of delay to some speakers so that all sounds will arrive at the listening position at the same time.
VSX_94TXH.book Page 42 Friday, April 27, 2007 8:21 PM 07 The System Setup menu Acoustic Calibration EQ Adjust Acoustic Calibration Equalization is a kind of room equalizer for your speakers (excluding the subwoofer). It works by measuring the acoustic characteristics of your room and neutralizing the ambient characteristics that can color the original source material (providing a ‘flat’ equalization setting).
VSX_94TXH.book Page 43 Friday, April 27, 2007 8:21 PM The System Setup menu 07 • Reverb characteristics for different channels – Reverb characteristics can be somewhat different for each channel. Since this difference increases as the sound is influenced by the various room characteristics, it is often better to capture a frequency analysis early on for smoother mixing of channel frequencies/sounds. By analyzing the graph, you should be able to see how your room is responding to certain frequencies.
VSX_94TXH.book Page 44 Friday, April 27, 2007 8:21 PM 07 The System Setup menu 3 If you selected ‘Reverb Measurement’, select EQ ON or OFF and then START. DV D/LD - 55.0dB 3e 1. Rever b Measur ement MCACC : M1. ME MORY 1 DV D/LD 0 . 0dB 3e1. Reverb Measurement Now Analyzing … ( 2/ 5 ) Rever b Measur e with E Q OFF E nvironment Check Ambient Noise Microphone S peaker Level [ S tar t ] :Cancel [ OK] [ ] [ ] DVD/ L D - 5 5 . 0dB 3e3 . Adv.
VSX_94TXH.book Page 45 Friday, April 27, 2007 8:21 PM The System Setup menu 07 1 Select ‘FULL BAND PHASE CTRL’ from the System Setup menu. See Making receiver settings from the System Setup menu above if you’re not already at this screen. DVD /L D - 55.0dB Syst em S etup ME NU 1. Au t o MCACC 2. Su rr Back S ystem 3. M anu al MCACC 4. F U L L BAND P HAS E CTRL 5. D at a Manag ement 6. M anu a l S P S etup 7. In p u t S etup 8. Ot h er S etup :E xit 2 DV D/LD - 55.0dB 4. FULL BAND PAS E CTRL a.
VSX_94TXH.book Page 46 Friday, April 27, 2007 8:21 PM The System Setup menu 07 1 Select ‘MCACC Data Check’ from the Data Management setup menu. DV D/LD 5. Data Manag ement a. b. c. d. e. DV D/LD - 55 . 0dB 5a. MCACC Data Check - 55.0dB 1. 2. 3. 4. 5. 6.
VSX_94TXH.book Page 47 Friday, April 27, 2007 8:21 PM The System Setup menu 07 Speaker Setting Manual speaker setup This receiver allows you to make detailed settings to optimize the surround sound performance. You only need to make these settings once (unless you change the placement of your current speaker system or add new speakers).
VSX_94TXH.book Page 48 Friday, April 27, 2007 8:21 PM 07 The System Setup menu • Subwoofer – LFE signals and bass frequencies of channels set to SMALL are output from the subwoofer when YES is selected. Choose the PLUS setting if you want the subwoofer to output bass sound continuously or you want deeper bass (the bass frequencies that would normally come out the front and center speakers are also routed to the subwoofer).
VSX_94TXH.book Page 49 Friday, April 27, 2007 8:21 PM The System Setup menu 07 Important • When Speaker Distance is selected while MCACC is set to OFF, the selection screen for the MCACC memory appears. Select a memory to adjust manually. DV D/LD - 55.0dB 6c. S peaker Distance S elect MCACC memor y. 2 Choose the X-Curve setting you want. Use / to adjust the setting. The X-Curve is expressed as a downwards slope in decibels per octave, starting at 2 kHz.
VSX_94TXH.book Page 50 Friday, April 27, 2007 8:21 PM 08 Other connections Chapter 8: Other connections Caution • Make sure the power is switched off before making or changing the connections. Connecting an iPod This receiver has a dedicated iPod terminal that will allow you to control playback of audio content from your iPod using the controls of this receiver.1 ANTENNA • If after pressing iPod the display shows No Connection, try switching off the receiver and reconnecting the iPod to the receiver.
VSX_94TXH.book Page 51 Friday, April 27, 2007 8:21 PM Other connections 2 Use the / buttons to browse the selected category (e.g., albums). • Use / to move to previous/next levels. 3 Continue browsing until you arrive at what you want to play, then press to start playback.
VSX_94TXH.
VSX_94TXH.book Page 53 Friday, April 27, 2007 8:21 PM Other connections 4 Press ENTER. After pressing ENTER, the preset class and number stop blinking and the receiver stores the XM channel. Tip • You can also press MEMORY during reception display to save the information of up to five songs. See Using the XM Menu below to recall this information. Listening to channel presets You will need to have some presets stored to do this. 1 Press CLASS to select the class in which the channel is stored.
VSX_94TXH.book Page 54 Friday, April 27, 2007 8:21 PM 08 Other connections 2 Press SIRIUS (SHIFT+TUNER) to switch to the SIRIUS input. For best reception, you may need to move the SIRIUS Connect tuner antenna near a window (refer to the manual for the SiriusConnect Home tuner for antenna placement recommendations). • If after pressing SIRIUS the display shows Antenna Error, try disconnecting the antenna and reconnecting.
VSX_94TXH.book Page 55 Friday, April 27, 2007 8:21 PM Other connections Using the SIRIUS Menu The SIRIUS Menu provides additional SIRIUS Radio features.1 1 Press TOP MENU. 2 Use / to select a menu item then press ENTER. Choose between the following menu items: • Channel Skip/Add – Use / and ENTER to select channels you would like to remove/restore from/to the channel guide. • Parental Lock – Use / and ENTER to select channels you would like to place under parental lock.
VSX_94TXH.book Page 56 Friday, April 27, 2007 8:21 PM 08 Other connections • The arrow on the cable connector body should be facing right for correct alignment with the connector on the player. 3 Use the INPUT SELECT button to select the HDMI input you’ve connected to (for example, HDMI 2). You can also perform the same operation by using the INPUT SELECTOR dial on the front panel or by pressing HDMI (SHIFT+TV CTRL) on the remote control repeatedly.
VSX_94TXH.book Page 57 Friday, April 27, 2007 8:21 PM Other connections 08 • SPA – Sound is output from speaker system A and the same signal is output from the pre-out terminals. Speaker B setup Caution • Before making or changing the connections, switch off the power and disconnect the power cord from the power outlet. Plugging in components should be the last connection you make with your system. • Be careful not to allow any contact between speaker wires from different terminals.
VSX_94TXH.book Page 58 Friday, April 27, 2007 8:21 PM 08 Other connections 2 Select the ‘Front Bi-Amp’ setting from the ‘Surr Back System’ menu. See Surround back speaker setting on page 39 to specify how you’re using the surround back speaker terminals. Caution • Most speakers with both High and Low terminals have two metal plates that connect the High to the Low terminals. These must be removed when you are bi-amping the speakers or you could severely damage the amplifier.
VSX_94TXH.book Page 59 Friday, April 27, 2007 8:21 PM Other connections 08 MULTI-ZONE listening options MULTI-ZONE listening This receiver can power up to three independent systems in separate rooms after you have made the proper MULTIZONE connections. An example MULTI-ZONE setup is shown below, but the number of MULTI-ZONE connections (and the way you choose to connect them) depends on how you want to set up your system.
VSX_94TXH.book Page 60 Friday, April 27, 2007 8:21 PM 08 Other connections Using the MULTI-ZONE controls • Connect a TV monitor to the MULTI-ZONE & SOURCE MONITOR OUT jacks on the rear of this receiver. You should have a pair of speakers attached to the surround back speaker terminals as shown below. The following steps use the front panel controls to adjust the sub zone volume and select sources.2 See MULTIZONE remote controls below.
VSX_94TXH.book Page 61 Friday, April 27, 2007 8:21 PM Other connections • You can’t use the iPod, HOME MEDIA GALLERY (VSX-94TXH only), XM and SIRIUS Radio functions simultaneously using the MULTI-ZONE feature. 4 Use the MASTER VOLUME dial to adjust the volume. This is only possible if you selected the VARIABLE volume control in ZONE Audio Setup on page 69.1 08 1 Connect the IR receiver sensor to the MULTI-ZONE & SOURCE IR IN (MAIN ZONE) jack on the rear of this receiver.
VSX_94TXH.book Page 62 Friday, April 27, 2007 8:21 PM 08 Other connections 12V TRIGGER Important • You can’t use the SR+ features when HDMI Control is set to ON. Make sure to set HDMI Control to OFF when you use the SR+ features (page 66). CENTER SUB W.
VSX_94TXH.book Page 63 Friday, April 27, 2007 8:21 PM Other connections 08 Using the SR+ mode with a Pioneer plasma display Connecting a PC for Advanced MCACC output When connected using an SR+ cable, a number of features become available to make using this receiver with your Pioneer plasma display even easier.
VSX_94TXH.book Page 64 Friday, April 27, 2007 8:21 PM 08 Other connections Use a commercially-available cable to connect the RS232C jack on your computer to the 9-pin RS-232C jack on this receiver. See the documentation provided with the Advanced MCACC application for more information. RS-232C Personal computer Advanced MCACC output using your PC Before continuing, make sure you have completed step 1 in Data Management on page 45. Note that transmission data is erased when the receiver is turned off.
VSX_94TXH.book Page 65 Friday, April 27, 2007 8:21 PM HDMI Control 09 Chapter 9 HDMI Control By connecting this receiver to an HDMI Controlcompatible Pioneer plasma display or the HDD/DVD recorder with an HDMI cable, you can control this receiver from the remote control of a connected plasma display, as well as have the connected plasma display automatically change inputs in response to operations carried out on this unit.
VSX_94TXH.book Page 66 Friday, April 27, 2007 8:21 PM HDMI Control 09 Setting the HDMI options You must adjust the settings of this receiver as well as HDMI Control-compatible connected components in order to make use of the HDMI Control function. For more information see the operating instructions for each component. 3 Choose the HDMI input to which the TV is connected to this receiver, and see if video output from connected components displays properly on the screen on not.
VSX_94TXH.book Page 67 Friday, April 27, 2007 8:21 PM Other Settings 10 Chapter 10: Other Settings The Input Setup menu You only need to make settings in the Input Setup menu if you didn’t hook up your digital equipment according to the default settings (see Input function default and possible settings below). In this case, you need to tell the receiver what equipment is hooked up to which terminal so the buttons on the remote control correspond to the components you’ve connected.
VSX_94TXH.book Page 68 Friday, April 27, 2007 8:21 PM 10 Other Settings 7 When you're finished, press RETURN. You will return to the System Setup menu. The Other Setup menu Input function default and possible settings The terminals on the rear of the receiver generally correspond to the name of one of the input source functions.
VSX_94TXH.book Page 69 Friday, April 27, 2007 8:21 PM Other Settings 10 Multi Channel Input Setup You can adjust the level of the subwoofer for a multichannel input. Also, when the multi-channel input is selected as an input source, you can display the video images of other input sources. In the Multi Channel Input Setup, you can assign a video input to the multi-channel input. 1 Select ‘Multi Ch In Setup’ from the Other Setup menu. DV D/LD 8. Other S etup a. b. c. d. e. - 55.
VSX_94TXH.book Page 70 Friday, April 27, 2007 8:21 PM Other Settings 10 2 Select the ‘PDP Volume Control’ setting you want. • OFF – The receiver does not control the volume of the plasma display. • ON – When the receiver is switched to one of the inputs that use the plasma display (DVD/LD, for example), the volume on the plasma display is muted so only sound from the receiver is heard. 3 Assign any input source connected to the plasma display to the corresponding input number.
VSX_94TXH.book Page 71 Friday, April 27, 2007 8:21 PM Using other functions 11 Chapter 11: Using other functions Setting Setting the Audio options There are a number of additional sound settings you can make using the Audio Parameter menu. The defaults, if not stated, are listed in bold. Important • Note that if a setting doesn’t appear in the Audio Parameter menu, it is unavailable due to the current source, settings and status of the receiver. 1 Press A PARAMETER (AUDIO PARAMETER).
VSX_94TXH.book Page 72 Friday, April 27, 2007 8:21 PM 11 Using other functions Setting What it does LFE ATT (LFE Attenuate) Some Dolby Digital and DTS audio sources include ultra-low bass tones. Set the LFE attenuator as necessary to prevent the ultra-low bass tones from distorting the sound from the speakers. The LFE is not limited when set to 0 dB, which is the recommended value. When set to –5 dB, –10 dB, –15 dB or –20 dB, the LFE is limited by the respective degree.
VSX_94TXH.book Page 73 Friday, April 27, 2007 8:21 PM Using other functions Setting What it does RESa (Resolution) Specifies the output resolution of the video signal (when analog video input signals are output at the HDMI OUT connector, select this according to the resolution of your monitor and the images you wish to watch). When AUTO is selected, the resolution is automatically selected depending on the capability of the display connected to this receiver.
VSX_94TXH.book Page 74 Friday, April 27, 2007 8:21 PM Using other functions 11 1 During recording, press the REC SELECT CONTROL button on the front panel until RECOUT shows in the display.1 2 While RECOUT shows in the display, use the INPUT SELECTOR dial to select the source you want to record. The default, RECOUT SOURCE, records the source you’re currently listening to (as in Press RETURN to confirm and exit the menu. above).
VSX_94TXH.book Page 75 Friday, April 27, 2007 8:21 PM Using other functions 11 Checking your system settings Resetting the system Use the status display screen to check your current settings for features such as surround back channel processing and your current MCACC preset. Use this procedure to reset all the receiver’s settings to the factory default. Use the front panel controls to do this. AUDIO SUBTITLE HDD DISP CH PHOTO T.
VSX_94TXH.
VSX_94TXH.book Page 77 Friday, April 27, 2007 8:21 PM Controlling the rest of your system 12 Chapter 12: Controlling the rest of your system Setting the remote to control other components Most components can be assigned to one of the input source buttons (such as DVD/LD or CD) using the component’s manufacturer preset code stored in the remote.
VSX_94TXH.book Page 78 Friday, April 27, 2007 8:21 PM 12 Controlling the rest of your system 4 Point the two remote controls towards each other then press the button that will be doing the learning on this receiver’s remote control. PRES KEY starts flashing to indicate the remote is ready to accept a signal. RECEIVER CH DVD MUTE STEREO/ F.S.SURR S.DIRECT MCACC PHASE INFO HDD REC STOP MEMORY DISC STANDARD ADV. SURR THX REC ANT MPX SHIFT AUDIO SUBTITLE DISP CH PHOTO T.
VSX_94TXH.book Page 79 Friday, April 27, 2007 8:21 PM Controlling the rest of your system 12 3 Press the button of the component for which you want to check the preset code, then press ENTER. The brand name and preset code appears in the display for three seconds. 2 Use / to select DIRECT F then press ENTER. The LCD on the remote prompts you for the button of the input source you want to control. Renaming input source names 4 Use / to switch direct function ON or OFF then press ENTER.
VSX_94TXH.book Page 80 Friday, April 27, 2007 8:21 PM 12 Controlling the rest of your system 5 Use / to select a command in the sequence then press ENTER. If this is the first command in the sequence, select 1ST CODE. Otherwise, simply choose the next command in the sequence. PRES KEY flashes after you press ENTER. Using multi operations You can start multi operations with the receiver switched on, or in standby. PHOTO T.
VSX_94TXH.book Page 81 Friday, April 27, 2007 8:21 PM Controlling the rest of your system 12 Controls for TVs Controls for other components This remote control can control components after entering the proper codes or teaching the receiver the commands (see Setting the remote to control other components on page 77 for more on this). Use the input source buttons to select the component.
VSX_94TXH.book Page 82 Friday, April 27, 2007 8:21 PM Controlling the rest of your system 1 DVD (SHIFT+ CH+) Switches to the hard disk controls DVR player when using a DVD/HDD recorder. IN 1 (TV/SAT) IN IN S.DIRECT MCACC ER CH LEVEL MENU T.EDIT RETURN ST BAND VOL MUTE MEMORY DVD ENTER TUNE CH TV CH SURR STEREO TUNE DTV INFO ST ADV. TV CONTROL REC STOP HDD CH INPUT SELECT SBch REC STANDARD SEL DTV MENU SETUP TV VOL D.
VSX_94TXH.book Page 83 Friday, April 27, 2007 8:21 PM Additional information 13 Chapter 13: Additional information Troubleshooting Incorrect operations are often mistaken for trouble and malfunctions. If you think that there is something wrong with this component, check the points below. Sometimes the trouble may lie in another component. Investigate the other components and electrical appliances being used.
VSX_94TXH.book Page 84 Friday, April 27, 2007 8:21 PM 13 Additional information Symptom Remedy No sound from surround back speakers. • Check that the surround back speakers are set to LARGE or SMALL (see Speaker Setting on page 47). • Make sure surround back processing is set to SBch ON (see Using surround back channel processing on page 32. • If the source is Dolby Surround EX or DTS ES with no flag to indicate 6.
VSX_94TXH.book Page 85 Friday, April 27, 2007 8:21 PM Additional information Symptom Remedy Can’t record audio. • You can only make a digital recording from a digital source, and an analog recording from an analog source. • For digital sources, make sure that what you’re recording isn’t copy protected. • Check that the OUT jacks are properly connected to the recorders input jacks (see Connecting analog audio sources on page 18).
VSX_94TXH.book Page 86 Friday, April 27, 2007 8:21 PM 13 Additional information Settings Symptom Remedy The Auto MCACC Setup continually shows an error. • The ambient noise level may be too high. Keep the noise level in the room as low as possible (see also Problems when using the Auto MCACC Setup on page 9). If the noise level cannot be kept low enough, you will have to set up the surround sound manually (page 47).
VSX_94TXH.book Page 87 Friday, April 27, 2007 8:21 PM Additional information Symptom 13 Remedy During playback of a DTS 96/24 • Make sure that the receiver is set to AUTO or DIGITAL (see Choosing the input signal on page 31). source, the display doesn’t show 96 kHz. When playing Dolby Digital or DTS sources, the receiver’s format indicators do not light. • Check that the player is connected using a digital connection.
VSX_94TXH.book Page 88 Friday, April 27, 2007 8:21 PM 13 Additional information HDMI Symptom Remedy The HDMI indicator blinks continuously. • Check all the points below. No picture or sound. • This receiver is HDCP-compatible. Check that the components you are connecting are also HDCPcompatible. If they are not, please connect them using the component, S-video or composite video jacks.
VSX_94TXH.book Page 89 Friday, April 27, 2007 8:21 PM Additional information 13 XM radio messages Symptom Cause Action Check Antenna The XM antenna is not connected. Check that the XM antenna cable is attached securely. Check Tuner The XM Mini-Tuner is not properly connected. Check whether the XM Mini-Tuner is firmly connected to the receiver. XM Power Error A short-circuit occurring in the antenna or surrounding antenna cable.
VSX_94TXH.book Page 90 Friday, April 27, 2007 8:21 PM 13 Additional information Dolby Digital Plus Surround sound formats Below is a brief description of the main surround sound formats you’ll find on DVDs, satellite, cable and terrestrial broadcasts, and video cassettes. Dolby The Dolby technologies are explained below. See www.dolby.com for more detailed information.
VSX_94TXH.book Page 91 Friday, April 27, 2007 8:21 PM Additional information DTS The DTS technologies are explained below. See www.dtstech.com for more detailed information. 13 transfer rates enable lossless transmission of 96 kHz/24-bit 7.1-channel audio sources without deteriorating the quality of the original sound. DTS-HD Master Audio is an irreplaceable technology that can reproduce sound faithfully as intended by the creator of music or movies. “DTS” is a registered trademark of DTS, Inc.
VSX_94TXH.book Page 92 Friday, April 27, 2007 8:21 PM Additional information 13 • Re-Equalization The tonal balance of a film soundtrack will be excessively bright and harsh when played back over audio equipment in the home because film soundtracks were designed to be played back in large movie theaters using very different professional equipment. Re-Equalization restores the correct tonal balance for watching a movie soundtrack in a small home environment.
VSX_94TXH.book Page 93 Friday, April 27, 2007 8:21 PM Additional information 13 Listening modes with different input signal formats The following charts outline the listening modes available with different input signal formats, depending on the surround back channel processing and decoding method you have selected. Stereo (2 channel) signal formats SBch Processing Input signal format Standard THX Auto Surround SBch Processing ON/AUTO (Automatically selects 6.1/7.
VSX_94TXH.book Page 94 Friday, April 27, 2007 8:21 PM 13 Additional information SBch Processing Input signal format Standard THX Auto Surround SBch Processing OFFd (Maximum 5.
VSX_94TXH.book Page 95 Friday, April 27, 2007 8:21 PM Additional information 13 SBch Processing Input signal format Standard THX Auto Surround SBch Processing ON (7.1 channel decoding used for all sources) DTS-ESb (6.1 channel sources/ 6.1 channel flagged) DTS-ES (Matrix/Discrete) DTS+2 Pro Logic llx MOVIEa DTS+2 Pro Logic llx MUSIC DTS-ES+THX (Matrix/Discrete) DTS+2 Pro Logic llx MOVIE+THXa THX Select2 CINEMAa THX MUSICMODEa THX GAMES MODEa DTS-ES (Matrix/Discrete) DTS and DTS 96/24 (5.
VSX_94TXH.book Page 96 Friday, April 27, 2007 8:21 PM 13 Additional information Stream direct with different input signal formats The following charts show what you will hear with different input signal formats, depending on the Stream Direct mode (see Using Stream Direct on page 30) you have selected. Stereo (2 channel) signal formats Surround Back speaker(s) Connected (Maximum 7.1 channel playback) Not connected (Maximum 5.
VSX_94TXH.book Page 97 Friday, April 27, 2007 8:21 PM Additional information 13 FM Tuner Section Specifications Amplifier section Continuous average power output of 140 (or 130) watts* per channel, min., at 8 ohms, from 20 Hz to 20 000 Hz with no more than 0.09 %** total harmonic distortion (front). Continuous Power Output (20 Hz to 20 kHz, 8 Ω, 0.09 %) Front . . . . .130 W + 130 W (92TXH), 140 W + 140 W (94TXH) Center . . . . . . . . . . . . . . . . . . 130 W (92TXH), 140 W (94TXH) Surround . . . . .
VSX_94TXH.book Page 98 Friday, April 27, 2007 8:21 PM Additional information 13 Our philosophy Pioneer is dedicated to making your home theater listening experience as close as possible to the vision of the moviemakers and mastering engineer when they created the original soundtrack.
VSX_94TXH.book Page 99 Friday, April 27, 2007 8:21 PM Additional information 13 We Want You Listening For A Lifetime Selecting fine audio equipment such as the unit you’ve just purchased is only the start of your musical enjoyment. Now it’s time to consider how you can maximize the fun and excitement your equipment offers. This manufacturer and the Electronic Industries Association’s Consumer Electronics Group want you to get the most out of your equipment by playing it at a safe level.
VSX_94TXH.book Page 100 Friday, April 27, 2007 8:21 PM Should this product require service in the U.S.A. and you wish to locate the nearest Pioneer Authorized Independent Service Company, or if you wish to purchase replacement parts, operating instructions, service manuals, or accessories, please call the number shown below.