
Installation Sheet
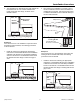


Table Of Contents
- Swan-Shower-Pan-Installation-Guide-20031410M_updated 1
- Swan-Shower-Pan-Installation-Guide-20031410M_updated 3
- Swan-Shower-Pan-Installation-Guide-20031410M_updated 4
- Swan-Shower-Pan-Installation-Guide-20031410M_updated 5
- Swan-Shower-Pan-Installation-Guide-20031410M_updated 6
- Swan-Shower-Pan-Installation-Guide-20031410M_updated 7
- Swan-Shower-Pan-Installation-Guide-20031410M_updated 8
- Swan-Shower-Pan-Installation-Guide-20031410M_updated 9
- Swan-Shower-Pan-Installation-Guide-20031410M_updated 10
- Swan-Shower-Pan-Installation-Guide-20031410M_updated 11
- Swan-Shower-Pan-Installation-Guide-20031410M_updated 12
- Swan-Shower-Pan-Installation-Guide-20031410M_updated 13
- Swan-Shower-Pan-Installation-Guide-20031410M_updated 14
- Swan-Shower-Pan-Installation-Guide-20031410M_updated 15
- Swan-Shower-Pan-Installation-Guide-20031410M_updated 16
- Swan-Shower-Pan-Installation-Guide-20031410M_updated 17
- Swan-Shower-Pan-Installation-Guide-20031410M_updated 18
- Swan-Shower-Pan-Installation-Guide-20031410M_updated 19
- Swan-Shower-Pan-Installation-Guide-20031410M_updated 20

Note: Step 5 must be used for uneven floors that do
not provide complete support under the base.
5a. Place up to a 1/2” thick slurry of fast-drying cement
or mortar on the floor. This will ensure complete
contact and support by the existing subfloor,
eliminating shower floor flex during normal use.
Taper the mortar/thinset to 1/4” thick around the
floor drain. Mix enough material to cover the area
under the shower floor. Do not place the material
closer than 2” to the edge of the shower floor or the
drain opening.
5b. With the stainless steel clips installed on the
threshold, place the barrier-free shower floor into
the framework and firmly press it into the
mortar/thinset. The outer perimeter of the shower
floor should contact the subfloor.
5c. Level the barrier-free shower floor in both directions,
and allow the mortar/thinset to cure for 24 hours.
Once cured, the mortar/thinset will prevent the
shower floor from moving without the use of any
mechanical fasteners.
Note: Clean up any excess mortar/thinset and allow the
mortar/thinset under the barrier-free shower floor ramp
to cure for 24 hours.
5d. Place the barrier-free shower floor ramp into a slurry
of fast-drying cement or mortar and all eight of the
stainless steel clips to prevent the shower ramp
from moving. The front (thin) edge of the shower
floor ramp must completely contact the floor
surface.
6. Apply a bead of 100% silicone sealant to seal the
joint between the shower floor and shower floor
ramp.
Note: If the shower walls extend past the shower floor,
apply a bead of silicone sealant at the joint where the
walls and shower floor ramp meet.
Installation Procedure
DreamLine – DreamStone
16
(866) 731-2244