INSTALLATION INSTRUCTIONS FREESTANDING BATHTUB Install Questions? Call 888-704-3690 -orEmail tubsupport@dreamline.com MODEL • BTCB6041HFXXC00, BTCB6635HFXXC00 (Caribbean) • BTSC6032WFXXF00 (Seneca) • BTLV6032WFXXF00 (Levantine) • BTMO6032WFXXC00, BTMO6636WFXXC00 (Montego) • BTCA6032WFXXC00, BTCA6636WFXXC00 (Caspian) A two person installation is recommended Read all instructions carefully before proceeding. SAVE THIS GUIDE FOR FUTURE REFERENCE.
TABLE OF CONTENTS PAGE Before you begin . . . . . . . . . . . . . . . . . . . . . . . . . . . . . . . . . . . . . . . . . . . . . 4 Tools and supplies. . . . . . . . . . . . . . . . . . . . . . . . . . . . . . . . . . . . . . . . . . . . 5 1. Unpacking the unit. . . . . . . . . . . . . . . . . . . . . . . . . . . . . . . . . . . . . . . . . . 6 2. Leveling legs adjustment. . . .
BEFORE YOU BEGIN • Carefully read the all the instructions in the manual before beginning the installation. • Consult local building codes to make sure the installation complies with standards. • Remove the unit from its packaging. Before disposing of it, inspect the unit to make sure it is in good shape. Should inspection reveal any damage or defect in the finish, contact your distributor. The warranty does not cover damages or defects in the finish once the unit has been installed.
TOOLS ⅛" -drill bit Level 30" 2 x 4 studs Pencil Safety equipment Electric drill Screwdriver Utility knife Measuring tape Hole saw SUPPLIES 50 Clear silicone sealant Freestanding Tub Installation Manual Box of #8x1¾" flathead screws Wooden shims DreamLineShowers.
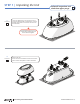
STEP 1 | Unpacking the Unit 1.1 Check me! Follow all instructions and check them off as you go. Cut the cardboard box so as to keep one side to protect the bathtub while is upside down. Turn the bathtub upside down. Unscrew the skirt from the wooden blocks. Not all bathtubs have screws and wooden blocks holding the skirt and the bathtub together. 1.2 Check me! Remove the skirt. Insert a flat-head screwdriver between the wooden blocks and the wood plank to remove the blocks.
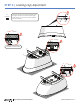
STEP 2 | Leveling Legs Adjustment 2.1 Check me! ⅛" Place back the skirt in the inverted bathtub. Adjust the legs so that they exceed the top of the edge of the skirt by 1/8". You can use a 2x4 to take the measure as shown. Skirt 2x4 Legs Cut view ⅛" 2x4 Skirt Cut view ⅛" Legs Bolt leg installation only applicable to certain models. Legs Skirt 2x4 Leg 2x4 Cut view ⅛" Legs Skirt Freestanding Tub Installation Manual DreamLineShowers.
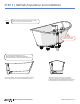
STEP 3 | Bathtub Skirt and Drain Positioning 3.1 Check me! With the help of the bathtub apron, mark the center of the drainage line in relation with the desired position of the bathtub. See also the rough-in information for your model on our website. Drain position Floor Make sure the floor is level. Before drilling a hole in the floor for the drainpipe, make sure there are no hidden elements underneath (pipes, floor joists, heating ducts, electrical wires). Desired bathtub position 3.
STEP 4 | Installing Faucets (NOT INCLUDED) 4.1 Check me! Faucet elements must be installed in the intended area. See also the rough-in information for your model on our website. Before drilling, position the faucet base to make sure they line up with the predrilled holes. Mark the location of the faucets on the unit and drill 3/16" (5 mm) pilot holes. Make sure the holes line up with the plumbing.
STEP 5 | Bathtub Preparation and Installation 5.1 Check me! Install the waste and overflow and faucets according to the manufacturer's instruction manuals. Install the valves and faucets at this stage.
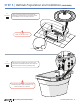
STEP 5 | Bathtub Preparation and Installation (CONTINUED) Top view 5.2 Check me! Apply a silicone seal under the apron (optional). According to bathroom flooring, use proper screws (not included) to secure the skirt to the floor. Make sure the skirt is level. Silicone 5.3 Check me! Skirt Add two spacers (example 2x4) on the skirt ends and position the bathtub inside the skirt. Attach the hot and cold water riser to the plumbing hoses.
STEP 5 | Bathtub Preparation and Installation (CONTINUED) 5.4 Check me! Remove the spacers. Make sure all the legs are in contact with the ground, so that the bathtub is not supported by the skirt (see cut view below). The bathtub must be tested before installation is complete. Fill the bathtub to the overflow and inspect for leaks. Tighten and loose connections between the hoses and motor by hand. Bathtub ⅛" Cut view Skirt The bathtub should not be supported by the skirt. 5.
TROUBLESHOOTING TOUBLESHOOTING Water accumulates around the drain and the bathtub does not completely empty. • Check that the installation is leveled and that the bathtub is well supported by the legs. With the help of level, place at the bottom of the bathtub, make sure to have a slight slope towards the drain. If necessary, adjust the legs under the bathtub. Bottom of bathtub moves during use. • Bathtub is not sitting firmly on its base; adjust leveling legs. Polyethylene film will not come off.
WARRANTY DreamLine Showers (hereafter “DreamLine”) offers the following express limited warranty on each of its products. This warranty extends only to the original owner/end-user for personal household use. For commercial uses, additional limitations apply.
DreamLineShowers.com CUSTOMER SUPPORT CALL 888-704-3690 -orEMAIL tubsupport@dreamline.