
Installation Guide


© DreamLine
All Rights Reserved
© DreamLine
All Rights Reserved
16 LUMEN shower door manual Ver 1 Rev 2 09/2018
©2018 DreamLine. All Rights Reserved
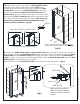
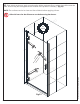
Note: It may be necessary to reposition the ST4.2 x 10 screw that was installed during step #8.
(Fig 12.1)
Fig 12
2
1
4
3
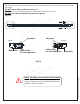
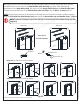
Strike side as viewed from inside the shower:
Hinge side as viewed from inside the shower:
View from
outside shower
Hinge side Strike side
3
4
2
ST4.2x10
1
Ø
1/8”
(3.2mm)
2
ST4.2x10
1
Ø
1/8”
(3.2mm)
!
inside
outside
outside
inside
Decorative cap
Washer
ST4.2x10 screw
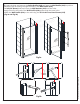
13(x7)
Left-Swing door installation shown as an example
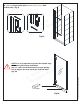
12. Adjust the door for level and plumb by adjusting the profiles on either side of the door. Use the
pre-drilled holes on the inside of the Wall Profiles (#01 and #10) as guides. After making final
adjustments to the Door Glass (#06), drill holes into the Hinge Profile (#02) and Strike Profile (#09)
through the pre-drilled holes in the Wall Profiles (#01 and #10) using an Ø1/8” (3.2mm) drill bit.
NOTE: Drill through one layer of the profile, not through the entire profile. Attach the profiles together
using the ST4.2x10 Pan Head Screws (#13) along with the Decorative Cap and Washer (#14). (Fig 12)