
Installation Guide


“SLIMLINE SHOWER BASE” Ver.5 Rev.5 06/2015
15
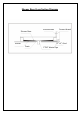
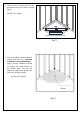
6. After the bedding material has been
poured and
before
it sets, place the
shower base into the position with the
drain assembly sliding over the PVC
waste pipe. It will be necessary to push
the shower base until the top of the tile
flange aligns with the marks drawn on
the studs and the front edge is
contacting the rough floor along the
entire length of the shower base. Ensure
that the base is level in all directions.
You may need to use shims to hold the
tray in the level until the bedding settles
and supports the tray. Remove all excess
mortar.
See Fig. 7 for details.
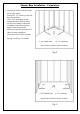
7. Allow the bedding material to completely harden before applying weight to the bottom of the
shower base.
Install the cement board (or the wallboard) above the tile flanges and secure it to the studs.
Put the tiles (or other finishing wall material) over the cement board leaving 1/8” gap between
the bottom of the tile and the splash rim of the shower base. Use caulk to fill that gap.
See Fig. 8 and Fig. 9 for details.
Fig. 7
Fig. 8
Waterproof Drywall to the
top of the tile flange
Caulk
Finished wall overlaps the
dry wall and tile flange
Stud
1
2
Drywall
e
4
3
Side View
1/8”
gap
Base