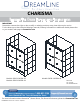
CHARISMA SHOWER/TUB DOOR INSTALLATION INSTRUCTIONS IMPORTANT DreamLine® reserves the right to alter, modify or redesign products at any time without prior notice. For the latest up-to-date technical drawings, manuals, warranty information or additional details please refer to your model’s web page on DreamLine.
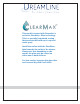
This model is treated with DreamLine’s exclusive ClearMaxTM Glass technology. This is a specially formulated coating that prevents the build up of soap and water spots. Install the surface with the ClearMaxTM label towards the inside of the shower. Please note that depending on the model, the glass may be coated on either one or both surfaces. For best results, squeegee the glass after each use and dry with a soft cloth.
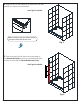
Preparation 1. PRIOR TO INSTALLATION, EXAMINE ALL BOXES AND PACKAGES FOR SHIPPING DAMAGE AND COMPARE THE PIECE COUNT WITH YOUR PACKING SLIP. AFTER OPENING ALL BOXES AND PACKAGES READ THIS INTRODUCTION CAREFULLY. CHECK THAT ALL OF THE NEEDED PARTS ARE INCLUDED IN THE PACKAGE BY CHECKING OFF THE COMPONENTS ON THE “DETAILED DIAGRAM OF SHOWER DOOR COMPONENTS”.
Tools Level Silicone Tape Pencil Measure Power Drill Drill bit 5/16” (8mm) Phillips Screwdriver Drill bit 3/16" (5mm) Drill bit 9/64" (3.5mm) Hammer Miter saw or Hacksaw Metal File Painter’s Tape Tip: Measure the finished opening before proceeding with the installation to be sure that the correct model size has been ordered. Top Middle Tip: Prior to installation, cover the shower/tub drain with tape to prevent losing screws or small parts.
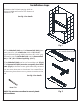
Detailed Diagram of shower door components 5 1 6 3 8 4 9 10 11 12 13 15 The glass surface with the ClearMax™ label must be installed facing the inside of the shower 16 2 # Item Parts List Qty # 9 Item Qty Decorative cover for Guide block 6PCS 10 Roller assembly 4PCS 11 Guide rail bracket 2PCS 2PCS 12 Guide Block (left / right / middle) 1set 4PCS 13 4PCS Round head screwST4.2×16 6PCS Round head screwST4.
Installation steps 1. Measure the finished opening width at the top, middle and bottom. This distance is marked as “W”. See Fig 1 for details W Fig 1 GUIDE RAIL (#01) W = FINISHED OPENING -1/16” 2. The Guide Rail (#01) and the Bottom Rail (#02) have been precut for your model size width of 48” or 60”. If your finished opening width is less than 48” or 60”, you will need to cut the Guide Rail (01) and the Bottom Rail (02) to “W” (W = finished opening -1/16”).
BOTTOM RAIL (#01) W = FINISHED OPENING -1/16” Divide the amount to be cut off by 2... W ...then cut off equal amounts from each end For Example, if the rail measures 60” out of the box and your finished opening = 57“, then you will need to cut 1-1/2” from each end. Place the Bottom Rail (#02) in the desired position and parallel to the front edge of the Shower base or the Tub deck. (60“ minus 57” = 3“, divided by 2 = 1-1/2”).
4. Apply silicone to the underside of the bottom rail, then position it in place on the threshold. See Fig 5 for details TIP: Use Painter’s tape to hold the bottom rail in place while the silicone cures. Fig 5 5. Draw a plumb line from the front outside edge of the Bottom Rail (#02) up from the threshold/tub deck surface to locate the left Guide Rail Bracket (#11).
HEIGHT OF THE GUIDE RAIL BRACKET FOR 76” SHOWER DOOR: MODEL # SHDR-1348760 & SHDR-1360760 6. Place the Guide Rail Bracket (#11) at a height of 74” from the base. 74” Align the front bottom corner of the Guide Rail Bracket (#11) with the outside of the Bottom Rail (#02) to mark the wall for drilling. Be sure to keep the Guide Rail Bracket (#11) level. See Fig 7 for details 74” Fig 7 HEIGHT OF THE GUIDE RAIL BRACKET FOR 58” TUB DOOR: MODEL # SHDR-1360580 7.
8. Mark the drill holes on the wall using the Guide rail bracket (#11). Drill the holes using a Ø5/16” drill bit. Insert the Wall anchors (#05) and secure the Guide rail bracket (#11) to the wall with the Round head screw ST4.2×40 (#08). See Fig 9 for details 1 2 3 Ø 5/16" 4 5 Fig 9 9. Place the Guide Rail (#01) onto the installed Guide Rail bracket (#11). Use a level to confirm the installation height of the second bracket before drilling on the opposite wall.
10. Install the Guide Rail (#01) over the top of the Guide Rail brackets (#11) and lock them together. Mark the drill holes in the underside of the Guide Rail (#01) through the holes in the bottom of the bracket. Remove the Guide Rail (#01) and drill the holes using an Ø1/8” drill bit. Before attaching the Guide Rail (#01) to the Guide Rail brackets (#11): Slide two Roller assemblies (#10) into each channel of the Guide Rail (#01) with the finished surface of the disks facing out. (Fig 11.6, 11.
. Secure the Door Glass (#03) onto the Roller assemblies (#10) and fasten them with the provided bolts. See Fig 13 for details TIP: BE SURE TO COVER THE DRAIN TO PREVENT LOOSING ANY SCREWS. NOTE: ROTATING THE GLASS HOLDER OUTER DISKS: THE DISK BOLT IS POSITIONED OFF-CENTER BY 1/8” TO PROVIDE FOR SOME MINOR ADJUSTMENTS TO THE DOOR GLASS TO ACHIEVE A BETTER SEAL WITH THE WALL. YOU WILL NEED AN ASSISTANT TO SUPPORT THE WEIGHT OF THE GLASS WHILE YOU LOOSEN THE BOLT, ROTATE THE DISK AND RE-TIGHTEN THE BOLT.
14. As viewed from the outside: Slide the Door Glass (#03) to the right side and secure the Left Guide block (#12) to the left end of the Bottom Rail (#02). Drill Ø1/8" holes into the Bottom Rail (#02) through holes in the Guide block (#12) and fasten the Guide Block (#12) with the Round head screw ST4.2×16 (#06). Install the Middle Guide block (#12) into the pre-drilled holes in the Bottom Rail (#02) using the Round head screws ST4.2×16 (#06).
16. Apply a good quality mildew-resistant silicone along the connection of the Guide Rail (#01) and the shower base or tub deck. Allow 24 hours for the silicone to fully cure before using the shower.
Product Maintenance BASES and BACKWALLS: To ensure long lasting life for your acrylic back walls: wipe them off after each use with a soft cloth. To clean the acrylic back walls use non-abrasive sprays or cream based cleaners. Avoid the use of aerosol spray cleaners. Never use abrasive cleansers, metal brushes or scrapers that could scratch or dull the surface. GLASS: To ensure long lasting life for your glass shower products: wipe them off after each use with a soft cloth.
TEL: 866-731-2244 FAX: 866-857-3638 DREAMLINE.COM For more information on DreamLine® Shower Doors and Enclosure please visit DreamLine.