
Manual
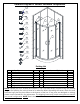

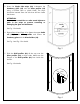
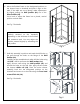
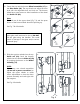
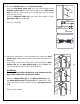

Table Of Contents

“PRIME” Enclosure Ver.1 Rev.3 12/2015
7
6. Move the finished frame to the designated position on
the shower base or threshold and push it tight to the
walls. If the walls are out-of-plumb, make adjustments
by slightly pulling the Wall profiles (01) out of the
Glass Profiles (02).
Use a level to adjust the frame into a plumb, vertical
position on both walls.
See Fig. 5 for details.
7. Hold this assembly in position and mark the drill holes on
the wall through the holes on the flange of the Wall
Profiles (01).
Carefully set the assembled unit aside; drill the holes using
a Ø 5/16” drill bit and insert the Wall anchors (15).
Apply silicone caulk along the Wall profiles (01) and
around the holes on the wall. Also apply silicone under
the bottom Guide rail (03). Place the entire shower
assembly back into the designated position on the
threshold and secure it to the walls using the Truss head
screws ST4.2×40 (10).
See Fig. 6 for details.
Fig. 6
Ø5/16”
2
1
3
4
5
6
NOTE: The installed unit may not sit
perfectly centered on the threshold,
depending on the thickness of the finished
wall treatment used. You may adjust the
position outward slightly by extending the
wall profiles.
Fig. 5
inside