
Manual


18FLEX 42x72 / 48x72 / 60x72 manual Ver 1 Rev 3 04/2018
©2018 DreamLine. All Rights Reserved
Fig 19
Fig 20
inside
Ø1/8”
(3mm)
Ø1/8”
(3mm)
ST4.2x10 &
washer
Decorative cap
1
2
3
4
5
6
Ø1/8”
(3mm)
Ø1/8”
(3mm)
1 2
3
4
5
6
ST4.2x10 &
washer
Decorative cap
insideinside
Right hand door installation shown
overhead view
door
panel
!
!
inside
inside
inside
inside
inside
washer
screw
decorative cap
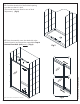
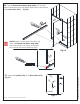
19. Once all adjustments have been made, drill pilot
holes from inside of the shower into the Top & Bottom
Pivot Rails (#15) through the predrilled holes using an
Ø1/8” drill bit.
Secure the Expanding rails using the Round Head
Screws ST4.2×10 (#04) and the raised white washers.
Cover the exposed screw heads and washers with the
Decorative Caps (#06). (Fig 19)
NOTE: Do Not drill the rails throughout,
only through the first layer.
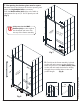
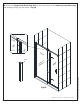
20. Make any final adjustments to the Door assembly within
the Wall Profiles (#01). Make sure that the entire assembly
sits tight down onto the threshold.
From inside the shower, drill holes near the center of the Wall
Profiles (#01) at the top and bottom of the profile using an
Ø1/8” drill bit. (Fig 20.1 and 20.2)
NOTE: Do Not drill the profiles throughout, only
through the first layer.
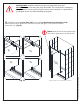
Secure the Door assembly to the Wall profiles (#01) using the
Round head screws ST4.2×10 (#04) and the raised white
washers.
Cover the exposed screw heads and washers with the
Decorative Caps (#06). Repeat this step on the strike side wall
profile as well. (Fig 22)