
Installation & Assembly


VISIONS Ver 1 Rev 7 07/2015
8
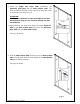
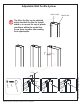
9.
Move
the finished frame to the
designated
position on
the shower base, the bathtub or
the
threshold
(depending on your installation);
push it
against the walls. If your top and bottom wall
opening measurements vary or if the walls
are out-of-plumb, make adjustments by
sliding the Wall profiles (#02) out of the Glass
Profiles (#01).
Use a level to adjust the frame so that it is
plumb.
Se
e Fig. 9 for details.
Fig. 9
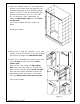
10.
Using hel
p to hold this assembly in the right
position, mark the drill holes on the wall through
the holes on the
flange of the Wall Profiles (#02).
11. Gently set the assembled unit aside; drill the holes
using a Ø 5/16” drill bit and insert the Wall
anchors (#15).
Apply silicone caulk along the Wall profiles
(#02) and around the holes on the wall. Also
apply silicone under the bottom Guide rail (#03).
Place the whole shower assembly back into the
designated position and secure it to the walls
using the Round head screws ST4.2×30 (#10).
See Fig. 10 for details.
Fig. 10
Ø5/16”
2
1
3
4
5
6