
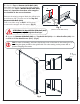
Installation & Assembly


© DreamLine
All Rights Reserved
© DreamLine
All Rights Reserved
Installation Steps
©2018 DreamLine. All Rights Reserved
7VISIONS Shower and Tub Door Manual Ver 2 08/2018
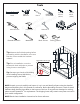
Fig 1
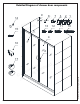
Fig 2
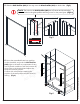
W
Bottom
Middle
Top
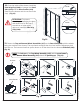
NOTE: The Top and Bottom Guide Rails (#03)
are shorter than the model size by design. They
have been pre-cut for the model width and are
made to fit between the wall profiles, (not
wall-to-wall). See Table A below:
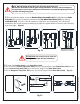
TIP: For easier installation into the opening, cut off an extra 1/8” from each end:
FINISHED OPENING (W) - 3-5/8”= FINISHED CUT LENGTH “D”
Use a metal
file to clean up
the cut ends of
the rails
!
EQ
EQ
“D”
“D”
3-3/8”
-
-
)
)
Finished Cut Size
(D)
Finished Cut Size
(D)
÷2
Amount To Cut
From Each End (EQ)
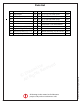
Table B
60” (for shower) 56-3/8”
60” (for tub) 56-3/8”
Model Size
Pre-cut
Guide Rail Length
Table A
Model Size
(from Table A)
=
Difference
Difference
)
)
)
)
=
=
Finished Opening
(W)
2. Subtract 3-3/8” from your finished opening (W) to
determine the finished cut length for the Top and
Bottom Guide Rails (#03). Cut the Top and Bottom
Guide Rails (#03) equally from both ends to the
finished cut length (D). (See Table B below.)
NOTE: In order to keep the pre-installed center stoppers
centered, it is necessary to cut the Top and Bottom
Guide Rails (#03) equally from both ends. (Fig 2)
1. Measure the distance between the two finished
walls at the top (at model height: 58” or 72”), middle
and bottom. The wall profiles will adjust for
out-of-plumb conditions, so use the smallest
measurement as the “finished opening” (W)
dimension to determine the finished cut length in
Step #2. (Fig 1)