
Manual


© DreamLine
All Rights Reserved
© DreamLine
All Rights Reserved
Installation steps
7PRISM PLUS with Buttress Shower enclosure manual Ver 1 10/2018
©2018 DreamLine. All Rights Reserved
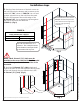
Fig 2
Fig 1
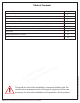
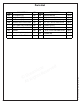
TABLE A
!
NOTE: The U-Channel (72”) (#01) must be
installed at the correct dimension for the model
size which may not be on the centerline of the
threshold.
Mark
the
holes
Measured from the finished back corner
to the outside of the u-channel
40-1/16” 40-1/16”
W1
W2*
W1
W1
W1
The nished buttress wall must be
22-3/4” otherwise the panel will
either extend over the edge or not
reach the edge preventing
installation.
*Use this W2 dimension as a
reference. The actual placement
of the buttress return panel will
be determined in Step #11.
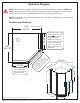
Right-hand buttress panel installation shown
1. Starting from the bottom of the back corner on
the wall opposite the buttress wall, measure to the
model size “W1” shown in TABLE A. Use a 4’ level
to draw a plumb line up the wall from that mark.
This line will represent the outside edge of the
U-Channel (#1). Use a carpenter’s square against
the wall to also mark the threshold.
(TABLE A) (Fig 1)
2. Hold the U-Channel (72”) (#01) plumb and
against the mark on the wall. Mark the drilling holes
on the wall through the pre-drilled holes in the
U-Channel (72”) (#01). (Fig 2)