
Manual


© DreamLine
All Rights Reserved
© DreamLine
All Rights Reserved
11PRISM PLUS with Buttress Shower enclosure manual Ver 1 07/2018
©2018 DreamLine. All Rights Reserved
8
7
Max 3/16”
(4mm)
Max 3/16”
(4mm)
5
6
2
3
1
Ø5/16"
(8mm)
4
Fig 6
Fig 7
(Left-hand L-Bar
™
installation shown)
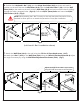
Adjust the angle of the L-Bar™ (up to 3/16”)
using the small set screws on the wall plate.
!
NOTE: When marking the L-Bar™ location on the wall, leave the Decorative Cover
attached to allow space to re-attach the Decorative Cover after installation.
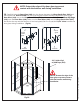
7. Attach the Wall Plate (#9.6) to the wall using the ST4.2 x 40 Truss Head screws (#9.7).
Re-attach the L-Bar™ (#9.3) to the Wall Plate (#9.6) using the M5x14 (Flat Head Screw#9.8) Adjust
the angle if necessary by using the Wall Plate Adjustment Set Screws (#9.9). (Fig 7)
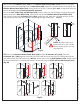
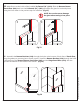
6. Position the Left-hand L-Bar™ (#9) onto the Hinge Panel Glass (#02) as shown and mark its
position on the wall. Remove the Wall Plate (#9.6) from the Left-hand L-Bar™ (#9). Hold the Wall
Plate (#9.6) to the marks on the wall. Hold the Wall Plate (#9.6) level and mark the holes for drilling
through the wider, untapped holes. (Fig 8.2) Drill two Ø5/16”(8mm) holes and insert the Ø5/16”
Wall anchors (#9.5). (Fig 6)