
Manual
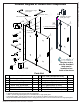
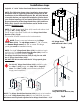

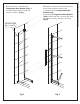
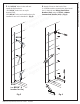
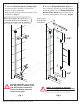

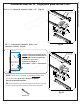
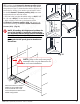
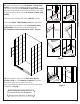
Table Of Contents

© DreamLine
All Rights Reserved
© DreamLine
All Rights Reserved
Installation steps
9
UNIDOOR-X (STYLE M) manual Ver 2 Rev 1 02/2019
©2019 DreamLine. All Rights Reserved
!
Fig A
#36
inside
outside
rubber
gasket
Fig B
6” Hinge Panel with
Hinge Panel Glass Bracket (#36)
rubber
gasket
top
!
NOTE: The following shower door installation instructions
should be used as a general guide and prerequisite to the
installation of the UNIDOOR Style M, M1, M2, M3, M4 and
L1 models. Before you begin the installation, please check
your finished opening size and model dimensions to ensure
proper placement of the Hinge Panel Glass (#32) and Door
Glass (#01). Specific size information can be found on our
website: DreamLine.com.
NOTE: The 24” Hinge Panel Glass (#32) installs with either a left
or right L-Bar™ (#35). (Fig A)
The 6“ Hinge Panel Glass installs with the Hinge Panel Glass
Bracket (#36). (Fig B)
This manual includes instructions for both methods.
Style M - 6” & 24” Inline Panel and Shower Door Installation
NOTE: For the 6” Hinge Panel Glass (#32) installation, begin
with Step #1. The Hinge Panel Glass Bracket (#36) installs at
the top of the vertical U-channel. (Fig B)
The Hinge Panel Glass Bracket (#36) is only for use with
the 6“ Hinge Panel Glass (#32).
DO NOT USE this bracket with the 24” hinge panel glass.
24” Hinge Panel
with left-hand L-Bar™ (#35)
NOTE: The Hinge Panel Glass Bracket (#36) is only to be installed
with the 6” Hinge Panel Glass (#32) for the UNIDOOR-X models.
Maximum out-of-plumb adjustment for Hinge Panel Glass = 1/4”
NOTE: There is a top and a bottom to the Hinge
Panel Glass (#32): The top hinge cutout is 7-7/8” to center,
the bottom hinge cutout is 8-3/8” to center. The hinge
panel glass must be installed correctly.
For the 24” Hinge Panel Glass (#32) installation with
the L-Bar™ (#35),
begin with Step #10 on Page 15.
Note: The L-Bar™ (#35) is not included with the 6”
hinge panel installation.