
Manual


© DreamLine
®
All Rights Reserved
© DreamLine
®
All Rights Reserved
Tools Needed
Q-WALL Installation Manual Ver 2 112019 13
© 2019 DreamLine® All Rights Reserved
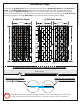
(2) Q-Wall Back Panels shown lying flat
detail of overlap
W3:______
W2:______
W1:______
Fig 2
Fig 3
The primary surface of each Q-Wall
Back Panel is covered with
protective plastic. Leave this
protective plastic on when marking
and cutting the Q-Wall Back Panels
to prevent damage to the primary
surface. Remove the protective
plastic sheet as instructed during
installation.
Q-Wall Back Panels
can be ipped if
desired to switch
direction of overlap
NOTE
NOTE
3. Measure the width of the rear wall in the
shower or tub opening, from corner to corner,
at the top, middle and bottom. Record these
measurements as W1, W2 and W3. Fig 3
2. Lay the back Q-Wall Back Panels face-up on a clean, flat surface. Overlap the two back Q-Wall Back Panels (see previous page)
evenly from top to bottom and tape the seam where the two Q-Wall Back Panels meet. Fig 2