
Manual


© DreamLine
®
All Rights Reserved
© DreamLine
®
All Rights Reserved
Tools Needed
Q-WALL Installation Manual Ver 2 112019 17
© 2019 DreamLine® All Rights Reserved
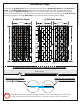
Fig 9
Do not apply
adhesive to the
overlap on the
2nd Q-wall Back
Panel
Fig 10
NOTE
9. Remove the overlap back panel and then apply clear silicone to the
face of the underlap on the installed Q-Wall Back Panel (where the
two back panels will overlap). Fig 9
10. When applying adhesive to the back surface of the 2nd Q-Wall Back Panel, do not apply adhesive to the overlapping section. The
clear silicone (applied to the installed Q-Wall Back Panel) will secure the two sections and waterproof the seam. Once the remainder of
the back surface of the 2nd Q-Wall Back Panel is covered with adhesive, install the 2nd Q-Wall Back Panel onto the the wall of the
opening, pressing firmly over the entire surface, paying special attention to the edges and corners and overlapping section. Remove the
protective plastic covering from the 2nd Q-Wall Back Panel once installed. Fig 10
overlapping
section