
Installation Guide


Product Installation Steps
©2018 DreamLine. All Rights Reserved
6DreamLine SHCM-3300 Shower Panel manual Ver 1 07/2018
Shower Floor
A
B
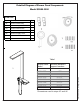
Fig 2
Fig 1
Approximately
1-1/2”
wall
1/2” copper male adapter
!
Copper pipe, elbows and
adapters not supplied
!
BE SURE THAT ALL WATER TO THE SHOWER IS TURNED OFF BEFORE STARTING THIS INSTALLATION
2. Using a helper, place the unit against the shower wall at the desired position (over the two stub-outs)
with the showerhead about 12”-18” above average head height (A). Plumb the unit with a level and mark
the wall on the side of the unit as well as at the bottom of the unit. Remove the unit from the wall and
carefully put it aside. (B) represents the distance from the floor to the bottom of the unit. (Fig 2)
1. The stub-outs for the shower panel should be 1/2” copper pipe, angled down with 90-degree elbows,
extending approximately 1-1/2” from the wall, with 1/2” male threaded adapters on the ends. This will
make attachment of the unit’s supply lines easier and allow the unit to sit flush against the wall. Please
note the rear opening width of the shower panel unit and be sure your stub-outs are close enough
together and at the proper height for easy installation. If this unit is a replacement, make sure all
unnecessary wall openings are closed prior to installation. (Fig 1)