
Installation Guide


Installation steps
7AQUA Series EX and RT panels manual Ver 1 Rev 3 10/2017
©2017 DreamLine. All Rights Reserved
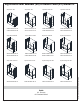
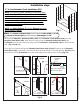
Fig 2
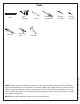
Fig 1
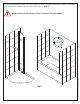
Align the Extender glass
with the Door glass
Extender
glass
U-Channel 1
U-Channel 2
inside
outside
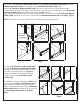
Door
Extender
glass
Door
inside
wall
wall
inside
outside
inside
wall
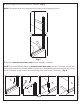
1
2
3
4
5
6
Note: The bottom u-channel (#02) should measure: Glass width (+) 3/16”
the vertical u-channel (#01) should measure: Glass height (-) 5/8“
1. Slip the U-Channel 2 (bottom profile) (#02) and U-Channel 1 (wall profile) (#01) onto the
Extender Panel Glass (#03). With the door open, place the Extender Panel Glass (#03) and
U-Channel onto the tub surface ensuring that the U-Channel 1 (wall profile) (#01) is flush with the
wall. (Fig 2.1 and 2.1)
Close the Door Glass and align the Extender Panel Glass (#03) (Fig 2.3) Ensure that the Extender
Panel Glass (#03) is precisely in line with the Door Glass and level it vertically (plumb). (Fig 2.5) Mark
the position of both U-Channels along the inside edge on the wall and tub surface (Fig 2.6).
NOTE: The following panel installation instructions apply
to all of the Aqua series tub doors. Please install whichever
Aqua model tub door you purchased prior to proceeding
with the following Stationary Glass installation instructions.
Please see the Shower / Tub Door Installation manual
included in the door packaging for complete tub door
installation instructions.
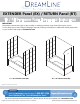
NOTE: Use Parts Diagram “A” for the EX panel assembly
and installation. (Fig 1)
9” In-Line Extender Panel Installation (EX)