
Installation Guide


8AQUA Series EX and RT panels manual Ver 1 Rev 3 10/2017
©2017 DreamLine. All Rights Reserved
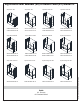
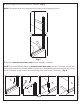
Fig 4
U-channel 1
U-channel 2
inside
1
wall
2
5
wall
6
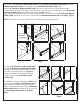
Fig 3
1
2
3
4
U-channel 1
U-channel 2
outside
inside
wall
5
6
4
3
2. Remove the U-Channel 1 (wall profile) (#01) and U-Channel 2 (bottom profile) (#02) from the
Extender Panel Glass (#03) and carefully set the Extender Panel Glass (#03) aside.
Place the U-Channel 2 (bottom profile) (#02) back onto the tub surface in line with the inside
U-Channel mark. Mark the drill holes on the tub surface through the pre-drilled holes in the U-Channel
2 (bottom profile) (#02) and drill the holes using an Ø1/8” drill bit.
Apply waterproof silicone along the bottom surface and around the holes of the U-Channel 2 (bottom
profile) (#02) and fasten it to the tub surface with the Countersunk Screws ST4.2×25 (#06). (Fig 3)
NOTE: The surface needs to be clean and free of debris before applying silicone.
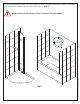
3. Place the U-Channel 1 (wall profile) (#01)
onto the U-Channel 2 (bottom profile) (#02)
and align it vertically with the inside U-channel
wall mark from the previous step (Fig 4.1).
Mark the drill holes on the wall through the
predrilled holes in the U-Channel 1 (wall
profile) (#01).
Now drill holes into the wall using a Ø5/16” drill
bit and insert the Ø5/16” Wall Anchors (#04).
Apply waterproof silicone along the bottom
surface and around the holes of the U-Channel 1
(wall profile) (#01) and fasten it to the wall with
the Countersunk Screws ST4.2×40 (#05).
(Fig 4)