
Installation Guide
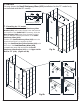

©2017 DreamLine. All Rights Reserved
20ENIGMA-XO manual Ver 1 08/2017
1
2
3
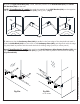
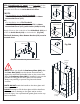
Fig 15
outside
(Right hand door installation shown as example)
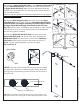
NOTE: Use the Guide Rail Bracket (#08)
set screws to adjust the Guide Rail (#03)
to level.
Lower guide rail Raise guide rail
To lower the rail:
Loosen the top set screw and
tighten the bottom set screw.
To raise the rail:
Loosen the bottom set screw and
tighten the top set screw.
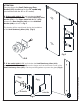
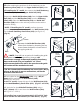
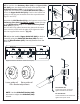
Glass Bracket adjustments
outside
4
for 72” model
Panel end
Door end
Glass bracket
Guide Rail Bracket
TIP: Adjust the installed Upper Guide Rail (#03) to level as
necessary using the Guide Rail Brackets (#08) first and
then the Glass Brackets (#07). Start adjustments from the
door end.
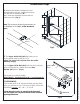
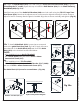
14. Re-position the Stationary Glass (#02) and Upper Guide
Rail (#03) onto the threshold and fasten both sleeves of the
Guide Rail Brackets (#08) to the brackets on the walls.
Tighten the set screws on the Guide Rail Brackets (#08) to
secure the Upper Guide Rail (#03). Position the bracket set
screws so that they are accessible from the top and bottom
(Fig 15.1 and 15.2).
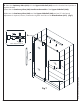
Assemble the Wall Bracket (#19) at the bottom corner of the
Stationary Glass (#02). For the 72“ model, repeat this step
for the Wall Bracket (#19) for the Small Stationary Panel
Glass (#23) (Fig 15.4)
Use the clear vinyl gasket between the glass and the metal
parts to avoid contact with the glass, then tighten the bolt
with the supplied allen wrench. (Fig 15)