
Manual


20ENIGMA-XO Shower Enclosure manual Ver 1 Rev 1 01/2018
©2018 DreamLine. All Rights Reserved
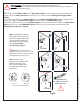
Part#22 - Small stationary Glass Bottom Bracket for 72” model only
5
Fig 19
1 2
3 4
**use anchor with
tile threshold
*see note
use a pencil or a
center-punch to
mark the hole
protective
padding
protective
padding
M5 X 10
ST4.2 X 40
!
!
NOTE: DO NOT attach the handle to the door glass
until instructed to do so. DO NOT attempt to lift the
door glass with the handle as this may result in
damage to the glass and/or serious personal injury.
Use a professional grade glass suction cup and an
assistant.
NOTE: Before you install the Stationary Glass (#02),
take the Door Glass (#05) into the shower area and
lean it against the wall with the handle holes on the
correct side. After the Stationary Glass (#02) is installed, it
may not be possible to easily get the door glass into the
shower or to turn it around. Always use padding to protect
the glass and shower surfaces.
19. If installing the 72” model, repeat Step #18 for the Small
Stationary Glass Bottom Bracket (#22). Loosen the set screw
and remove the guide block face plate.
*NOTE:
◾For installation into an Acrylic Threshold:
drill an Ø1/8”(3mm) hole and use the ST4.2 x 40mm
Countersunk Screw (#17)
OR
◾For installation into a Tile Threshold:
drill a Ø5/16”(8mm) hole and use the ST4.2 x 40mm
Countersunk Screw (#17) (with Wall Anchor (#09b) for
tile)
Apply silicone to the underside of the Stationary Glass
Bottom Bracket (#22) and screw the Stationary Glass
Bottom Bracket (#22) to the threshold. (Fig 19)
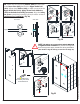
NOTE: The Small Stationary Glass Bottom Bracket (#22)
screwed down to the threshold.