
Manual


27ENIGMA-XO Shower Enclosure manual Ver 1 Rev 1 01/2018
©2018 DreamLine. All Rights Reserved
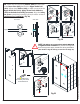
48”or 60”
model
1
2
3*
door
small panel
4
Fig 32
door
wall
(Right-hand door installation shown as an example)
outside
door
inline panel
inside
72” model
door side of opening
48” and 60” models
Fig 33a
3”
wall
(+/- 1/8”)
approximately
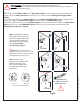
29. Press the Anti-Water Strip (#14) onto the vertical edge
of the Stationary Glass (#02) and the Door Glass (#05)
(Fig 24.1). Press the Bumper Strip (#13) onto the vertical
edge of the Door Glass (#05) (48” and 60“ model). (Fig 32.2)
For the 72” model: Attach Anti-Water Strip (#14) to the
edge of the Small Stationary Glass (#23). The Bumper Strip
(#13) is not necessary with the 72” model (Fig 33.3*).
Attach the Handle (#06) to the Door Glass (#05). (Fig 32)
Note: Use a razor knife to trim the Anti-Water Strip (#14) at
the top to avoid interfering with the lower Rollers (#04).
!
30. Position the Door Stoppers (#01) and screw them tightly to the Upper Guide Rail (#03).
NOTE: The Door Stoppers (#01) must be positioned correctly to prevent the handle from
contacting the Stationary Glass (#02) (48”, 60” & 72“ models) and to stop the Door Glass (#05) in a
position that allows the bumper strip to create a seal with the wall, but does not allow the door glass to
bang into the wall during normal operation (48” & 60” models). (Fig 33a and Fig 33b)
*For the 72” model: Install the door-side stopper in a position to prevent the handle from making
contact with the small inline panel glass when the door is in the closed position. (Fig 33b.7)