
Manual


12ENIGMA-XO Shower Enclosure manual Ver 1 Rev 1 01/2018
©2018 DreamLine. All Rights Reserved
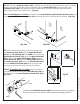
Fig 6
Fig 7
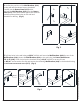
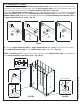
Use a metal file to
deburr the cut end
Fig 5
W
W
door end
door end
glass bracket
holes
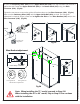
6. Measure the distance from the finished wall to the
inside surface of the installed Return Panel Glass
(#27). This distance will represent the finished
opening size “W” that will be used to calculate the
finished cut dimension for the Upper Guide Rail
(#03). (Fig 6)
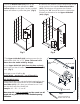
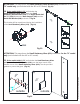
5. Place the Return Panel (#27) back in the
designated position and assemble the Wall
Brackets (#19) onto the glass. Use the provided
gaskets and sleeve to protect the glass. (Fig 5)
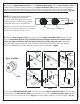
7. The Upper Guide Rail (#03) has been precut for the
model width of 48”, 60” or 72”. (Note: The actual rail is
shorter than the model width by design).
Cut the Upper Guide Rail (#03) from the door end only,
which is the end that is farther from the Glass Bracket (#07)
holes. (Fig 7)
The length to cut off will be (L):
Model Width – opening W = cut off length (L)
FOR EXAMPLE ONLY:
If the model width is 60” and the finished opening from the
finished wall to the inside surface of the installed Return
Panel Glass (#27) is 58”, then you will need to cut 2” off
from the door end of the Guide Rail.
Example: 60” – 58” = 2” cut off
*Note that this is only an example and the actual cut-off
length will vary based on the actual finished opening
dimension.