
Manual


14ENIGMA-XO Shower Enclosure manual Ver 1 Rev 1 01/2018
©2018 DreamLine. All Rights Reserved
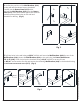
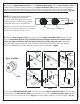
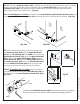
Fig 9a
Glass Connector (#28)
1 2 3
not used in this
configuration
X
sleeve
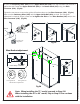
Fig 9b
Glass Bracket adjustment
rotate disk(s) to level rail
Lower guide rail Raise guide rail
Glass Bracket adjustments
rotate disk to level rail
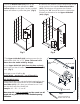
Note: When installing the 72” model, proceed to Step #10.
When installing the 48”or 60” model, skip to Step #13 to continue
with the installation.
!
9. Place the Stationary Glass (#02) with the Upper Guide Rail (#03) onto the threshold and position it
against the wall. Fasten the Upper Guide Rail (#03) to the Return Panel (#27) using the Glass
Connector (#28). (Fig 9a)
Tighten the set screws to secure the guide rail bracket sleeve to the Glass Connector (#28). (Fig 9a)
Make sure the Stationary Glass (#02) and the Upper Guide Rail (#03) are level. If a horizontal
adjustment is required; loosen, rotate and re-tighten the disks on the Glass Brackets (#07) and/or the
Glass Connector (#28). (Fig 9b)