
Folding Shower Seat Manual


Installation steps:
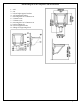
1. Place the seat (02) facing the wall (01), level it. It is
recommended to mount the seat 400-500mm (15 ¾” – 20”)
above the floor, however, the mounting height can be chosen
to one’s needs. Left and right support brackets (03) should be
butted against the edge of the seat. Place the wall mounting
brackets (04) abutted against the wall, mark the drill holes in
tiles or sheetrock for all 6 mounting holes (05), remove the
seat. Use
7
/
32
” drill bit to drill the holes. Holes need to be
drilled through the thickness of tiles and sheetrock only.
Do not drill through the wood framing. (See figure 1)
2. Put seat into place, fasten left and right support brackets (03)
using 5x70mm screw (06). (See figure 1)
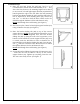
3. Place the bracket sliding slot (09) on top of the exterior
support bracket. NOTE: the side with block should be on top.
Lower the seat to the designated level, move the bracket
sliding slot (09) up along the wall to the top position, so its
bottom is in the middle of exterior support bracket (10); keep
it vertical, mark the drill holes in tiles or sheetrock for 4
mounting holes in the bracket sliding slot (08); close the seat.
Use
7
/
32
” drill bit to drill the holes. Holes need to be drilled
through the thickness of tiles and sheetrock only.
Do not drill through the wood framing. (See figure 2)
4. Secure the bracket sliding slot (09) using 5x70mm screw (07)
- make sure the seat is folded to the top of the exterior
support bracket (10). Tighten up everything, lower the seat.
The seat is now ready for use. (See figure 3)
3