
Warranty


5
+1<:;05.!6<;05.,7;/
# When making deep cuts, especially
plunge cuts away from the edge of the work-
piece, it is recommended to make several
successive cuts progressively deeper using
the depth adjustment and depth scale rather
than making one single deep cut.
The depth limiter can be adjusted for two
depths.
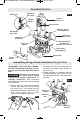
1. Place your Dremel Rotary Tool and Router
assembly on the workpiece.
2. Turn the upper adjustment nut upward and
turn the lower adjustment nut downward
so depth stop is free to move (Fig. 5).
3. Loosen the locking hand grip (Fig. 6).
Slowly lower the tool until the router bit just
touches the workpiece.
4. Tighten the locking hand grip to lock the
tool in place.
5. Press and hold the release button so
depth stop touches the router base.
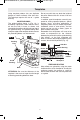
:;!6<;05.,7;/
6. Turn the depth stop upwards so that mea-
surement X equals the first desired routing
depth (Fig. 7).
NOTE: 1 turn equals .06" (1.5 mm)
7. Turn the upper adjustment nut down snug
against the router frame.
5+!6<;05.,7;/
8. Turn the depth stop upwards so that mea-
surement X equals the second desired
routing depth. Make sure upper adjust-
ment nut turns with the depth stop, so it
rises away from router frame (Fig. 8).
9. Turn the lower adjustment nut up snug
against the router frame.
NOTE: The upper adjustment nut must
remain stationary when tightening the lower
adjustment nut.
1
X
X
X
X
$77,9
+1<:;4,5;
<;
6>,9
+1<:;4,5;
<;
(5+
907
FIG. 5
FIG. 6
!,3,(:,
<;;65
FIG. 7
,7;/
";67
$77,9
+1<:;4,5;
<;
,7;/
";67
6>,9
+1<:;4,5;
<;
,7;/
";67
FIG. 8
DM 2610920458 05-12_DM 2610920458 08-10 5/14/12 11:18 AM Page 5