
Operation Manual


7
ASSEMBLY
!
WARNING
ALWAYS SWITCH OFF THE TOOL BEFORE
ATTACHING OR REMOVING A BIT.
GENERAL
The Dremel Cordless Screwdriver has a magnetic bit holder
that accepts any 1/4" hex bit. The low RPM capability of this
model is not a defi ciency. On the contrary, low speed means
high torque and high torque is benefi cial for effi cient driving. The
low speed also provides more control to prevent strip-out of the
screw and damage to the work surface.
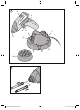
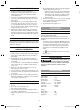
FIGURE 1
1. Magnetic bit holder
2. Ventilation openings
3. Soft grip
4. Forward/reverse lever and trigger lock
5. Variable-speed trigger switch
6. Charger
7. Charge indicator light
8. Extra storage space
9. Slot for attaching bit storage compartment
10. Bit storage compartment (optional)
GETTING STARTED
INSERTING BITS
Your power tool is equipped with a magnetic bit holder. Simply
push the shank of the bit into the bit holder as far as it will go
(Figure 2).
BIT STORAGE COMPARTMENT (optional)
Your power tool is equipped with a removable bit storage
compartment that can be attached to the charger and that will
allow you to store 12 of your favourite bits (Figure 1).
VARIABLE-SPEED TRIGGER SWITCH
Your power tool is equipped with a variable-speed trigger switch.
The power tool can be switched "ON" or "OFF" by squeezing
or releasing the trigger. The speed can be adjusted from the
minimum to maximum RPM by the pressure you apply to the
trigger. Apply more pressure to increase the speed and release
pressure to decrease speed.
BRAKE
When the trigger switch is released it activates the brake to
stop the chuck quickly. This is especially useful in the repetitive
driving and removal of screws.
AUTOLOCK
Your power tool is equipped with an automatic locking system.
This feature will lock the bit holder in one position when the
trigger switch is released. This will allow you to tighten or loosen
a nut or screw by rotating the tool by hand with the switch off.
This is convenient when higher turning torque is needed.
FORWARD/REVERSE LEVER AND TRIGGER LOCK
!
WARNING
AFTER TOOL USE, LOCK THE TRIGGER IN
THE "OFF" POSITION TO HELP PREVENT
ACCIDENTAL STARTS AND ACCIDENTAL DISCHARGE.
Your power tool is equipped with a forward/reverse lever and
trigger lock located above the trigger (Figure 1). This lever is
designed for changing the rotation of the bit and for locking the
trigger in an "OFF" position.
For forward rotation, (with the chuck pointed away from you)
move the lever to the far left. For reverse rotation move the lever
to the far right. To activate the trigger lock move the lever to the
centre "OFF" position.
STALL PROTECTION
This tool has a built-in stall protection feature to protect the
motor and battery in the event of a stall. If you stall the tool
for too long, or bind the bit in a work piece, especially at high
speeds, it will automatically switch itself off. Just remove the
tool from the material, switch it off for 3 seconds, then switch
it on again. When the battery is nearly discharged, the tool may
shut down automatically more frequently than normal. If this
happens, it is time to recharge the battery.
CHARGING THE TOOL
Your Dremel Driver is not completely charged at the factory. Be
sure to charge the tool prior to initial use.
To charge the tool:
1. Switch the tool off.
2. Place the tool in the charger as shown in fi gure 1.
3. Plug the charger into a power source.
– Green light ON = charging.
– Green light OFF = charging completed.
The charger will automatically stop charging the battery
when charging is completed. It is OK to leave the tool on the
charger continuously.
4. The charger will require approximately 5 hours to charge a
completely discharged battery.
Important charging notes
This tool was designed with a lithium-ion battery and charger for
the following benefi ts:
1. The lithium-ion battery will hold its charge while in storage for
up to 2 years. Therefore, it is always ready when you need it.
2. You can place the tool on the charger and recharge it at any
time without reducing the original charge capacity.
3. The charger was designed to use as a place to store your
tool while you are working on your projects. Simply place
the tool in the charger when you are not using it on your
project, and it will continually recharge the battery so it will
run longer for you.
4. The charger is also designed to be your permanent
storage device for your tool. Keep it on your workbench or
2610398910-Driver-0807.indb 72610398910-Driver-0807.indb 7 31-7-2008 12:37:1031-7-2008 12:37:10