
User manual


24
USE
GETTING STARTED
The first step in using the multitool is to get the "feel" of it. Hold
it in your hand and feel its weight and balance. Feel the taper of
the housing. This taper permits the tool to be grasped much like
a pen or pencil.
Always hold the tool away from your face. Accessories can be
damaged during handling and can fly apart as they come up to
speed.
When holding tool, do not cover the ventilation openings with
your hand. Blocking the ventilation openings could cause the
motor to overheat.
IMPORTANT! Practice on scrap material first to see how the
tool’s high-speed action performs. Keep in mind that your
multitool will perform best by allowing the speed, along with
the correct Dremel accessory and attachment, to do the work
for you. Do not put pressure on the tool during use, if possible.
Instead, lower the spinning accessory lightly to the work surface
and allow it to touch the point at which you want to begin.
Concentrate on guiding the tool over the work using very little
pressure from your hand. Allow the accessory to do the work.
Usually it is better to make a series of passes with the tool
rather than to do the entire job with one pass. A gentle touch
gives the best control and reduces the chance of error.
HOLDING THE TOOL
For best control in close work, grip the multitool like a pencil
between your thumb and forefinger. PICTURE 4
The "golf" grip method is used for heavier operations such as
grinding or cutting. PICTURE 5
OPERATING SPEEDS
To select the right speed for each job, use a practice piece of
material.
SLIDE "ON/OFF" SWITCH
The tool is switched "ON" by the slide switch located on the
topside of the motor housing.
TO TURN THE TOOL "ON", slide the switch button forward.
TO TURN THE TOOL "OFF", slide the switch button backward.
HIGH PERFORMANCE MOTOR
Your tool is equipped with a high performance rotary tool motor.
This motor expands the versatility of the rotary tool by driving
additional Dremel attachments.
ELECTRONIC MONITORING
Your tool is equipped with an internal electronic monitoring
system that provides a “soft start”, which will reduce the
stresses that occur from a high torque start. The system also
helps to maximize motor and battery performance by cutting
the voltage to the tool when stall conditions (see section “Stall
Protection”) occur. The motor and battery pack are protected by
cutting back the voltage to the motor in these situations.
VARIABLE SPEED SLIDE SWITCH
Your tool is equipped with a variable speed slide switch. The
speed may be adjusted during operation by sliding the switch
back or forth between any one of the settings.
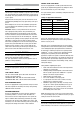
The speed of Rotary Tool is controlled by setting this dial on the
housing. PICTURE 6
Settings for Approximate Revolutions
Switch Setting Speed Range
5 5000-7000 min
–1
10 7000-10000 min
–1
*15 13000-17000 min
–1
20 18000-23000 min
–1
25 23000-27000 min
–1
30 28000-30000 min
–1
* Do not exceed 15000 min
–1
when using wire brushes.
Refer to the Speed Settings chart on pages 4-7 to help
determine the proper speed for the material being worked on
and the accessory to use.
Most jobs can be accomplished using the tool at the highest
setting. However, certain materials (some plastics and metals)
can be damaged by high-speed generated heat and should
be worked on at relatively low speeds. Low speed operation
(15000 min
–1
or less) is usually best for polishing operations
employing the felt polishing accessories. All brushing
applications require lower speeds to avoid wire discharge from
the holder. Let the performance of the tool do the work for you
when using lower speed settings. Higher speeds are better for
hardwoods, metals and glass and for drilling, carving, cutting,
routing and shaping.
Some guidelines regarding tool speed:
• Plastic and other materials that melt at low temperatures
should be cut at low speeds.
• Polishing, buffing and cleaning with a wire brush must be
done at speeds no greater than 15000 min
–1
to prevent
damage to the brush and your material.
• Wood should be cut at high speed.
• Iron or steel should be cut at high speed.
• If a high speed steel cutter starts to vibrate, it usually
indicates that it is running too slowly.
• Aluminium, copper alloys, lead alloys, zinc alloys and tin
may be cut at various speeds, depending on the type of
cutting being done. Use a paraffin (not water) or other
suitable lubricant on the cutter to prevent the cut material
from adhering to the cutter teeth.
NOTE: Increasing pressure on the tool is not the answer when
it is not performing properly. Try a different accessory or speed
setting to achieve the desired result.
STALL PROTECTION
This tool has a stall protection feature built into it to protect the
motor and battery in the event of a stall. If you put too much