CarDAQ-M J2534-1&2 Module Quick Start Guide
CarDAQ-M has been carefully designed and tested to comply with OBDII protocols, which are used on most 1996 and newer cars and light trucks sold in the USA. However, some vehicle models are not in full compliance with these protocols for various reasons. In addition, the computer control systems or sensors on any given vehicle may be malfunctioning or out of specification.
Contents CONTENTS .....................................................................................................................3 1. INTRODUCTION......................................................................................................4 COPYRIGHTS & TRADEMARKS ..............................................................................4 2. GETTING TO KNOW CARDAQ-M.....................................................................4 CARDAQ-M EXPANSION MODULES ...........................
1. Introduction Thank you for choosing CarDAQ-M! You now have the most complete and upgradeable J2534 Pass-Thru device available for technicians today. The CarDAQ-M will allow you to reflash modern vehicle controllers to stock as well as perform dealer level diagnostics on select manufacturer’s vehicles. This Quick Start Guide covers the initial setup, features, and common questions. This manual is always available at www.drewtech.com.
Setting up the CarDAQ-M Do not connect the CarDAQ-M to your PC until you have installed the software below. Installing the CarDAQ-M Software to your PC 1. Insert the CD that came with your CarDAQ-M into the CD/DVD slot of your PC. Make sure your CarDAQ-M is not connected to the PC at this point. The Autoplay options will appear: 2. Click on [Run setup.exe] to begin the installation. 3. The J2534 ToolBox, Tech2Win Driver and the CarDAQ-M drivers will now begin installation.
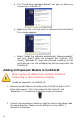
a. The “Found New Hardware Wizard” will pop up when you connect your CarDAQ-M. b. Make sure “No, not this time” is selected and click [Next]. This screen appears: c. Select “Install the software automatically (Recommended)” and click [Next]. After the progress bar finishes, click [Finish]. Windows XP users are finished installing at this point and can run the software they will be using with the CarDAQ-M.
3. Fasten the two modules together with the four full tabs and additional screws that came with the new expansion module. The Capabilities of J2534 and CarDAQ-M The CarDAQ-M is the most complete J2534 pass-thru device available today. The capabilities of CarDAQ-M are largely determined by software the vehicle manufacturers provide. More information on specific manufacturers can be found in the J2534 Toolbox.
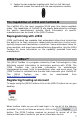
As you work through the registration process fill out all information completely and correctly. Step 1 (Personal Information) of the registration will require you to fill out information regarding your J2534 Toolbox account. Step 2 (Business Information) will require some information about your business. Step 3 (Device Registration) will require you to register the CarDAQ M you are using. Please have the CarDAQ M connected to the PC at this point.
Step 4 (Registration Confirmation) confirms your J2534 Toolbox account. Your CarDAQ M has now been registered. All features of the J2534 Toolbox will now be available to you. Remember to save your login information so that you can login quickly. If you lose your login information you will need to click on “Forgot Password?” at the login screen. J2534 Toolbox Resources Once you have logged in to the account you registered for you will have access to all of the benefits the J2534 Toolbox has to offer.
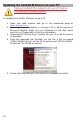
Updating the CarDAQ-M Drivers on your PC Unplug CarDAQ-M’s cable from your PC before completing the steps below. To update the CarDAQ-M drivers on your PC: 1. Open your web browser and go to the downloads page at www.drewtech.com 2. Determine if your computer is running a 32 or 64 bit version of Microsoft Window. Right click on [Computer] in the Start menu and click on [Properties] to find this information. 3. Download the “Drivers Only” installer for your 32 or 64 bit version of Windows. 4.
Specifications J2534-1&2 Modules Supported Protocols CAN Bus (capable of ISO 15765, GMLAN, J1939, and ISO14229) 2nd CAN (Dual or Single Wire) Ford SCP (J1850PWM) GM Class2 (J1850VPW) KWP2000 (ISO9141/14230) Chrysler SCI (J2610) o Compliant to SAE J2534 (Feb 2002) and SAE J2534-1 (Dec 2004) o Compliant to ISO 22900-1 MVCI physical layer o Programming voltage on J1962 pin 6, 9, 11, 12, 13, 14 or Aux o Ground pin 9 Specifications Name Input Voltage Range Supply Current Operating
Connectors and Status Indicators PC Connection Panel Ports and their functions: Expansion A and B: Future PC connection options. USB: For a direct to PC USB connection. AUX: External programming voltage supply. For use on some vehicles that have special programming needs. PWR: External power option which maybe needed for future expansion modules. Expansion Panel This side of CarDAQ-M allows future modules to be connected for more capability.
Q: I have installed the drivers and connected my CarDAQ-M but nothing seems to be working. A: Connect CarDAQ-M to your computer and to a vehicle. Turn the vehicle key to the “On” position. Open the J2534 Toolbox and go to the support tab. Use the Vehicle Check application to see if a protocol is found. If a error occurs instantly, re-install the drivers. Q: How do I re-install the drivers on the PC? Find the CD that came with your CarDAQ-M or download the installer from the website. Run the installer.
Notes: 14
Notes: 15
Other Drew Tech Products Drew Technologies has several products available for data acquisition, diagnostics, development, testing, and reprogramming for modern vehicles. Visit www.drewtech.com for more information CarDAQ-Plus™ - Fully SAE J2534 compliant. Ethernet and USB connectivity to a computer, a built-in operating system for running internal programs, protocol support for all modern vehicles, and six analog inputs.