
Products Owner's Manual Dehumidifiers


Copyright 2000, 2002 Dri
-
Eaz Products, Inc. 2
3. Allow five minutes before restarting after the unit shuts off
for any reason. This will avoid damaging the compressor.
4. If your unit has a pump, run the pump drain hose into a sink,
toilet, drain, or bucket. Make sure the hose is not kinked. If
using a bucket, check and empty the bucket frequently to
prevent overflow.
5. Before moving the unit, make sure the pump is empty of wa-
ter. To do this, let the unit sit while OFF for 10 minutes, while
water drains drain from the coils into the pump. Then push
the PURGE switch. When using the DrizAir 80, tip the unit
backward to about a 30-degree angle; this will cause the
pump impeller to run and empty the collection pan.
6. CAUTION: Check dehumidifier daily for correct operation.
Protect floor surfaces from leakage.
Water Removal Rate
With all dehumidifiers, the rate of water removal varies with hu-
midity and temperature. If possible, judge the performance of the
dehumidifier by how much the humidity drops, rather than by the
volume of water being removed and deposited in the bucket. You
can roughly guess the humidity by its "feel" on your skin, but to
be accurate use a thermo-hygrometer.
To estimate how many dehumidifiers to place, see the Specifica-
tions below.
How the Machine Works
DrizAir units are refrigerant dehumidifiers. They operate by
blowing moisture-laden air from the room across a cold evapo-
rator coil. Moisture in the air condenses on the coil, drips off, and
then is removed through a drain hose or pump. Now warmer and
drier, the air passes back into the room to continue its work of
carrying water vapor.
When a DrizAir Dehumidifier is operating at a room temperature
below about 68° F (20° C), frost will normally form on the evapo-
rator coil. Water removal will stop temporarily. When an auto-
matic control built into the unit senses the ice temperature, it
initiates a defrost cycle. During this time, considerable quantities
of water drain from the unit. As soon as the ice has melted, nor-
mal operation resumes.
How to Use the Touchpad Controller
(DrizAir 1200, 2000, 2400 only)
The Touchpad Controller used on DrizAir dehumidifiers has one
display and four keys. The normal display messages are:
DEHUMIDIFIER OFF
DEHUMIDIFIER ON
TOTAL HRS=00000
JOB HRS=00000
CMPRSR DELAY 60
PUMP PURGING
DEFROST ON
GET SERVICE ER01
Control Keys
ON-OFF. When the unit is first plugged in, the display
cycles through three messages: DEHUMIDIFER OFF,
TOTAL HOURS , and JOB HOURS. Press the ON-OFF
key to turn the unit on. The display often reads CMPRSR
DELAY 00, with the numeral counting down from a
maximum of 60 seconds to 0. At that point the unit be-
gins to operate and the display reads DEHUMIDIFIER
ON. (The delay prevents damage from accidental power
interruptions, where power to the compressor stops and
then starts again when pressure in the system is still
high.)
PURGE. Push this key to run the purge before tipping
the unit. This empties water from the pump reservoir to
prevent leakage. If the unit has been operating, turn the
power OFF but leave the cord plugged in for about 10
minutes while water drips from the coil; then press
PURGE to remove residual water. The purge also runs
automatically every six minutes during operation, and
whenever the reservoir is full. While the purge is running,
the display reads PUMP PURGING.
DISPLAY. Press the DISPLAY key to stop the display at
DEHUMIDIFER ON or OFF, TOTAL HOURS, or JOB
HOURS, when it is cycling. Press again to make the dis-
play cycle again.
CLEAR. To clear the JOB HOURS reading, first press
the DISPLAY key to make the display read JOB HRS
steadily. Then press the CLEAR key to re-set the nu-
merals to 00000. NOTE: the TOTAL HOURS reading
cannot be re-set.
Defrost On
The display will read DEFROST ON whenever the unit is in a
defrost cycle. During normal operation, frost forming on the coils
is detected by the temperature sensor, causing a defrost cycle to
start. Dehumidification is suspended as hot gas flows through
the coils and melts the frost. At the end of the defrost cycle, the
display returns to its normal condition.
Changing Language Shown on Display
The default language is English. To change to another language,
follow these steps. (1) The unit must be unplugged from the
power outlet. Hold down the DISPLAY key while plugging the
unit in. The display now reads "ENGLISH." (2) Press the DIS-
PLAY key or the CLEAR key to adjust the reading to FRANCAIS,
DEUTSCH, or ESPANOL. (3) Then unplug the unit from the
power outlet, which sets the language.
CAUTION: While in the change-language mode, pressing other
keys can change operating parameters of the unit. Do NOT
press other keys or change parameters, except when following
guidelines from the Dri-Eaz Service Department.
Error Messages
In case of certain problems, the display may show the error
message "GET SERVICE," followed by "ER01" or another nu-
meral. Follow these steps:
1. First, unplug the unit and then plug it back in. This may re-
set the electronics.
2. If that does not fix the problem, try the solution if one is
listed in the table below.
3. If that does not fix the problem, contact the Dri-Eaz Service
Department ( contact information above).
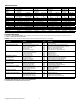
ER
1-2-3-5-6
Problem with the electronic control panel.
Contact Service.
ER4 Problem with temperature sensor or cable.
ER8 Problem with a touchpad key. Press and release
each key several times.
ER9 Check for obstructions in pump or drain hose, or
that pump wiring is correct.
ELECTRICAL CONNECTIONS
DrizAir Dehumidifiers are designed to operate on a 115V/60 Hz
electrical connection. Make sure that the electrical outlet is
grounded and that all safety precautions are taken.
MAINTENANCE
Always turn off the power before performing maintenance proce-
dures. All the service procedures below are to be executed with
the unit unplugged. Perform before each use or as needed.
INSPECT ELECTRICAL SYSTEM: Inspect the electrical cord for
damage at regular intervals. Periodically, remove the housing
and inspect internal wiring for bare wires, insecure fasteners,
and discoloration. Remove and repair any damaged wiring as
needed. Failure to do so may lead to electrical shock or a fire
hazard.