USER MANUAL Item: #13246 – Stand-Aid Lift Drive Medical Design and Manufacturing www.drivemedical.
IMPORTANT SAFEGUARDS Your lift is for transferring patients only. Do not use the lift for any other purpose. “Stand-Aid Lift” is intended to be used for persons within the specified weight limit indicated for the lift. Do not attempt to lift more than the weight limit indicated. Before attempting to transfer, the user must be assessed by a qualified professional. The lift must be used by a caregiver with proper training to work with the person to be transferred.
ASSEMBLY INSTRUCTIONS 1. Remove all the parts from the carton and place on the floor, taking care to protect the finish from damage. 2. Place the chassis in a clear space and apply the rear bakes. Attach the “foot plate” to the base. Drive Medical Design and Manufacturing www.drivemedical.
3. Fit the “mast” and “boom" assembly into the base socket. Tighten the mast assembly with the drive screw. Drive Medical Design and Manufacturing www.drivemedical.
Tighten up screw Assemble actuator bottom and top. Insert the pin chain through actuator top. Drive Medical Design and Manufacturing www.drivemedical.
Fit control box onto bracket (on mast). Tight up control box. Fit battery onto control box. Drive Medical Design and Manufacturing www.drivemedical.
Plug the hand set in control box bottom at left side. Plug actuator in control box bottom at middle. Fit the adjusting handle. REMARKS: Please always check the mast is fully locked into position. Drive Medical Design and Manufacturing www.drivemedical.
I. How to Operate the Stand-Aid Lifter: (Weight Lifting Capacity: 180 kgs) Important: Prior to first use, please make sure that the battery is being charged 24 hours in order to reach proper function and prolong the lifetime of battery. 1. Spread the base legs to the widest position before lifting. 2. Keep the patient centered between the base legs and have the patient face the attendant. 3. Be extremely cautious and use restraint straps for spastic or severely handicapped patients. 4.
◆ Charger plugged in ◆ Unplug charger Control box completely dead ◆ Battery completely flat ◆ Charge battery on battery and no relay ◆ Battery defective ◆ Replace battery Control box okay apart from ◆ handset defective ◆ Send handset for repair One direction on one channel ◆ Control box defective ◆ Send control box for repair clicking is heard. Warning and Caution! 1. Patient lifter is a Transfer Device that allows patient attendant to transfer patients from bed to wheelchair or commode…etc.
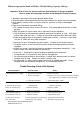
PICTURE B: Battery box Control box with internal charger Emergency stop button Connect the plug of Handset LCD display Connect the plug of Actuator Insert the plug of power cord in control box and the other end to a wall outlet. . Maintenance: It is extremely important that the lift be inspected before each use. The following items need to be checked: a. All nuts and bolts should be tight. b. The lifter should move freely with caster brakes off. c.
WARRANTY INFORMATION Your Drive brand product is warranted to be free of defects in materials and workmanship as follows: Frame: Lifetime Electronic Components and Actuator: 1 year This device was built to exacting standards and carefully inspected prior to shipment. This Lifetime Limited Warranty is an expression of our confidence in the materials and workmanship of our products and our assurance to the consumer of years of dependable service.