
Product Manual


10.1.4 Replacement of the glass and gaskets
After a year or more of use, the gasket of the door will compress and become hard which
can allow air to pass. You can check the air tightness of your door gasket by closing and
locking the door on a piece of paper. Check all around the door. If the paper slides easily
anywhere, adjust the door and the gasket if this is not enough.
Always use a genuine gasket that you can purchase from your dealer. The correct size and
density of the gasket are important to ensure a good seal.
Prior of removing the defective glass, you need to remove the door gasket. Inspect the door
gasket before it is reinstalled to make sure it is in good condition. We suggest replacing the
door and glass gasket at the same time as their level of wear over time is similar.
For the following steps, wearing gloves and safety glasses are recommended for
handling seals can irritate the skin and the glass can be sharp.
- To replace the door gasket, use the steps 1 to 3 and 10 outlined below.
- To replace the glass, use the steps 1 to 6 and 9 to 10 outlined below.
- To replace the glass gasket, use the steps 1 to 10 outlined below.
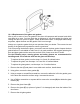
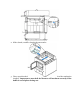
1. Remove the door (F) and place it on a stable work surface, handle down.
2. Using pliers, remove the door gasket (A).
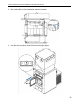
3. Using a scraper or a small flat screwdriver, remove the adhesive left in the gasket grove
in the door then clean the surface using a commercial vacuum.
4. Use a Phillips screwdriver or a power drill to remove the screws (B) that holds the glass
retainer (C).
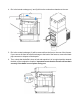
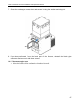
5. Remove the glass frame (D).
6. Remove the glass (E) (or pieces of glass if it is damaged) and clean the inside of the
door frame.
7. Remove the old glass gasket.