Assembly instructions DrumCraft Series drum set
Musikhaus Thomann Thomann GmbH Hans-Thomann-Straße 1 96138 Burgebrach Germany Telephone: +49 (0) 9546 9223-0 E-mail: info@thomann.de Internet: www.thomann.de 30.07.2021, ID: 482708, ...
Table of contents Table of contents 1 Safety instructions................................................................................................................. 4 2 Note............................................................................................................................................... 5 3 Unpacking.................................................................................................................................. 6 4 Setting up the bass drum.........
Safety instructions 1 Safety instructions DANGER! Danger for children Ensure that plastic bags, packaging, etc. are properly disposed of and are not in the reach of babies and young children. Choking hazard! Ensure that children do not detach any small parts (e.g. knobs or the like) from the product. They could swallow the pieces and choke! Never let children play unattended with the product.
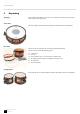
Note 2 Note This document is a general guide showing typical steps for setting up a drum set. Depending on the model, there can be variations in the type and number of components. No cymbals are included in these sets.
Unpacking 3 Unpacking Assigning The following guide makes it easy for you to completely assemble your drum set, to tune it and to set it up properly. Snare drum The snare drum is delivered fully assembled. The drum heads are already fitted. Bass drum Due to the size of the bass drum, it is always supplied dismantled.
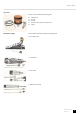
Unpacking Floor tom The floor tom includes the following parts: n n n n n Hardware package 1 drum shell 2 hoops 2 heads 16 tension rods with one washer each 3 spurs The hardware package includes the following parts: 1 bass drum pedal 1 hi-hat stand 1 snare stand 2 cymbal boom stands DrumCraft Series drum set 7
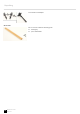
Unpacking 2 tom holders and adapters Accessories The accessories include the following parts: n 1 tuning key n 1 pair of drumsticks 8 DrumCraft Series drum set
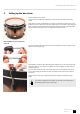
Setting up the bass drum 4 Setting up the bass drum Let's start with the bass drum. Position the bass drum shell such that the screws of the tom holder point down‐ wards. Now lay the resonator head (with the logo print) on the shell and put a hoop over it. Both the hoops are identical so it doesn't matter which one you put on first. Align the white resonator head such that the "DrumCraft" writing is parallel to the tom holder. The head must be lying evenly on the edge of the shell on all sides.
Setting up the bass drum Mounting the beater head 10 DrumCraft Series drum set The batter head without logo print is used on the beater side. When mounting it, we proceed in just the same way as with the resonator head. Put the head on first and lay the hoop on it, put the washers and claw hooks on the tension rods and screw them on. Do not tighten them too much; only enough for the hoops not to be shifted. We'll do everything else when we tune the drums.
Assembling the floor tom 5 Assembling the floor tom The principle of assembling the floor tom is basically the same as with the bass drum. The hoops are made of steel. This means that they don't need any claw hooks; rather, you screw them on directly. The tension rods aren't as long as with the bass drum either, since the hoops are not as wide. To make the hoops easier to transport, they are fixed on one side of the shell with a couple of screws.
Assembling the bass drum pedal 6 Assembling the bass drum pedal The beater is screwed into the bracket. NOTICE! Do not stick the bottom end of the shaft in too far; otherwise, it could damage the bass drum head. You can make all the other settings later on. A separate user guide is enclosed for the the bass drum pedal.
Assembling the hi-hat 7 Assembling the hi-hat Pull the stand's three legs far enough apart until there is optimum stability between the base point of the stand and the legs. A wing nut ensures that the legs do not move out of position. The hi-hat pedal is stabilized with a rod. To do this, reach under the pedal, press the rod fork together a bit until the ends lock home in the holes. The next thing to do is to tightly screw home the pull rod in the stand's thread.
Assembling the cymbal stands 8 Assembling the cymbal stands The legs of the cymbal stands are folded out or extended until it stands secure. After this, you fix the legs using the wing nut. Push the centre and spacer tubes onto the bottom case and fix them with the wing screws. We will make the final settings later on. The cymbal holder is directly on the retractable spacer tube. You attach the cymbals in exactly the same way as with the hi-hat-stand after positioning.
Assembling the snare drum stand 9 Assembling the snare drum stand In the case of the snare drum stand too, you fold out the three legs and fix them with wing nut. Now put the top part with the arms into the lower section and screw it tight. Screwing down the union nut opens the support arms. The union nut on the joint allows you to set the angle of the drum. Here too, we will make all the necessary set‐ tings later on when positioning the set.
Tuning the shells 10 Tuning the shells All the drum shells are mounted. All the hardware is assembled. Basics Always tighten the tension rods in the diagonally opposite sequence to ensure even tension. You should tighten all the screws evenly. At the beginning, don't turn the screw by more than one rotation – towards the end, rotate by ¼ to ⅛ of a turn. Then check the pitch. You check the pitch by tapping the head about 3 cm from the rim near the screw that you are just setting.
Tuning the shells Hanging toms and floor tom You proceed in the same way with the hanging toms and the floor tom. Seat the head slowly and evenly. At first, press the head down with your hands to seat it well. Tap your finger along the rim to check: you should hear a ringing tone. You shouldn't be able to see any more wrinkles. The sounds of the three toms should also harmonise. The sounds should harmonise while you're tuning the heads.
Setting up the drum set 11 Setting up the drum set For optimum playing, we don't just need tuned drums; rather, it is also necessary to position all the drums in an optimum way. We now make all the settings that we neglected before. The set-up that is described here is intended for right-handers. The set-up for left-handers is a mirror image of this one. A non-slip surface like a carpet or similar guarantees stability. Drum stool Let's start with the drum stool.
Setting up the drum set Completing the bass drum Now that we've tuned our bass drum, it's time to mount the bass drum pedal and the tom racks on the bass drum shell. Let's start with the bass drum legs. Fold the bass drum spurs out such that they point forwards at an angle of about 45°. This guaran‐ tees a safe and stable position and protects the bass drum from being pushed for‐ ward when we operate the pedal.
Setting up the drum set Bass drum and hi-hat The snare drum is now between the drummer's knees and we will add the bass drum and hi-hat stands. The bass drum and hi-hat pedals are placed where the drummer's feet rest naturally when they are in a normal upright seated position. In this connec‐ tion the knees must not touch the snare drum. The bass drum with pedal comes on the right-hand side and the hi-hat stand on the left-hand one. The two pedals form a V shape pointing towards the stool.
Attaching the cymbals 12 Attaching the cymbals Our drum set is starting to take shape. We've already found the position of the hi-hat stand. What's missing now is attaching the hi-hat cymbals and adjusting the height. No cymbals are included in these sets. Attaching the hi-hat cymbals First place a metal washer and the felt disk on the hi-hat stand. Then the bottom cymbal (labelled "bottom"). Lie it freely onto the stand's felt disk. We have to make some preparations for the top cymbal (labelled "top").
Attaching the cymbals Now tread the hi-hat pedal half way down and tighten the wing screw of the hi-hat clutch. Attaching the ride and crash cymbals The ride cymbal is placed on the right between the floor tom and the right-hand hanging tom. As with the hi-hat, you screw the cymbal between two felt washers. Now position the cymbal such that you can comfortably reach it with your drumstick it doesn't hit the shell. Now all the parts are in place and you can start to play.
Protecting the environment 13 Protecting the environment Disposal of the packaging material For the transport and protective packaging, environmentally friendly materials have been chosen that can be supplied to normal recycling. Ensure that plastic bags, packaging, etc. are properly disposed of. Do not just dispose of these materials with your normal household waste, but make sure that they are collected for recycling. Please follow the notes and markings on the packaging.
Notes 24 DrumCraft Series drum set
Notes DrumCraft Series drum set 25
Notes 26 DrumCraft Series drum set
Musikhaus Thomann · Hans-Thomann-Straße 1 · 96138 Burgebrach · Germany · www.thomann.