
Operation Manual

43
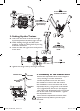
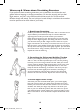
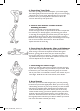
3a
Grab onto
both tracks and
set the device
right side up.
3b
Hold on to
both tracks and
loosen the xing
knob.
3c
Press both tracks
towards the fl oor.
3d
Fixing knob
Groove
Groove
Handle bars
Bore
Adjustment
knob
Support
pole
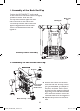
4. Assembly of the Handle Bars
Remove the adjustment knob on the support
rob by turning it counter-clockwise.
Pull the adjustment knob out and insert
the handle bars. Ensure that the holes in
the handlebars are on the same side as the
adjustment knob. (The groove in the handle
bars is aligned with the bore in the support
pole.) Allow the adjustment knob to lock into
one of the holes in the handle bars. Tighten
the adjustment knob.
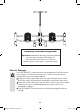
Ensure that the adjustment knob has been
tightened securely before you start your
exercises.
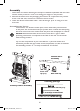
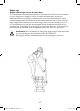
3. Setting Up the Trainer
a.
Grab onto the ends of the left and right
track and position the device right side up.
b.
While holding the right and left tracks
together, loosen the xing knob by turning
it counter-clockwise.
c.
Lower the left and right track slowly down
to the oor.
d.
Tighten the xing knob by turning it clockwise.
03355_DE-GB-FR-NL_V6.indb 43 06.07.11 09:12