Introduction Welcome to the DLS-2 Downloading Software! This manual explains how to use the DLS-2 Downloading Software for Windows. Before installing and using DLS-2, please read Section One and Section Two.
Section One Hardware and Software Requirements You will need the following hardware to run the DLS-2 software: • 80486 DX4 or higher IBM PC or compatible strongly recommended • colour monitor The minimum video resolution required to use DLS-2 is 640 x 480 pixels. For DLS-2 to display properly, use the “small fonts” setting for the font size. See your Windows manual for information on changing display properties. • 1 modem capable of 300 baud communication.
Compatible Control Panels (through DLS-1 v6.5) During installation of DLS-2, there is the option to include support for older panel types through the use of DLS-1 Version 6.5. Older versions of DLS-1 are not compatible with DLS-2 v1.3. If this option is selected the following panel types and software versions will also be available for selection: • DSC8400: • Maxsys PC4010: • Maxsys PC4020: • PC1150: • PC1500/1550: • PC1555 • PC1575: • PC2525: • PC2550: • PC4000: • PC5010: • PC5015 Version 2.3L Version 1.
Installing the DLS-2 Software To install DLS-2, ensure that your hard disk drive has at least 10 megabytes of free disk space. When installed, the DLS-2 Software will occupy approximately 5.3 megabytes. NOTE: If you will be using DLS-2 to program systems which use the Escort4580, or to program panels listed in the section "Compatible Control Panels (through DLS-1 v6.5)" you must have installed DLS-1 v6.5 first. If you have not yet installed DLS-1, exit Windows to DOS and install DLS-1 v6.5.
Section Two Using the DLS-2 Software For The First Time This section of the manual describes how to start up and log on to the DLS-2 software for the first time after installation. In this section you will: • learn how to start the DLS-2 software • learn how to log on • learn how to create Users and User Access Codes for the DLS-2 software Starting a DLS-2 Session Start the DLS-2 software by opening the DLS2 Program Group. Double click on the DLS-2 icon.
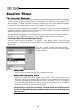
After you log on, the software will display the Account Manager window for the [DLS2 Fixed Disk Group], and the software will attempt to initialize the modem. See section 3 for a detailed explanation of the Account Manager. If the software cannot initialize the communications port for the modem, a Communications Error window will appear. Check that all modem settings are correct, that the modem is connected to the correct communications port and that the modem is plugged in or turned on.
Creating Folders and Accounts If this is your first DLS-2 session, there will be no folders or accounts present in the account manager window for the DLS2 Fixed Disk Group. To begin creating folders, select “CREATE FOLDER…” from the Folder menu. You must create at least one folder in an account manager group before you can begin creating accounts. To begin creating accounts, select “CREATE ACCOUNT…” from the Account menu and enter the appropriate account information in the Account Information window.
Finding a Programming Section Once you have selected a programming area by clicking on the control panel or a module icon, use one of the following methods to find the specific programming section you want: 1. Scroll through the list of programming sections and click on the button for the programming section you want. 2. Click on the drop down list beside the Choose Dialog field to display a list of the titles of all the programming sections available in the account.
Displaying the Communications Window The Communications window may be brought to the top of the desktop in several ways: Use the ALT and TAB keys to scroll through the list of active applications. Release the TAB key when the DSC Communications window is highlighted.
Section Three The Account Manager The Account Manager allows you to organize your downloading accounts into folders which are then organized into Groups. Each group can hold up to 150 folders. The default group is called the DLS2 Fixed Disk Group. You can create additional groups in order to have better organization of your folders and accounts. For example, you could create two groups named Rural and Local.
Opening an Account Manager Group From the Folder menu, select “Open Account Manager Group...”. Select the desired Group from the list displayed. Only Groups to which your Access Code has been granted access will be displayed! The Account Manager Group window will display a list of folders in that Group. To open a folder, double click on the desired folder icon. When a folder is opened, the individual Accounts kept in the file will be displayed.
Changing an Account Manager Group Name Note that a user must have the following User Permissions assigned to them or they will not be able to change the Account Manager Group name: Create Account Manager Group, Delete Account Manager Group, Copy Folders and Access Code Maintenance. If the name of an existing Account Manager Group needs to be changed do the following: 1. From the Security menu, select “Access Code Maintenance” to open the Access Code Maintenance window. 2.
Managing Folders Folders hold all accounts that are created by the user and allow for better organization of the existing accounts. For example, two folders could be created named Commercial Accounts and Residential Accounts. The accounts that are held in a folder will not be displayed until the folder is opened. To open a folder, double click on the desired folder icon. When a folder is opened, the individual accounts kept in the folder will be displayed.
Deleting a Folder Select the desired folder by clicking on it’s name. From the Folder menu, select “Delete Folder...”. With the Delete Folder window displayed, press ENTER or click “Yes” to delete the folder. To cancel without deleting the folder, click “Cancel”. Copying a Folder From the Folder menu, select “Copy...”. With the Copy window displayed, scroll through the list of Groups in the Destination Group field and select a group to copy the folder to.
Managing Accounts An account holds all programming information for a customer’s security system. You select the model and version number of the security system when you create the account. Using the DLS-2 software, you can send the programming for the account to the security system. You can also update the programming on the system as needed.
Account Information Window In this window, you can review and/or change the information for the currently selected account. To display the Account Information window for a selected account, choose Open Account Database from the Account menu. DLS-2 will automatically open the Account Information window whenever you create a new account.
When the account is created, it is assigned a DLS-1 Identifier by DLS-2. The DLS-1 Identifier is an 8 digit number that is used with DLS-1 accounts when editing, printing, or executing the batch file for the account. This number is used as a means of identifying where the DLS-1 account can be found within DLS-2.
Delete Account Select the account to be deleted in the Account Manager window. With the desired account selected, select ‘Delete...’ from the Account menu. Press ENTER or click “Yes” to delete the account, or click “No” to leave the account in place. You are also able to select multiple accounts when deleting. To do so, select the first of the accounts to be deleted and while holding down SHIFT select the last of the accounts.
Importing DLS-1 Accounts NOTE: This option will not be shown in the account menu unless the support for DLS-1 account was selected during installation. This function allows you to import all account work files that are already present in DLS-1 v6.5 and allows those accounts to be used in DLS-2. To begin importing DLS-1 account work files into DLS-2, select “Import DLS-1 File(s)...” from the Account menu.
Account Already Exists When copying an account into a folder with accounts with the same name, this window will be displayed to advise of the condition. Replace Click Replace to replace the existing account with the account displayed in the window. All account and programming information will be replaced when the displayed account is copied over the existing account. Replace All Click Replace All to replace all existing accounts with the same name.
Note that the Batch File may be edited after it has been created by selecting “Create DLS-1 Batch File...” from the Account menu again. Refer to the DLS-1 v6.5 Instruction Manual for additional information on the functionality of the Batch Command menu. In the Account Manager Group window, this icon will be displayed beside any account that has a batch file that has not yet been executed.
PC4000 PC4010 Version 1.0 PC4020 Version 1.0 These account types allow you to select which sections in the selected file are printed. When you select Print DLS-1 File... from the Account menu, a DOS window is opened and within the DOS window is a window showing a list of all the sections for the selected account. Any section in the window can be selected for printing by highlighting the section and pressing SPACE. An arrow to the left of a section indicates that the section has been selected for printing.
Using the Search Function The Search function will allow you to search the Account Names in the Account Database and the DLS-1 Identifiers shown in the Account Manager Window, for a word, phrase, or a number. This function may be used to find, for example, all accounts with the last name “Smith”. Select “Search...” from the Account menu to display the Search Folders window. Search Criteria Enter the word or item to be searched in the Search Criteria field.
Opening the Account Database This function allows you to review or change the Account Information for the currently selected account. Select “Open Account Database...” from the Account menu. The Account Information window will be displayed. Refer to Creating an Account for instructions on how to change the information displayed in the Account Information Window.
Opening an Account To open an account for review or programming, double click on the desired account, or select an account and select “Open Account...” from the Account menu. Whenever a PC4010/4020 v2.x, PC4010/4020 v3.0 or PC4020KT v1.x account is opened, the DLS-2 will take a few moments to load the Signature Graphic for the account. All other panel types and versions will be opened in a DOS window. Once the window is opened, the modem will be reinitialized and then the account will be displayed.
Section Four Section Four explains the following: • • • • • • • how to prepare control panels for downloading how to accept an incoming call (DLS-2) how to accept an incoming call (DLS-1) how to start the DLS-1 Batch Mode how to use the Communications Window how to use DLS-1 Communications how to communicate via PC-Link Preparing Control Panels for Downloading Each of the following control panels requires some programming before the DLS-2 software can communicate with them.
Maxsys PC4010 v2.1 and lower, PC4020 v2.1 and lower, and PC4020KT, all versions Make note of the Downloading Access Code and Panel ID Code which can be ✱ ][8][Installer’s programmed in the DLS Section. Enter Installer’s Mode by pressing, [✱ Code]. To program the Downloading Access Code , enter [0] for System Area, then [0][3] for DLS Section and then [4] for the Downloading Access Code. To program the Panel ID Code , enter [0] for System Area, then [0][3] for DLS Section and then [3] for the Panel ID Code.
Maxsys PC4010 and PC4020 Version 3.0 Make note of the Downloading Access Code and Panel ID Code which can be programmed in the DLS Section. This section gives the reference numbers for each programming section. To enter a ✱ ][8][Installer’s Code], reference number, enter Installer's Programming by pressing, [✱ then press and hold the [A]uxiliary key. When the keypad displays "Enter Ref # then *", enter the reference number and press [*] to go to the programming section.
PC1150 - Version 1.X Make note of the Downloading Access Code programmed in Section [27] and the Panel Identifier Code programmed in Section [28]. These values must be entered into the account. Make sure that the Panel Identifier Code is not the same as the Identifier Codes in other work files. To Have the Computer Call the Control Panel 1. Section [31] must have Light [1] turned ON to enable downloading. Light [3] should be turned ON, in Section [31], to enable the answering machine override feature.
To Have the Control Panel Call the Computer 1. If the system is to periodically call the downloading computer, turn ON Light [3] in Section [14] to enable periodic downloading. 2. When using this feature, a downloading telephone number must be programmed in Section [26]. 3. A time for the periodic download must be programmed in Test Transmission Time which is in Section [19]. The interval, in days, for the periodic downloading may also be programmed in Test Transmission Repeat Time which is in Section [17].
PC1555 Version 2.X, PC5010 Version 2.0, PC5015 Version 2.2 and PC580 Version 2.1 Make note of the Downloading Access Code programmed in Section [403] and the Panel Identifier Code programmed in Section [404]. You must enter these values into the DLS account. Make sure that the Panel Identifier Code is not the same as the Identifier Codes in other Accounts. To Have the Computer Call the Control Panel 1. The panel will answer on a double call, enable Downloading Answer in Section [401] Light [1]. 2.
PC1575 Version 1.X Make note of the Downloading Access Code programmed in Section [73] and the Panel Identifier Code programmed in Section [74]. You must enter these values into the DLS account. Make sure that the Panel Identifier Code is not the same as the Identifier Codes in other work files. To Have the Computer Call the Control Panel 1. In Section [70] set the number of rings for the panel to answer. In Section [71], enable Downloading Answer by turning ON Light [1].
To Have the Control Panel Call the Computer 1. If the system is to periodically call the downloading computer, turn ON Light [5] in Section [70] to enable periodic downloading. 2. When using this feature, a downloading telephone number must be programmed in Section [71]. 3. A time for the periodic download must be programmed in Test Transmission Time of Day which is in Section [43].
PC3000 - Version 7.5L Make note of the Downloading Access Code programmed in Section [26] and the Panel Identifier Code programmed in Section [48]. You must enter these values into the DLS account. Make sure that the Panel Identifier Code is not the same as the Identifier Codes in other work files. To Have the Computer Call the Control Panel 1. In Section [47], Modem Configuration, set the number of rings for the panel to answer. In Section [47] enable Ring Detect by turning ON Light [5].
To Have the Control Panel Call the Computer 1. If the system is to periodically call the downloading computer, turn ON Light [7] in Section [49] to enable periodic downloading. 2. When using this feature, a downloading telephone number must be programmed in Section [46]. 3. A time for the periodic download must be programmed in Test Transmission Time of Day which is in Section [23].
PC5010 - Version 1.X Make note of the Downloading Access Code programmed in Section [403] and the Panel Identifier Code programmed in Section [404]. You must enter these values into the DLS account. Make sure that the Panel Identifier Code is not the same as the Identifier Codes in other work files. To Have the Computer Call the Control Panel 1. In Section [401], enable Downloading Answer by turning ON Light [1]. 2.
WLS900 - Version 2.2 Make note of the Downloading Access Code programmed in Section [72] and the System Identifier Code programmed in Section [73]. You must enter these values into the DLS account. Make sure that the System Identifier Code is not the same as the Identifier Codes in other work files. To Have the Computer Call the Control Panel 1. In Section [74], set the number of rings for the panel to answer. In Section [70], enable Ring Detect by turning ON Light [1].
Waiting For a Panel to Call This function is used to place the DLS-2 in automatic answer mode when an incoming call from a control panel is expected. Calls from panels can originate in two ways: as a user-initiated request for downloading or as an automatically initiated periodic request for downloading from the panel. When a call is answered, the DLS-2 will then attempt to match the panel with the correct account by using the Panel Identification code.
Wait For a Panel to Call Mode - DLS-1 (DLS-1 supported panels only) IMPORTANT: If you intend to use Waiting for Panel to Call Mode or Batch Mode with DLS-1 accounts, DO NOT create the Account Manager Group for those accounts anywhere but in the Folders directory of the DLS-2 installation directory. To start the Wait For Panel Mode, select GO (DLS-1) Wait For Panel from the User menu. A DOS Window with the title ‘Wait For A Panel To Call’ will be opened.
The Communications Window When you start a DLS-2 session, two applications are opened: the main DLS-2 window and the DSC Communications window. When you log on, the Communications Window will open in whatever state that the window was in when the DLS-2 was last open. The software will attempt to initialize the modem if the Auto-Answer Enabled option is selected. The Auto-Answer Enabled option can be changed in the Modem Configuration window. When editing a PC4010/4020 v2.X, PC4010/4020 v3.0 or PC4020KT v1.
Status Bar At the bottom of the Communications Window is a Status Bar. The Status Bar is used to display communications related messages such as ‘Upload in Progress’ or ‘Communications Complete’. If the modem has been initialized properly and there are no communications taking place, the Status Bar will normally be displaying the message, ‘Waiting for Panel to Call’ or ‘Auto Answer Disabled’. The messages found on the Status Bar can be translated by editing the MAIN_100.
Communications Functions Initializing the Modem To initialize the modem, select the Initialize Modem icon. DLS-2 will then advise that the initialization was successful, or that it could not be completed. Hanging Up From a Call To hang up a call, click the Hang Up button in the Communications Window. DLS-2 will complete communications with the system and hang up the line.
Downloading and Uploading There are two different types of downloading and uploading options in the DLS-2 software: • Global downloading and uploading • Window downloading and uploading Global Downloading and Uploading Global Downloading Selecting Global Downloading will download most programming information to the alarm system. Keypad Programming and Escort4580 Module Programming will not be downloaded to the alarm system when Global Downloading is selected.
Window Downloading and Uploading Window Downloading and Uploading allows you to download or upload a specific part of the alarm system’s programming information. In DLS-2, the programming information is divided up into Information Windows that organize the information similarly to the way information is organized in the alarm system.
DLS-1 Communications When you open a DLS-1 account, DLS-2 will close the Communications window reinitialize the modem. If the modem initializes properly, the DLS-1 account will be displayed. If there is a problem initializing the modem then the following error message will be displayed: The Modem Board is not present or has not been connected properly. If you wish help information, press [ Y ], to go to DOS press [ Esc ], or press any key to continue.
Communicating via PC-Link Do not use the PC-Link option unless you will be communicating with accounts that are v3.0 or later. Disable this option whenever you communicate with PC4020KT v1.0 accounts, or PC4010/4020 accounts that are v2.1 or earlier. The PC-Link function is a communications mode that uses a direct connection between your computer and panel. A serial cable is used to link the computer with control panels that are capable of supporting the PC-Link option.
Section Five DLS-1 Accounts NOTE: DLS-2 cannot access DLS-1 accounts unless you are using DLS-1 v6.5. Previous versions of DLS-1 cannot be used. Types of DLS-1 Accounts During installation of DLS-2, there is an option to include support of DLS-1 accounts through the use of DLS-1 v6.5. To include DLS-1 accounts in the installation, check the DLS2 4580 support box when it is displayed.
When the right-most end of each tree branch on the program tree is selected, a screen will be displayed that will allow editing of programming information for the selected section. The information on the screen can be uploaded or downloaded without communicating any other program information. If changes have been made to the account programming, the information can be saved by pressing ESC or by pressing ALT Q to select Quit. The message ‘There have been changes made to the WorkFile...
DLS-2 Account Programming See the DLS-2 help file for more information on account programming. You can reach some programming sections in more than one way. For example, zone related programming may be reached through the Zone Information [Zones 1-128] button as well as by clicking on a Zone Module icon in the Signature Graphic. The Signature Graphic The Signature Graphic provides a schematic illustration of the system for opened DLS-2 accounts and provides access to the programming options.
PC4400 Output Module Icon Click on this icon to program RS-232 module functions. Escort4580 Voice Prompting Module Icon Click on this icon to open a DOS window that allows programming of Voice Prompting module functions. Note this type of module is not supported without the use of DLS-1 v6.5. PC4700 Fire Module Icon Click on this icon to program Fire Module functions. PC4701 Fire Expansion Module Icon Click on this icon to program Fire Expansion Module functions.
Signature Graphic Legend The Legend indicates how Communication Error, Module Low Voltage, Module Tamper and Module Normal Diagnostic conditions for each module will be displayed on the Signature Graphic. NOTE: The Diagnostic conditions will be displayed in order of priority if more than one condition is present for a module.
Adjusting the Signature Graphic Display The spacing of the icons within the Signature Graphic may be adjusted by editing the DLS.INI file. When making these changes, do not program any of these variables as “0”. Use a text editor or .INI file editor to edit the DLS.INI file. Changes made to the DLS.INI file will be implemented the next time the software is started. Note that the DLS.INI file can be found in the directory that was specified for DLS-2 during installation.
Section Six Other DLS-2 Functions The DLS-2 also allows you to: • • • • create DLS-2 users change the language used for DLS-2 displays configure the modem view a log of system events Access Code Maintenance Window Logon Name Click on the button to scroll through the list of users’ logon names. Select one of the logon names to make changes. Comment The Comment field allows you to enter a comment, description or other notes for the user displayed in the Logon Name field. Create Another User...
Delete... Click on this button to delete the user shown in the Logon Name field. When the Delete User window appears, click “Yes” to delete the user, or click “Cancel”. Topic The Topic field displays which of the options are to be changed: • Groups • Passwords • Languages • Permissions Click on a topic to select the topic to be programmed. Creating and Assigning Groups Click on groups to assign access to Account Manager Groups to the user.
Grant All Groups Grant access to all groups to the user by clicking on the “Grant All Groups” button . icons will appear beside the group names to indicate that they are assigned to the user. Clear All Groups Clear all groups from the user by clicking on the “Clear All Groups” button. All icons in the group list will be removed to indicate that no groups are assigned to the user. When finished with the group settings, select the next item from the Topic field.
Creating Passwords Passwords allows you to change the password for the user displayed in the Logon Name field. A password is used on the Log On window when starting a DLS-2 session. Passwords are an additional measure of security to limit access to customer accounts. It is not necessary to assign a password for a user. The DLS-2 software automatically assigns a blank password to every user that is created. The only exception is the DSC user which has a default password of 1234.
Assigning Permissions Permissions allows you to control the user’s access to DLS-2 functions. To grant permission to use a function, double-click on the desired function in the Permissions List. A icon will appear beside the item to indicate that the function is assigned to the user. To remove a permission, double click on the item again. Clear All Permissions To clear all permissions, click the “Clear All Permissions” button.
Access Code Maintenance: allows the user to change Access Code Maintenance Settings Create Batch File: allows the user to create a batch file for the selected panel if the panel is supported in batch operation Delete Batch File: allows the user to delete the batch file for the selected account Import DLS1 Workfiles: allows the user to import workfiles that were created on DLS-1 System Options: allows the user to change System Options Modem Configuration: allows the user to change the modem configuration Sys
Editing a Language From the Options menu, select System Options. The System Options window will be displayed. Language(s) in Database This field indicates which languages are presently available for use. Double click on a language to select it for editing or other functions. Edit (Translate)... This button will be greyed out (unavailable for user) until a language is created with the “Create Language” button. Click “Edit (Translate)” to display the Translate window.
Edit Language When the “Edit (Translate)” button is selected, the Edit Language window will be displayed. In the Select Module to Edit field there are three files displayed: This module contains the phrases used for PC4010 and 40XX.LDB PC4020 accounts of all account versions. 40XYBUF.LDB This module contains the phrases used for PC4010 and PC4020 event buffers. MAIN_100.LDB This module contains the words and phrases used within the DLS-2 software.
Translate Window When the “Edit” button in the Edit Languate window is selected, the Translate window will be displayed. The “Original” list indicates the original phrases in Source Language from which the new language has been created. The “Translated” list indicates the translated phrases from the language being created or edited. All of the phrases in the “Translated” list will be RED until they are translated. All translated phrases will be GREY.
hand Phrase field and enter the number of the desired phrase and then press enter to go to the desired phrase. · Use the scroll bars to scroll through the list of phrases and once the desired phrase is displayed click on the phrase to select it for editing. 2 Enter the translation for the new language in the Translation... field. The translation may include groups of words or special keypad characters, such as graphic characters and accented characters.
Modem Configuration The Modem Configuration window allows the type of modem being used for communications when communicating with any PC4010/4020 v2.X, PC4010/4020 v3.0 or PC4020KT v1.0 account. Other modem-related settings can also be changed from this window. The modem to be used and the COM Port will normally be selected during installation of the DLS-2 software. Note that the modem configuration for communications with DLS-1 accounts must be done from within the Program Configuration of the DLS-1 v6.
4. Click the ports. button for the Com Port field to scroll through the list of COM Only COM ports that are present on your computer will be listed. Select a COM port to be used by clicking on it. 5. Click the button for the Dial Type field to select a dialing method. The available dialing methods are TONE and PULSE. Select a dialing method by clicking on it. 6. Enter the number of rings required before the DLS-2 software will answer an incoming call in the Rings Before Answer field. 7.
13. If the DSC MD12 is the selected modem then one of the following baud rate options can be selected: Always use 300 - When this option is selected, all communications with any control panel will be at 300 baud as normal. Always use 1200 – When this option is selected, all communications to panels that support DSCs proprietary 1200 baud format will be done at 1200 baud.
Modem Support Window Clicking the Advanced button in the Modem Configuration window will display the Modem Support window. Refer to your modem instruction and owner’s manual when programming advanced modem options. IMPORTANT NOTE: Incorrect modem strings may result in communications failures. Ensure that you understand the modem options as described in your modem’s instruction manual before using custom strings.
System Log The System Log provides a record of computer and DLS-2 activity. The Time and Date of each event are indicated, along with the Log On Name of the user and an event description. Icons in the log window represent the type of event: General Information This icon indicates a typical system event, such as opening or closing the software. User Generated This icon indicates user activity, such as opening accounts, programming options, creating or deleting files, and so on.
Open Backup Log(s) The DLS Software will automatically create a backup file of the System Log after 2400 events have been recorded. To review these files you must first select ‘Open System Log’ from the Log menu. The present System Log will be opened. Then select ‘Open Backup Log(s)...’ from the Log menu and select a backup log to be reviewed. When the System Log is backed up, it is renamed using the following format, YYMMDD: 2 digits for the year, month and day.
Appendix A Troubleshooting Communications Troubleshooting 1. “The Modem has failed reinitialization. Please check that the modem is on and connected properly” or “The Modem could not be initialized. Please check that the modem is on, connected properly or the Modem Configuration settings under the Options menu within the DLS-2.
6. “Panel that called could not be identified. Communications cancelled.” or “Panel that called back had the wrong panel type, version, or identifier. Communications cancelled.” If this error message is displayed, ensure that the Panel Identifier Code is the same in the account as it is in the customers security system. You can check the Panel Identifier Code for the panel by viewing the Event Detail for the event, Unable to Identify calling Panel in the System Log.
13. While on-line with any DLS-1 account or the Escort4580, and when communications is idle, the DOS window for the account should be brought to the foreground or connection to the panel will be terminated. If communication is taking place, the DOS window for the account can be placed in the background until the communication request is completed. 14. COM ports with 16650 or 16750 UARTs are not supported with DLS-2.
NOTES: 72
© 1998 Digital Security Controls Ltd.
Downloading Software For Windows Version 1.
Introduction 1 Welcome to the DLS-2 Downloading Software! .............................. 1 Section One 2 Hardware and Software Requirements ........................................... 2 Compatible Control Panels .............................................................. 2 Compatible Control Panels (through DLS-1 v6.5) ........................... 3 Compatible Modems ....................................................................... 3 Installing the DLS-2 Software ...............................
Creating a Batch File ..................................................................... 20 Deleting a Batch File ...................................................................... 21 Printing a DLS-1 File ...................................................................... 21 Account Type: How to Print the Selected Account ................. 21 Using the Search Function ............................................................ 23 Opening the Account Database .....................................
Section Five 47 DLS-1 Accounts ............................................................................. 47 Types of DLS-1 Accounts ........................................................ 47 Editing DLS-1 Accounts .......................................................... 47 Changing the DLS-1 Directory in DLS-2 .................................. 48 DLS-2 Account Programming ........................................................ 49 The Signature Graphic .............................................
NOTES: iv 79