Model # DSHD19536V OMSID: 0000 000 000 USE AND CARE GUIDE 3 LIGHT VANITY Questions, problems, missing parts? Before returning to the store, call Design Solutions International Customer Service Mon-Fri 9:30 am to 3:00 pm EST 1-800-388-6141 ext. 216 For customer service support and the fastest response, please email us at CustomerSupport@DSILighting.
Table of Contents Table of Contents ........................................................... 2 Safety Information ......................................................... 2 Warranty ......................................................................... 2 Three (3) Year Warranty ............................................................. 2 What is Covered ....................................................................... 2 What is Not Covered ....................................................
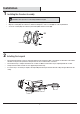
Pre-Installation PLANNING INSTALLATION Read all instructions before installing. To avoid damaging this product, place it on a soft, non-abrasive surface, such as carpet or cardboard. IMPORTANT: Inspect the wire insulation for any cuts, abrasions, or exposed copper that may have occurred during shipping. If there is a defect in the wire, do not attempt installation. Please call the Customer Service Team at 1-800-388-6141 ext 216.
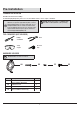
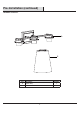
Pre-Installation (continued) PACKAGE CONTENTS A B Part Description Quantity A Fixture body 1 B Shade 3 4
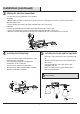
Installation 1 Installing the Crossbar Assembly NOTE: Prior to installation, close or cover the sink drain and/or any vents near the installation site to prevent loss of mounting hardware if dropped. □ □ □ Remove the crossbar (AA) from the backplate on the fixture body (A). Align the crossbar (AA) to the outlet box so that the mounting holes on the crossbar (AA) are on the top and bottom. Secure the crossbar (AA) to the outlet box (not included) with outlet box screws (BB).
Installation (continued) 3 □ □ Making the electrical connections * Use wire connectors (CC) (supplied) to connect the wires. Ground Wire: 1. Wrap the supply ground wire around the green ground screw on the crossbar (AA), no less than 2 in. from the end of the wire. Tighten the ground screw. 2. Connect the fixture ground wire to the supply ground wire with a wire connector (CC). Supply Wire: 1. Connect the supply white wire to the white fixture supply wire with a wire connector (CC). 2.
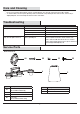
Care and Cleaning □ Do not use any cleaners with chemicals, solvents, or harsh abrasives. Use only a dry, soft cloth to dust or wipe carefully. □ To clean the fixture, disconnect power by turning off the circuit breaker or by removing the fuse at the fuse box, and use a dry or slightly dampened, clean cloth to wipe the exterior surface of the fixture. Troubleshooting Problem Possible Cause Solution The lights will not turn on. The bulb is burned out. The power is off. There is a faulty switch.
Questions, problems, missing parts? Before returning to the store, call Design Solutions International Customer Service Mon-Fri 9:30 am to 3:00 pm EST 1-800-388-6141 ext. 216 For customer service support and the fastest response, please email us at CustomerSupport@DSILighting.com Retain this manual for future use.