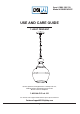
Item # 1006 106 532 Model # DSHD19565P USE AND CARE GUIDE 1 LIGHT PENDANT Questions, problems, missing parts? Before returning to the store, call Design Solutions International Customer Service Mon-Fri 9:30 am to 3:00 pm EST 1-800-388-6141 ext. 216 For customer service support and the fastest response, please email us at CustomerSupport@DSILighting.
Table of Contents Table of Contents ........................................................... 2 Safety Information ......................................................... 2 Warranty ......................................................................... 2 Three (3) Year Warranty ............................................................. 2 What is Covered ....................................................................... 2 What is Not Covered ....................................................
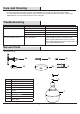
Pre-Installation PLANNING INSTALLATION □ Read all instructions before installing. □ To avoid damaging this product, place it on a soft, non-abrasive surface, such as carpet or cardboard. IMPORTANT: Inspect the wire insulation for any cuts, abrasions, or exposed copper that may have occurred during shipping. If there is a defect in the wire, do not attempt installation. Please call Customer Service Team at 1-800-388-6141 ext 216.
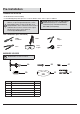
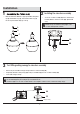
Pre-Installation (continued) PACKAGE CONTENTS A B C Part Description Quantity A Fixture loop 1 B Cap 1 C Fixture body 1 4
Installation 1 2 Installing the crossbar assembly □ Guide the fixture wire with bare copper ground wire through the cap (B) and the fixture loop (A), and screw the fixture loop (A) onto the top of the fixture body (C) securely. □ Secure the crossbar assembly (AA) to the outlet box (not included) with the outlet box screws (BB). Tighten until snug. NOTE: The preassembled mounting nipple on the crossbar should protrude outward.
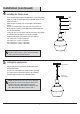
Installation (continued) 4 Installing the fixture chain □ □ □ □ □ Choose desired hanging length for the light fixture. Suggested mounting height over a table or island is 30 inches from the table/island top to the bottom of the fixture. Adjust the fixture chain (FF) to the desired length, removing links if needed. Connect one end of the fixture chain (FF) to the canopy chain loop preassembled to crossbar assembly (AA) with one quick link (DD) and close the quick link (DD).
Installation (continued) 6 Trimming excess fixture wire □ □ □ □ □ □ 7 □ □ Supply wire and ground wire Unthread the canopy lock ring. Slide canopy lock ring and ceiling canopy (EE) down the quick link (DD). Push all slack fixture wire through canopy chain loop and into the outlet box. Trim excess fixture wire leaving a minimum of 6 inches hanging out of the outlet box. Separate the smooth side and ribbed side of the supply wire to about 3 inches from the end.
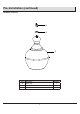
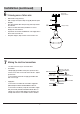
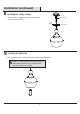
Installation (continued) 8 Installing the ceiling canopy □ □ Attach the ceiling canopy (EE) back over the canopy chain loop. Secure with canopy lock ring. Canopy chain loop EE 9 Installing the light bulb □ Install correct bulb referring to fixture markings and/or labels for maximum wattage. NOTE: Use (1) 60W maximum medium base (E26) type "S" or 8W maximum medium base (E26) self-ballasted LED vintage Edison bulbs (sold separately).
Care and Cleaning □ Do not use any cleaners with chemicals, solvents, or harsh abrasives. Use only a dry, soft cloth to dust or wipe carefully. □ To clean the fixture, disconnect power by turning off the circuit breaker or by removing the fuse at the fuse box, and use a dry or slightly dampened, clean cloth to wipe the exterior surface of the fixture. Troubleshooting Problem Possible Cause Solution The lights will not turn on. The bulb is burned out. The power is off. There is a faulty switch.
Questions, problems, missing parts? Before returning to the store, call Design Solutions International Customer Service Mon-Fri 9:30 am to 3:00 pm EST 1-800-388-6141 ext. 216 For customer service support and the fastest response, please email us at CustomerSupport@DSILighting.com Retain this manual for future use.
Articulo # 1006 106 532 Modelo DSHD19565P GUÍA DE USO Y MANTENIMIENTO LÁMPARA COLGANTE DE 1 LUZ ¿Tiene alguna pregunta o algún problema? ¿Le faltan piezas? Antes de volver a la tienda, llame al Servicio de atención al cliente de Design Solutions International De lunes a viernes, de 9.30 a 15 h EST 1-800-388-6141 ext. 216 Para obtener ayuda de nuestro Servicio de atención al cliente y la respuesta más rápida, envíenos un correo electrónico a CustomerSupport@DSILighting.
ÍNDICE Índice............................................................................... 2 Información de seguridad.............................................. 2 Garantía........................................................................... 2 Tres (3) años de garantía............................................................. 2 Lo que está cubierto.................................................................... 2 ¿Qué no está cubierto?........................................................
Antes de la instalación Planificación de la instalación □ Lea todas las instrucciones antes de realizar la instalación. □ Coloque este producto sobre una superficie suave y no abrasiva, como una alfombra o una base de cartón, para evitar dañarlo. IMPORTANTE: Inspeccione el aislamiento del cable para detectar cualquier corte, abrasión o exposición del cobre que pueda haberse producido durante el envío. Si el cable tiene algún defecto, no intente realizar la instalación. Llame al 1-800-388-6141, ext.
Antes de la instalación (continuación) CONTENIDO DEL PAQUETE A B C Pieza Descripción Cantidad A Enganche de la lámpara 1 B Tapa Cuerpo de la lámpara 1 C 1 4
Instalación 1 del Ensamble de la barra 2 Instalación transversal Montaje del cuerpo de la lámpara □ Pase el cable de la lámpara y el cable desnudo de cobre a tierra a través de la tapa (B) y la enganche de la lámpara (A) y atornille la enganche de la lámpara (A) a la parte superior del cuerpo de la lámpara (C) con firmeza. □ Fije la barra transversal (AA) a la caja de salida (no incluida) con los tornillos para la caja de salida (BB). Apriete hasta que esté ajustado.
Instalación (continuación) 4 Instalación del Cadena de la lámpara □ □ □ □ □ Escoja el largo deseado del soporte para la lámpara. La altura sugerida para colgar el producto sobre una mesa o isla es 76,2 cm desde la parte superior de la mesa o isla hasta la parte inferior de la lámpara. Ajuste la cadena de la lámpara (FF) al largo deseado, retirando eslabones si es necesario.
Instalación (continuación) 6 Corte el exceso de cable de la lámpara □ □ □ □ □ □ 7 □ □ Desenrosque el anillo de bloqueo de la cubierta. Deslice el anillo de bloqueo de la cubierta y la cubierta para techo (EE) por el eslabón de conexión rápida (DD). Empuje todos los cables flojos de la lámpara a través del enganche de la cadena de la cubierta hacia el interior de la caja de salida. Corte el exceso de cable de la lámpara, dejando un mínimo de 15,24 cm fuera de la caja de salida.
Instalación (continuación) 8 Instalación del Cubierta para techo □ □ Enganche de la cadena de la cubierta Vuelva a fijar la cubierta del techo (EE) en el enganche de la cadena. Asegure con el anillo de bloqueo de la cubierta. EE 9 □ Anillo de bloqueo de la cubierta Instalación de la bombilla Instale las bombillas correctas consultando las marcas o las etiquetas en la lámpara para conocer el voltaje máximo.
Cuidado y limpieza □ No use limpiadores que contengan agentes químicos, solventes o abrasivos fuertes. Use solo un paño suave y seco para desempolvar o limpiar cuidadosamente el producto. □ Para limpiar la lámpara, desconecte la alimentación apagando el interruptor de circuito o retirando el fusible de la caja de fusibles y use un paño limpio seco o levemente húmedo para la superficie exterior de la lámpara.
Conserve este manual para futuras consultas. ¿Tiene alguna pregunta o algún problema? ¿Le faltan piezas? Antes de volver a la tienda, llame al Servicio de atención al cliente de Design Solutions International De lunes a viernes, de 9.30 a 15 h EST 1-800-388-6141 ext. 216 Para obtener ayuda de nuestro Servicio de atención al cliente y la respuesta más rápida, envíenos un correo electrónico a CustomerSupport@DSILighting.com Conserve este manual para futuras consultas.