
User`s guide
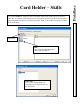

DataBase
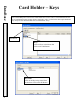
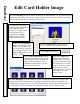
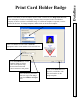
Edit Card Holder Image
50
From the
Edit Image
Screen the Image selected can be edited manually with the controls located
in the lower left section of the screen. Use any of the property controls as well as the Crop Image
tool to make changes to the Card Holders stored image.
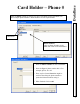
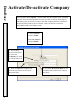
The
Auto Edit Image
screen automatically applies 12 different adjustments to the image and
displays each one in a different frame. The Image is automatically adjusted 12 different ways
and displayed in separate frames. Click on the Image that best suits your taste and then return to
the Edit Image Tab where the image can be edited further and saved by clicking on OK.
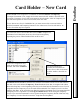
The Image just captured or
imported will be displayed in
the Card Holder Image
Window to the right. If there
are other Image Types
defined select an Image
Type and the associated
Image will be displayed.
Click on the
Control Slide
Bars to make changes to the
Image. The slide bar can be
moved precisely to make the
exact change necessary. The
Restore Image can be used
until it is saved.
Click on
Re
-
Capture Image
to retake
the image of the Image Type selected.
Clicking here will take you to the File
Import or Image Capture Screens
depending on What Image Type has
been selected on the left.
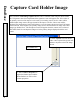
Click on this
Import File
Button to import the card
holders picture. This button
is typically
used where image
files from an off-site facility
could be used as the primary
image instead of the live
video capture that is typically
performed for the card
holders on-site.
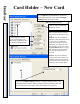
Use the
Cropping Frame
to better center the
subject or to remove unwanted background.
Click on OK when finished.