
User`s guide

DataBase
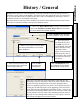
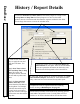
History / Report Details
82
6. Enter the
Start Date
and
Start Time
that the History Report is to begin. Enter
the Stop Date and Stop Time the History Report is to end. Use the small
up/down arrows to increment and decrement the segments within the date fields.
Use the large down arrow to access the calendar menu.
7. Click on one of the two
ways to apply the start and
stop times and dates. Use
either:
Apply Start Time to Start
Date and Stop Time to Stop
Date. The report will
encompass all time between
the start and stop dates and
times.
Apply the Start and Stop
Time to Each Day of the
period from the Start Date to
the Stop Date. For Example
with this selected the report
is run from the start time to
stop time on each of the days
between the start date and the
stop date.
8. Select this to have the system
Sort the History by
Time and Date for the report. If this is not selected the
events are reported in the manner in which they were
received at the PC designated as the Comm Server.
Complete the series of 4 questions that are remaining
before clicking on Build Report. See page 80.
9. Select this field to instruct the system to configure for a
Time
and Attendance Report. Select this for Time and Attendance
only, it does not have to be selected for any other report.
See next page.
Faster History Searches can be achieved by selecting specific
card holders and specific events. Leaving either All Card
Holders or All Events checked will not use the fast search.