
User Manual


DTC COMMUNICATIONS, INC.
5
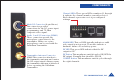
When you have selected the channel you need, push the RF button to
start transmitting again. The RF LED will turn ON. The transmitter
RF should always be set to ON. The vest is deactivated by
disconnecting power.
NOTE: The RF switch should remain ON during normal use. The RF
automatically shuts off during programming to prevent accidental
transmissions on unintended frequencies. DO NOT HOLD THE RF
BUTTON DOWN FOR MORE THAN ONE SECOND, or the unit will go
into sleep mode. In sleep mode, the unit is non-functional. If
necessary, recover from sleep mode by pressing and holding the RF
button for more than two seconds.
5. When power is applied, the transmitter will power-up to its last RF
ON/OFF state. Ensure that the green RF LED turns ON indicating the
unit is transmitting. If needed, push the RF button to begin
transmitting.
The channel number LED also turns ON, representing the most recent
channel setting from the last time the transmitter was used.
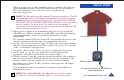
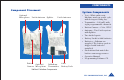
6. Put the vest on (refer to photos page 6). Tighten the Velcro side straps so
that the system components are held closely to the body. The rear flap
of the vest should be hanging loose.
7. Orient the camera on the Velcro for a proper (right side up) picture.
8. Put the shirt on over the vest. Button the camera through the
appropriate buttonhole in the shirt. (See photos right.)
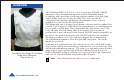
9. Test the system. Verify the camera is properly positioned by looking at
the receiver’s monitor. Walk quickly for a few steps, returning to the
monitor. Make sure the camera’s field of view has not changed.
Reposition if necessary. Double-check the camera picture and angle
before the mission.
Your Transmitter is now operational. Confirm its signal with your
Palladium Receiver.
NOTE: The red ALARM LED typically indicates no video input.
It could also indicate a hardware failure or low battery power.
Button Camera
The camera position can be adjusted to
desired button hole.
Casual Shirt
QUICK START