
Installation manual


DTS-6 Installation Manual Section 4: Checkout and Adjustment
4-1
IV. CHECKOUT AND ADJUSTMENT PROCEDURE
A SPL meter and the DTS technician’s kit (not included with the DTS system) are required to
complete the checkout and adjustment procedure. The technician’s kit consists of:
- a DTS 6-track Rev. DS1 (or C) Setup disc (to adjust DTS-6 levels)
- the DTS BUZZ AND BILL SHOW disc (to test the DTS system), dated Feb 1, 1999
- the DTS Demo film (used with the BUZZ AND BILL SHOW disc)
- a DTS Empirical test disc (to test the theater’s sound system), dated June 7, 1997
- a DTS trimpot tweeker
- a DTS T-shirt
4.1 Setting SPL (Sound Pressure Level)
The theater sound processor’s B-chain should be checked and adjusted before the DTS system is
installed. Any changes to the B-chain will effect the output levels on the DTS system.
Introduction
The output levels are factory preset at 250mV rms. This nominal level will insure that speakers
will not be overdriven during the setup procedure. If the DTS-6 processor you are about to
install has come from another theater installation, be sure to turn down the level trimpots (CCW)
before proceeding to guard against accidental overdriving of speakers.
Subwoofer
The DTS subwoofer output level ranges from 20Hz to 80Hz, up to 27dB above reference
(112dB). You must observe your subwoofer’s specifications to avoid damage to the speaker.
If a subwoofer is driven below its cutoff frequency, its driver(s) may become unloaded. When
unloaded, the voice coil can travel outside of the magnet’s gap, thus overheating or causing
mechanical damage to the speaker. A high pass filter should be installed on those speakers with
high cutoff frequencies. Contact your speaker manufacturer for more information.
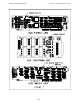
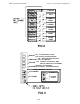
Setting DTS-6 Levels
Turn power on and insert the SETUP DISC (mentioned above). After a delay of about 40
seconds, the SYSTEM light will blink, then the DIGITAL light and the CD-ROM light will illuminate
and the cinema processor will change to digital format. Tone should be heard in the theater.
Open the screen curtains. Go into the theater to make SPL readings in the rear third and just off-
center of the room. Do not simply point the sound pressure level meter out of the port hole
window. This will not give you accurate SPL readings. See the next page for SPL level settings.
(continued)