
Installation manual


DTS-6 Installation Manual Section 5: Operation
5-1
V OPERATION
•
••
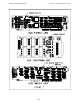
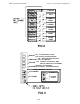
• Threading Timecode Reader: Refer to Figure 5. Make the same size loops through
the projector as you did when checking the offset number.
•
••
• Verifying Movie Discs
Make sure your discs match the movie (e.g. “Jurassic Park” film with “Jurassic Park”
movie discs). If the film and discs don't match the digital sound track will not play.
For movies running over 90 minutes, you should receive two movie discs: one labeled
6-track A and another labeled 6-track B. The two discs can be inserted into the
drives in any order.
For movies running at or under 90 minutes, you should receive one movie disc. These
movie discs will be labeled “one disc only”. You may place the single disc into either
drive. Do not put any other disc in the remaining drive.
A disc labeled STEREO will not play properly in your system.
•
••
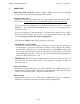
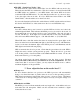
• Loading Discs into the DTS-6
Turn power on. Press the eject button of both drives to remove any discs that may be
left in the drives. Any discs present will eject after 3 seconds. Remove the old discs
from the drives. Open drive door, and slowly push the new CD-ROM (in caddie) into
drive. When about 1/2 inch of caddie is left sticking out of the drive, the drive will
automatically pull in the disc. Do not eject any disc from the DTS-6 while playing in
digital as it will cause the unit to reset.
IMPORTANT: Whenever discs are changed from one movie to another, eject the old
discs, insert the new discs, wait for discs to seat, turn power off, wait 2 seconds and
then turn power on.
•
••
• Before The Show
Remember to add the DTS trailer (logo) film to the head of the DTS encoded movie.
Cut the trailer at about six frames after fade-out (should still have timecode) and splice
directly to the first frame picture (of the movie) with timecode.
•
••
• Fader Setting
Most faders should be set to “7”. This may be readjusted for best play in your theater.
NOTE: In some theaters, the subwoofer will not change with the fader.