LDG DTS-6/6R Desktop Coaxial Switch / Remote LDG Electronics 1445 Parran Road, PO Box 48 St. Leonard MD 20685-2903 USA Phone: 410-586-2177 Fax: 410-586-8475 ldg@ldgelectronics.com www.ldgelectronics.
LDG DTS-6/6R Desktop Coaxial Switch / Remote Table of Contents Introduction Jumpstart, or “Real hams don’t read manuals!” Specifications Getting to know your DTS-6 2 3 3 3 About the Radio Sense feature Installation Operation 6 7 8 Selecting an antenna 8 Grounding all inputs 8 Setting Radio Sense mode On and Off 8 Application Notes Remote Control Protocol Technical Support Warranty and Service Feedback 8 9 12 12 12 Introduction Congratulations on selecting the LDG DTS-6 desktop coaxial switch.
Jumpstart, or “Real hams don’t read manuals!” Ok, but at least read this one section before you transmit: 1. Attach the RF input jack (center connector, marked TX) to your transmitter or transceiver with a 50 ohm coaxial jumper cable. 2. Attach your antennas to the other RF ports. 3. Connect a 12 volt power supply capable of providing 500 ma to the 2.5 x 5.5 mm coaxial power jack (center positive). 4. Press a front panel button to select the desired antenna.
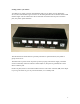
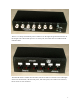
Getting to know your DTS-6 Your DTS-6 is a quality, precision instrument that will give you many years of outstanding service; take a few minutes to get to know it. On the front panel there are six buttons and six LED indicator lights. The six buttons select the six antennas connected to the rear ports. Pressed in pairs, they select special functions. The red LEDs show which antenna is presently selected. For special functions, they blink in groups of two or six. The DTS-6 has no power switch.
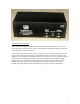
The 2.5 x 5.5 mm jack coaxial DC power connector is on the right. The ground connection is via the wingnut. The control cable input is a 1/8" stereo jack; the control cable is included with the DTS-6R remote. The DTS-6R remote is smaller than the DTS-6, but has the same six switches and six LED lights on the front. On the back, it has the same power, and control jacks, and a radio sense connector, but of course no coax connectors.
About the Radio Sense feature Radio Sense is an exclusive LDG feature that automatically grounds all inputs when you turn your radio off. It is available only if you are using the DTS-6 with the DTS-6R remote; the DTS6 by itself does not support this feature. A sense line connects the DTS-6R to any DC output port on your radio providing at least 2 volts DC at 1 ma when the radio is turned on; most modern radios have at least one such DC output.
Installation The DTS-6 and -6R are intended for indoor use only; they are not water resistant. If you use them outdoors (Field Day, for example) you must protect them from rain. Position your DTS-6 in a convenient spot on your operating desk, as close to your transceiver or transmitter as practical. If you are using the DTS-6R remote, you can position the DTS-6 switch anywhere within reach of the control cable.
Operation Your DTS-6/6R has no power switch; it powers up when you plug it in. The relay associated with the selected antenna is energized and draws current all the time. Operation is exactly the same whether you use the DTS-6 directly, or remotely with the DTS-6R remote control. Selecting an antenna Never attempt to change antennas while transmitting. If you attempt to do so, the DTS-6 will not switch, and all six LEDs will flash to indicate the error condition.
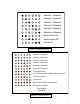
Antenna 1 Selected Antenna 2 Selected Antenna 3 Selected Antenna 4 Selected Antenna 5 Selected Antenna 6 Selected Radio Sense On Radio Sense Off Ground All Button Command Summary Antenna 1 Selected Antenna 2 Selected Antenna 3 Selected Antenna 4 Selected Antenna 5 Selected Antenna 6 Selected Radio Sense On* Ant.
Remote Control Protocol The control port of your DTS-6 is in fact a serial I/O port compatible with standard USB ports. In the future, LDG may release Windows software and a USB cable enabling you to control your DTS-6 from your PC! In the meantime, this section documents the control protocol; you can write your own software to control the switch. The protocol below describes the dialog between the DTS-6R remote and the DTS-6 switch.
Codes sent by the DTS-6R remote to the DTS-6 switch R 00 - Remote is telling main unit that buttons 4&5 were pushed – user wants to ground all antennas. R 01 - Not used. Remote doesn’t give the command to ground all. R 02 - Remote tells main unit that button 1 is selected – user wants to select antenna 1. R 03 - Remote tells main unit that button 2 is selected – user wants to select antenna 2. R 04 - Remote tells main unit that button 3 is selected – user wants to select antenna 3.
Care and Maintenance Your DTS-6/6R switch/remote are essentially maintenance-free; just be sure to observe the power and voltage limits discussed in this manual. Never attempt to change antennas while transmitting; always switch in receive mode. The outer case may be cleaned as needed with a soft cloth slightly dampened in a mild household cleaning solution. As with any modern electronic device, your DTS-6/6R can be damaged by temperature extremes, water, impact or static discharge.