XDMA6415 INSTALLATION/OWNER'S MANUAL AM/FM/CD/MP3/WMA Receiver with Detachable Face
XDMA6415 INSTALLATION Preparation Please read entire manual before installation. Before You Start • Disconnect negative battery terminal. Consult a qualified technician for instructions. • Avoid installing the unit where it would be subject to high temperatures, such as from direct sunlight, or where it would be subject to dust, dirt or excessive vibration. Getting Started • Remove trim ring from unit, • Remove 2 transit screws located on top of the unit.
XDMA6415 INSTALLATION Wiring Diagram RCA Connections Right Channel (Red) Left Channel (White) REAR SUBWOOFER FRONT FRONT SUB/W L-CH R-CH REMOTE IN Antenna Connector Steering Wheel Interface Input (PAC SWI-PS required) BLACK Bluetooth Microphone Input Connect the included Bluetooth microphone. Bluetooth Microphone (must be connected for Bluetooth functionality) FUSE When replacing the fuse, make sure new fuse is the correct type and amperage. Using an incorrect fuse could damage the radio.
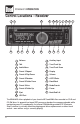
XDMA6415 OPERATION Control Locations - Receiver 1 2 21 20 19 18 17 3 4 5 16 15 14 6 7 13 8 9 10 11 12 1 Release 12 Auxiliary Input 2 Talk 13 Tune/Track Up 3 Audio/Menu 14 Tune/Track Down 4 Preset 1/Repeat 15 Display 5 Preset 4/Play/Pause 16 Volume 6 Preset 2/Random 17 AS/PS/Enter 7 Preset 5/Folder Down 18 Band/Back 8 Preset 3/Intro 19 Mode/Search 9 Preset 6/Folder Up 20 Power 10 Eject 21 Mute/End Call 11 USB Port The XDMA6415 allows playback of
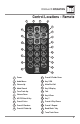
XDMA6415 OPERATION Control Locations - Remote 1 2 4 3 5 21 6 20 7 19 8 9 18 10 17 11 12 16 13 15 14 1 Power 11 Preset 5/Folder Down 2 Audio/Menu 12 Key 9/EQ 3 Volume Up 13 Mute/End Call 4 Mode/Search 14 Key 0/Display 5 Tune/Track Up 15 Talk 6 Volume Down 16 Key 8/Scan 7 AS/PS/Enter/# Key 17 Key 7 8 Preset 3/Intro 18 Preset 4/Play/Pause 9 Preset 2/Random 19 Preset 1/Repeat 10 Preset 6/Folder Up 20 Band/Back/* Key 21 Tune/Track Down 5
XDMA6415 OPERATION General Operation Faceplate Removal Semi-Permanent Faceplate Installation Press RELEASE and pull away from the left side to remove. To re-install, insert right side of faceplate first then push left side to secure. Remove trim ring and install supplied #1 x 7/32” Phillips head screw through left side of mounting frame into faceplate. Power On/Off Press POWER or any other button (except eject) to turn the unit on. Inserting a disc will turn the unit on automatically.
XDMA6415 OPERATION General Operation Reset Press to RESET the unit upon initial installation or if abnormal operation occurs. Reset button is located behind the faceplate. Set the Clock With the unit on, press and hold DISP until the clock begins to flash, then release. Press TUNE to adjust the hours and TUNE to adjust the minutes. Press DISP momentarily to save the selected time. nn ll 12/24-hour Clock Setup Menu The clock will display 12-hour AM/PM time in USA frequency spacing mode (PM 10:00).
XDMA6415 OPERATION General Operation Audio Press AUDIO/MENU momentarily to select between Volume (default), Bass, Treble, Balance, & Fader. VOLUME BASS TREBLE BALANCE FADER SUBWOOFER Bass Press AUDIO/MENU until BAS appears then rotate volume left/right to adjust ( -6 minimum / +6 maximum). Treble Press AUDIO/MENU until TRE appears then rotate volume left/right to adjust ( -6 minimum / +6 maximum).
XDMA6415 OPERATION Seek Tuning Manual Tuning AM/FM Tuner Operation Press TUNE nn or TUNE ll momentarily to seek the next strong station. nn ll Press TUNE or TUNE for more than two seconds, then release. "MANUAL" will momentarily appear in the display. Press TUNE or TUNE momentarily to move radio frequency up or down one step at a time. Press and hold to advance quickly. If tuning is not adjusted for five seconds, the unit will return to seek tuning mode (default).
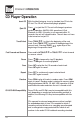
XDMA6415 OPERATION CD Player Operation Insert CD Eject CD Track Select Fast Forward and Reverse Pause Scan Repeat Random CD-R/CD-RW Compatibility With the label facing up, insert a standard size CD into the CD slot. The CD will automatically begin playback. Press to eject the CD. The unit will change to previous mode of operation (AM/FM, AUX, operation of iPod, Bluetooth or USB). If the disc is not removed within 10 seconds, the unit will reload the disc.
XDMA6415 OPERATION CD Player Operation - MP3/WMA Files Playing an MP3/WMA Disc When an MP3/WMA encoded disc is first inserted, “READING” will appear in the display. Depending on the number of files and folders, this may take several seconds. Displaying Information Press DISP to select between track number/elapsed time (default), clock, track name, directory name, title, artist and album. “NO ID3 TAG” will be displayed if the MP3 file contains no ID3 tag information.
XDMA6415 OPERATION CD Player Operation - MP3/WMA Files Direct Select and Navigate Modes Press SRCH for more than 3 seconds, to select between the following modes: • Direct File Select • File or Folder Navigate Direct File Select Step 1 Press SRCH for more than 3 seconds, then release. “MP3 T " or “WMA T ” will flash in the display. * * Step 2 Turn the volume knob to change to the desired track number.
XDMA6415 OPERATION CD Player Operation - MP3/WMA Files Navigating Note *Folder Access After navigating by direct select or file/folder navigate modes, the track number and elapsed time will be displayed by default. Press DISP momentarily to select clock, track name, directory name, title, artist and album. Press to select the previous folder. Press to select the next folder. *Folder access is only available on MP3/WMA discs recorded with more than one folder.
XDMA6415 OPERATION CD Player Operation - MP3/WMA Files Media Compatibility The following types of discs/files are compatible: • CD-ROM (ISO), CD-R, CD-RW • CD-DA • MP3 data • WMA data The following types of discs/files are not compatible: • WMA files that are protected by DRM (Digital Rights Management).
XDMA6415 OPERATION CD Player Operation - MP3/WMA Files Additional MP3/WMA Information An internal buffer provides ESP (Electronic Skip Protection) to virtually eliminate skipping. When playing a disc recorded with regular audio files (CD-DA or .WAV) and MP3/WMA files, the unit will play the MP3/WMA files only. Only MP3 files with filename extension (.mp3) can be played. Only WMA files with filename extension (.wma) can be played.
XDMA6415 OPERATION USB Operation - MP3/WMA Files (Optional) Connecting a USB Device (sold separately) Playing Music Displaying Information Play MP3/WMA files from most mass storage devices by connecting them to the XDMA6415's USB port. To connect a USB device, line up the connectors and insert the USB device into the port. The USB icon will appear in the display. Press MODE to enter USB mode. When a USB device is first connected, “READING” will appear momentarily in the display.
XDMA6415 OPERATION USB Operation - MP3/WMA Files (Optional) Direct File Select Press SEARCH for more than three seconds, then release. "T*" will appear in the display. Use the volume knob to select the desired track number and press to confirm. Note: When a file is accessed, the elapsed time will be displayed. Press DISP momentarily to select track number, clock, track name, directory name, title, artist or album. *Folder Access Press to select the previous folder.
XDMA6415 OPERATION USB Operation - MP3/WMA Files (Optional) Track Select Press TRACK ll to skip to the beginning of the next track. Press TRACK nn to return to the beginning of the current track. Pressing TRACK nn again skips to the beginning of the previous track. Fast Forward and Reverse Pause Media Compatibility ll Press and hold TRACK or TRACK forward or reverse a track. Press Press nn to fast temporarily stop USB playback. ll// IIII toagain to resume playback.
XDMA6415 OPERATION USB Operation - MP3/WMA Files (Optional) Additional MP3/WMA Information Sampling Frequency Rates MP3 WMA Transfer Bit rates MP3 WMA Only MP3 files with filename extension (.mp3) can be played. Only WMA files with filename extension (.wma) can be played. Do not attempt to play non-MP3/WMA files with the MP3/ WMA extension.
XDMA6415 OPERATION Operation of iPod Connect iPod Device (Not Included) Use the included 2-wire cable to connect an iPod device to the XDMA6415. Press MODE to select the operation of iPod mode. Playback will begin automatically. If a song is playing on the iPod device before it is connected, it will continue to play. Note: Both the USB and auxiliary input connections must be made when connecting the 2-wire cable.
XDMA6415 OPERATION Fast Forward and Reverse Pause Intro Repeat Operation of iPod Press and hold ll or nn to fast forward or reverse a song. Press Press temporarily stop playback. ll// IIII toagain to resume playback. Press INT to play the first 10 seconds of each song. Press INT again to cancel. Press RPT to continuously repeat selected song. Press RPT again to cancel. It is not possible to select songs in repeat mode. Random Press RDM to play all songs in random order.
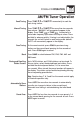
XDMA6415 OPERATION Bluetooth® Operation Overview The XDMA6415 supports the HFP (hands-free profile), A2DP (advanced audio distribution profile) and AVRCP (audio video remote control profile). Preparation Before you can use a mobile device with this head unit, it must be connected and authenticated - commonly referred to as "pairing" a device. Please make sure that Bluetooth is activated on your mobile device before you begin the pairing process.
XDMA6415 OPERATION Bluetooth® Operation Description Function Press Making a Phone Call Last Number Dialing Receiving a Phone Call once. An "_" will appear on the display. Input the desired phone number using the 0-9, *, # buttons on the remote control. Press to begin dialing. A phone call may be placed from your mobile device using the keypad, phone book or speed dial. When a call is placed from a mobile device, “DIALING” will appear on the head unit display.
Bluetooth® Settings Menu Function Options BT ON Bluetooth Mode BT OFF ACNT ON Auto Connect ACNT OFF AANS OFF Auto Answer Bluetooth Audio AANS ON SPK 2-CH SPK 4-CH Action Enables Bluetooth mode. The Bluetooth icon will flash every 10 seconds. Disables Bluetooth support. Allows reconnection to the most recently connected mobile device. Note: Some mobile devices do not support this feature. Disables the auto connect feature. You must press every time to connect a mobile device.
Limited One Year Warranty This warranty gives you specific legal rights. You may also have other rights which vary from state to state. Dual Electronics Corp. warrants this product to the original purchaser to be free from defects in material and workmanship for a period of one year from the date of the original purchase. Dual Electronics Corp.
XDMA6415 OPERATION Troubleshooting - General Problem Unit will not turn on (no power) Unit has power (but no sound) Unit blows fuses Excessive skipping Cause Action Yellow wire not connected or incorrect voltage Check connections for proper Red wire not connected or incorrect voltage voltage (11~16VDC) Black wire not connected Check connection to ground Fuse blown Replace fuse Speaker wires not connected Check connections at speakers One or more speaker wires touching each other or touching cha
XDMA6415 OPERATION Specifications CD Player Frequency response: 10Hz-20kHz Channel separation @ 1kHz: >65dB D/A converter: 1 Bit FM Tuner Tuning range: 87.5MHz-107.9MHz Usable sensitivity: 8.5dBf 50dB quieting sensitivity: 10dBf Stereo separation @ 1kHz: 40dB Frequency response: 30Hz-13kHz AM Tuner Tuning range: 530kHz-1710kHz Usable sensitivity: 22uV Frequency response: 30Hz-2.
Dual Electronics Corp. Toll Free: 1-866-382-5476 www.dualav.com ©2010 Dual Electronics Corp. All rights reserved. Windows Media and the Windows logo are trademarks, or registered trademarks of Microsoft Corporation in the United States and or other countries. Other trademarks and trade names are those of their respective owners. iPod is a trademark of Apple Inc., registered in the U.S. and other countries.