CS 529 DE: Betriebsanleitung: Hi-Fi Plattenspieler mit Vollautomatik Seiten 2 - 11 EN: Instruction Manual: Hi-Fi Turntable fully automatic Pages 13 – 24 FR: Manuel d'utilisation: Tourne-disque Hi-Fi automatique Télécharger depuis l'internet BDA CS ϱ29_V1_DE_EN
Inhaltsverzeichnis Inhalt Seite Inhaltsverzeichnis 2 Technische Daten 3 Vorwort 4 4 4 4 4 Zielgruppe dieser Bedienungsanleitung Warnhinweise Richtlinien und Normen Entsorgungshinweise Hinweise zur Handhabung Sicherheitshinweise Bestimmungsgemäße Verwendung Lieferumfang / Verpacken 6 Geräteübersicht 7 Aufbau 8 8 8 8 8 8 8 8 9 9 9 Plattenteller montieren Tonarm Tonarmkopf montieren Tonarm-Gegengewicht montieren Tonarm ausbalancieren Auflagekraft einstellen Anti-Skating-Einstellung Abdeckhaube
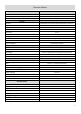
Technische Daten Antrieb Technische Änderungen und Irrtümer vorbehalten. Die Abmessungen sind ungefähre Werte.
Vorwort Diese Bedienungsanleitung hilft beim bestimmungsgemäßen und sicheren Gebrauch des Gerätes. Die Bedienungsanleitung aufmerksam durchlesen und für den späteren Gebrauch aufbewahren. Insbesondere die enthaltenen Sicherheits - und Warnhinweise müssen beachtet werden, um mögliche Gefahren beim Gebrauch des Gerätes abzuwenden. Zielgruppe dieser Bedienungsanleitung Die Bedienungsanleitung richtet sich an jede Person, die das Gerät • aufstellt, • bedient, • reinigt oder • entsorgt.
Hinweise zur Handhabung Alle Sicherheitshinweise sorgfältig durchlesen und diese Bedienungsanleitung für spätere Fragen aufbewahren. Alle Warnungen und Hinweise in dieser Bedienungsanleitung befolgen. Sicherheitshinweise zum Umgang mit dem Steckernetzteil Das Steckernetzteil darf nur an eine Netzspannung von 100-240 V~, 50/60 Hz angeschlossen werden. Niemals das Steckernetzteil mit einer anderen Spannung betreiben. • Nur das mitgelieferte Steckernetzteil verwenden.
Lieferumfang / Verpacken Auspacken 1) 2) 3) Bitte erst das Gerät und alle Zubehörteile aus der Verpackung entnehmen. Klebestreifen und Transportbänder entfernen. Sicherstellen, dass alle nachfolgend aufgeführten Teile vorhanden sind: Hinweis: • Die Kleinteile befinden sich in den Seiten der Styroporverpackung! • Die Schutzkappe für die Nadel am Tonarmkopf nicht wegwerfen! • Behalten sie die Verpackung für zukünftige Transporte! Lieferumfang 1. 2. 3. 4. 5. 6. 7. 8. 9. 10.
Geräteübersicht 1 14 15 2 18 3 16 4 13 19 17 20 12 11 10 21 22 23 5 Nr 1 2 3 4 5 6 7 8 9 10 11 12 13 14 15 16 17 18 19 20 21 22 23 6 7 8 9 Beschreibung Scharniere der Abdeckhaube (2×) Plattenteller Plattentellerbelag Plattentellerachse Umschalter PHONO / LINE RCA-Audio-Ausgang GND: Erdung (Masseanschluss) Netzschalter DC IN: 12 V-Anschluss für Steckernetzteil Bluetooth Bedienung Wiederholung Start / Stopp & Geschwindigkeitswahl Tonarm Gegengewicht Auflagekraftskala Tonarmlift Tonarmablage mit H
Aufbau Plattenteller mit Riemen montieren Der Antriebsriemen liegt bereits auf der Riemenlauffläche des Plattentellers auf. Der Riemen wird mit dem roten Band um die Antriebsrolle des Motors gezogen. (Abb. 1) 1. Den Plattenteller auf die Plattentellerachse aufsetzen. Den Plattenteller so drehen, dass die Antriebsrolle in der Aussparung erscheint (auf ca. 08.00 Uhr-Position). 2. Ziehen Sie den Riemen mit dem roten Band und legen Sie ihn mittig über die Antriebsrolle. Entfernen Sie dann das rote Band. 3.
Aufbau Abdeckhaube montieren 1. Die Scharniere (2) in die Halterungen (3) auf der Rückseite des Gerätes stecken. 2. Die Abdeckhaube (1) dann auf die beiden Scharniere (2) stecken. Plattenspieler am Verstärker anschließen Der Plattenspieler verfügt über einen eingebauten Entzerrer-Vorverstärker und kann sowohl an einen Phono-Eingang als auch an einen AudioEingang (AUXIN, LINE) angeschlossen werden. Über einen Schiebeschalter (1) kann der eingebaute Entzerrer-Vorverstärker ein- und ausgeschaltet werden.
Bedienung Abnehmen / Anbringen der Nadelschutzkappe Vor der Wiedergabe einer Schallplatte muss die Nadelschutzkappe vom Tonabnehmer entfernt werden. (Abb. 1) Abb.1 1 A) Halten 1. Die Nadelschutzkappe (2) nach vorne vom Tonabnehmer (1) abziehen. 2. Die Nadelschutzkappe nach der Wiedergabe wieder aufstecken. 2 C) Abziehen B) Drücken Schallplatte abspielen (manuell) 1. Den Netzschalter (8) einschalten. Die LEDs Bluetooth und „33‘“ leuchten rot und blau. (Abb. 2). 2.
Bluetooth Operation Installation App am Mobilgerät QR Code: apple und android Playstore: Apple: link xxxxxxxxx link xxxxxxxxx Mobilgerät Einstellungen 1) Bluetooth einschalten. 2)Für Android: Standort einschalten. Verbindung Fernbedienung herstellen Die Bedienmöglichkeiten in der App und auf dem Plattenspieler sind identisch. BLE Menü öffnen Connect drücken Bereit = Zustand wird angezeigt „Pairing“ Taste am Mobilgerät, oder am Plattenspieler drücken.
Reinigen und Fehlerbehebung Nadel und Platte reinigen Die Nadel und die Platte sollten vor dem Abspielen stets gereinigt werden, um eine vorzeitige Abnutzung zu verhindern. Beschädigung von Bauteilen! 1. Mit einem Reinigungspinsel von hinten nach vorne über die Nadel streichen. 2. Zur Reinigung der Platte mit einer Carbon- Faserbürste leicht schräg über die Platte wischen. Hinweis: Zubehör ist in unserem Shop unter www.dual.de erhältlich.
Contents Page Contents 13 Technical specifications 14 Preface 15 15 15 15 15 Intended users of this operating manual Warnings Directives Disposal Safety Intended use and application 16 16 16 List of contents / Packing instruction 17 Product overview 18 Set Up 19 19 19 19 19 19 19 19 20 20 20 Safety instructions Platter and belt installation Tonearm Fitting the Headshell Counterweight fitting Balancing the tonearm Tracking force Anti-Skating-adjustment Dust cover fitting Connection to amplif
Technical Specifications Motor Drive Belt / DC Servo-controlled Motor with optical speed control Speed settings Wow & Flutter 33/45/78 < ±0,08 % (DIN WTD) Tonearm Function Bearing Effective length Offset Angle All functions can be fully automatic or manually operated Ball-bearing / Twin Gimbal Mounting 221,5 mm 25,6° Overhang Type Stylus Pressure Range Cartridge Weight Range 19 mm statically balanced with counterweight 0 to 4 g 5 g to 9 g Factory installed Pick-up Replacement Stylus Ortofon 2M Red
Preface This instruction manual will help you to operate the turntable in a safe way. Please read this manual and the safety notices carefully before using the unit and keep them for later use. Be sure to make them accessible to other users and observe all information given here. Intended users of this operating manual This operating manual is intended for everyone who: • sets up, • operates, • cleans • or disposes of the record player.
Safety instructions Please read through all of the safety instructions carefully and keep them for questions that may arise later. Always observe all warnings and instructions in this operating manual and on the rear of the unit. Safety instructions for using the power supply • The unit should only be connected to a mains voltage supply of 100- 240 V~, 50/60 Hz. • Never try to operate the unit with a different voltage. • Only use the supplied power supply or an original Dual alternative.
List of contents / Packing instructions Unpacking 1) 2) 3) First, remove the appliance and all associated parts from the packaging. Remove all adhesive tapes. Ensure that all listed components are present: Note: • • • The small components are in the side compartments of the polystyrene packaging sections! Do not throw the stylus guard for the needle away! Retain the packaging for any possible future transportation! List of contents 1. 2. 3. 4. 5. 6. 7. 8. 9. 10.
Product overview 1 14 15 2 18 3 16 4 13 19 17 20 12 11 10 21 22 2 23 5 Nr 1 2 3 4 5 6 7 8 9 10 11 12 13 14 15 16 17 18 19 20 21 22 23 18 6 7 8 9 Description Dust cover hinges (2×) Platter Platter mat Platter bearing PHONO / LINE Switch RCA-Audio-Output R / L GND: Ground connection Power switch DC IN: 12 V-Input for Power supply Bluetooth control Repeat Start / Stop & Speed selector Tonearm Counterweight Tracking force dial Tonearm lift Tonearm rest with safety fasterner Anti-Skating-Adjustment
Set Up Platter and belt installation Tape The record player is delivered with the drive belt already fitted around the platter flange. The belt is provided with a red tape so that it can be pulled over the drive motor pulley. (pic. 1) 1. Place the platter on the platter bearing. Rotate the platter until the cut-out is positioned over the motor pulley (at about the 8 o'clock position). 2. Using the red tape, pull the drive belt over the motor drive pulley and position it in the centre of the pulley.
Set Up Dust cover fitting 1. 2. Slot both hinges (2) into the housings (3) in the back of the turntable. Uniformly push the right and left dust cover (1) receptacles onto the hinges Connection to Amplifier The turntable comes with a built-in phono pre-amplifier. It can be either connected to the phono input or the line input at the amplifier. The built-in phono stage can switched on or off via a switch in the back of the turntable. Phono-Input 1. 2. 3.
Operating the turntable Removing / Attaching the stylus protection cap Pic. 1 1 Remove the stylus protection cap from the pick-up (1) prior to playing a record. (Pic.1) A- Hold 1. Push the stylus cap (2) on the bottom (B) as seen in the diagram. Hold in position (A) while move it up in circular motion (C). 2. Replace the cap after playing the record. 2 C- Move B-Push To play the record (manually) 1. Push the power button (8). The LEDs for Bluetooth and “33” will light up red and blue (Pic.2). 2.
Operating Bluetooth Install App on Mobile Device QR Code: apple und android Playstore: Apple: link xxxxxxxxx link xxxxxxxxx OUTSTANDING CONTENT Mobile Devise Settings 1) Enable Bluetooth. 2) Android only: Enable Location. Connect the Remote-Control Function The operating options are identical on the turntable and the mobile device. Open the BLE Menu Press Connect Ready = Status is indicated Press the „Pairing“ button on the mobile device, or the turntable.
Cleaning & Troubleshooting Cleaning stylus and record Clean the stylus and record prior to every record played. That minimises premature wear and tear. Damage to components! 1. Carefully wipe the stylus brush in a front to back motion under the stylus. 2. To clean a record, use a carbon fibre brush to wipe gently and diagonally over the record. Note: Brushes and accessories are available in the Dual shop: www.dual.
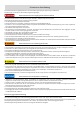
FCC statement in User’s Manual (for class B) -for FCC 15b devices (15.105) Federal Communication Commission Interference Statement This equipment has been tested and found to comply with the limits for a Class B digital device, pursuant to part 15 of the F CC rules. These limits are designed to provide reasonable protection against harmful interference in a residential installation.
FCC/IC Caution: 1. This device complies with Part 15 of the FCC rules/ Industry Canada licence‐exempt RSS standard(s). Operation is subject to the following two conditions : 1) this device may not cause harmful interference and 2) this device must accept any interference received, including interference that may cause undesired operation. 2. This Transmitter must not be co-located or operating in conjunction with any other antenna or transmitter. 3.