
Installation Guide

1. Ensure that the wall bracket is mounted properly to handle applied loads as wall construction may vary.
2. The wall bracket must be securely fixed to wall with all screws fastened tightly.
3. Do not make any modification to bracket assembly or fixings.
4. Check that all screws and bolts are secured tightly before placing the unit on it.
5. Bracket is designed for masonry wall mount, for stud wall mount proper blocking must be made between
studs to insure proper wall bracing will accommodate bracket weight load.
Note:
Disclaimer.
Your use and application of our products requires the customer to be responsible for product application, installation and compliance with local and environmental regulations that
are applicable including all practices of safety and safety regulations. These products are provided as is without any guarantees or warranty. Ductless supply makes no warranties
of any kind, either express or implied, including but not limited to warranties of merchantability, fitness for a particular purpose, of title, or of infringement of third party rights.
Use of the product by a user is at the user’s risk. In case of claim or dispute, all cases will be considered in accordance with our General Conditions of Sale.Use of the product by a user is at the user’s risk. In case of claim or dispute, all cases will be considered in accordance with our General Conditions of Sale.
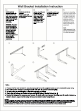
Mount crossbar
securely to wall with
anchor screws and
bolts. Insure mounting
surface is suitable for
bracket and add extra
wall supports if wall supports if
necessary.
CAUTION: Crossbar
is only to help with
proper mounting of
arms and not load
bearing. Crossbar
is not designed is not designed
to hold weight of
arms and equipment.
Arms must be
secured to wall
separately.
Install arm on the the
crossbar.
Measure and mark
proper distance for arms
on cross bar.
Double check bracket
is level and arm
alignment is correct
before any anchor
drilling. Mark hole
locations on wall and
move arms to the move arms to the
side to drill anchor
holes.
Completely unfold arms
and check all securing
hardware nuts and
washers.