
Operating instructions


9.4 Sewing process
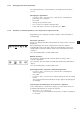
9.4.1 Switching on
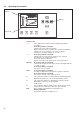
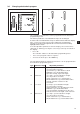
Number of
buttonhole
sequence
Buttonhole shape
Buttonhole
sequence
Rotation speed
buttonhole length
cut mode
Piece counter
–
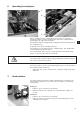
Turnonthemainswitch.
The Dürkopp Adler logo briefly appears..
–
The main screen appears.
–
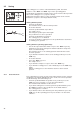
Press the “RST” key on the operating panel.
The machine moves to the insertion position and is ready for
operation.
A sketch of the buttonhole to be sewn first appears in the left half of
the display.
9.4.2 Sequence mode and single-button mode
Depending on the service-menu setting either sequence mode or
single-button mode is available.
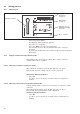
9.4.2.1 Selecting a sequence (sequence mode)
After switch-on the top line in the display appears on a dark
background. The last sewing sequence used is selected.
Selecting a different sequence
–
Press OK.
–
Use the ñ and ò cursor keys to switch from one sequence to
another.
9.4.2.2 Selecting a buttonhole (single-buttonhole mode)
If single-button mode is set in the service menu, no sequence can be
activated.
After switch-on the top line in the display appears on a dark
background. The last buttonhole sewn is displayed.
Selecting other buttonholes
–
Press OK.
–
Use the ñ and ò cursor keys to switch from one buttonhole to
another.
24