
Operating instructions


ATTENTION !
During the use of the setting program do not turn on the handwheel or
the hand crank!
–
If necessary, lower the sewing arch by pressing the
F3 key
.
–
With the setting aid still turned on the knife block can now be
moved downward with the
F4 key
.
–
By pressing the
F4
key
again the knife block can be run up again.
If the sewing arch is not lowered the knife block can not be run
downward with the
F4
key
. First the sewing arch must then be lowered
with the
F3
key
. Also the function of the
F3 key
(lift sewing arch) is
blocked with the knife lowered.
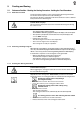
Setting the knife to cut
With the knife block lowered and the knife depth stop screwed
completely in, the knife should lay onto the plastic cutting block.
Setting:
–
Lower the knife block.
–
Slightly loosen nut 1.
–
Press the knife onto the cutting block.
–
Tighten nut 1.
–
Conduct a sewing trial and check the cut, if necessary correct the
cutting depth with the knife stop.
The incision of the knife should lie about 2 fabric threads in front of the
last sewn back tack.
Setting:
–
Loosen screw 3 and set the clearance accordingly.
Observe:
With the knife block lowered there
must
be a safety clearance of
0.5 mm
between the front edge of the knife and the slot in the needle
plate insert.
–
Tighten screw 3.
Ending the setting aid
–
Press the "
F1
" key.
The setting program is ended.
4.10 Replacing the Plastic Cutting Plate (only with Cutting Block)
–
Loosen screws 4.
–
Pry out cutting plate 5 with a screwdriver and remove it.
–
Insert a new cutting plate, press on the holder and tighten the
screws 4.
–
Conduct the setting as per the Chapter " Replacing and Setting the
Knife (Cutting Block)".
18