CAUTION! This manual contains important information for the correct installation, operation and maintenance of the equipment described herein. All persons involved in such installation, operation, and maintenance should be thoroughly familiar with the contents. To safeguard against the possibility of personal injury or property damage, follow the recommendations and instructions of this manual and keep it for further reference.
TABLE OF CONTENTS PAGE SECTION I 1-1 1-2 1-3 1-4 FIGURE 1-5 SECTION II 2-1 2-2 2-3 2-4 SECTION III 3-1 3-2 3-3 SECTION IV 4-1 4-2 4-3 4-4 4-5 SECTION V FIGURE 5-1 5-1 SECTION VI FIGURE 6-1 FIGURE 6-2 GENERAL INFORMATION General Industrial Use Only Factory Preparation Warranty Dimensions and Specifications 3 3 3 3 4 INSTALLATION Installation Procedures Limit Switch Cam Adjustment Potentiometer Installation Digital Position Indicator 5 5 5 6 OPERATIONAL PRECAUTIONS AC Motor Voltage Supply Clevis Pin
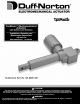
SECTION 1 GENERAL INFORMATION 1-1. General 1-4. Warranty and Warranty Repair This manual provides instructions for the installation, operation and maintenance of the Duff Norton® 3905 and 6905 Series AC Mini-Pac™ electromechanical actuator. It includes proper procedures for the disassembly, cleaning, inspection, rebuilding and assembly of the actuator. To ensure efficient, long, satisfactory use of this unit, these instructions should be followed closely.
115 V., 60 HZ, AC MOTOR 115 VAC Motor is enclosed, permanent split capacitor induction type. Load/no-load speeds are approximately equal. Equipped with thermal overload which opens and resets automatically. Standard motor requires 28-33 mfd capacitor or a 64-77 mfd capacitor for high speed motor (supplied by customer, or by Duff-Norton at additional cost) for loads up to 500 pounds.
SECTION II INSTALLATION At maximum load, repeatability is 1/8” in either direction including drift and normal wear of parts. 2-1. Installation Procedures Use Figure 6.2 on page 14 as a guide to properly attach the actuator to your power source. FOR UNITS WITH POTENTIOMETER 2-2.
travel. (For strokes shorter than 9”, the retracted resistance can be increased so that pot adjustment is less critical. b. For travels greater than 9” (multi-turn pot): i. Turn pot shaft counterclockwise until it reaches its stop. Now turn shaft back clockwise 1/4 turn. ii. Without turning pot shaft, slide pot onto engagement with the plastic worm and tighten locknut. iii. Starting 1/4 turn from the end, the 3-turn pot has enough rotation for 25” of actuator travel. 6.
SECTION III OPERATIONAL PRECAUTIONS 3-1. A.C. Motor This motor is an intermittent duty type motor having a five minute rating. Since the motor draws almost the same amperage at no load as a full rated load, it only takes 5 minutes of continuos running, regardless of how light the load may be, before the thermal overload relay cuts out. It then takes about 10 minutes before the motor cools sufficiently for the thermal relay to close.
SECTION IV MAINTENANCE 4-1. Lubrication Duff-Norton recommends the use of the following lubricant in conjunction with proper maintenance procedures of this unit: Shell Oil Co. Darina EP2. 9. Unscrew outer tube (45) from housing (22) and remove translating tube (54) screw (50), gear (41) and outer tube (45) from housing (22). 4-2. Required Tools 10 Remove translating tube (54) from outer tube (45) by slipping outer tube (45) over translating tube (54) towards clevis end.
Assemble into housing (22) end opposite side of housing with 4 holes for mounting motor adaptor (31). NOTE If coupling is not damaged, it need not be removed. 7. Press bushing (37) in housing (22) clevis. 22. If bushing (40) in housing (22) is worn, remove it. 8. Press bushing (40) in housing (22). 23. If bushing (37) in housing (22) clevis is worn, press bushing (37) out. 9. Install red jumper wires (17) and (18) on limit switch (16) (jumper wire 18 with flag terminal on N.C. spade of switch 16).
28. Assemble translating tube (54), bearing (43) and gear (41) assembly into housing. Take care not to damage gear (41) teeth. Rotate pinion (36) while assembling to be sure of proper mesh of gear (41) teeth with pinion (36) thread. NOTE Rotate gear cam shaft to make sure that switch gear cam is properly located and activates switch. 15. Thread set screw (12) in switch cam (11). Tighten lightly against shaft to prevent movement. NOTE Also check mesh of worm (48) with switch gear cam (13). 16.
34. Adjust limit switches per Paragraph 2-2 and calibrate and install potentiometer (if applicable) per Paragraph 2-3. 35. Assemble gasket (3) and cover (1) on housing (22) and hold in place with screws (1). Assembly is now complete.
FIGURE 5-1. EXPLODED ILLUSTRATION 3905, 6905 SERIES AC MINI-PACTM ACTUATOR. WARNING Use only replacement parts supplied by or approved by Duff-Norton. Nonauthorized parts may be inadequate, resulting in serious injury or death in event of failure.
SECTION V ILLUSTRATED PARTS LIST 5-1. Parts list PARTS LIST FOR DUFF-NORTON MINI-PAC™ ACTUATOR, 115 VAC WITH LIMIT SWITCH Index No. Part Name Qty. Req. Index No. Part No. Part Name Qty. Req. Part No. Screws Switch Cover Switch Cover (Optional Pot Unit) Switch Cover Gasket Switch Cover Gasket (Opt. Pot.
SECTION VI TECHNICAL ILLUSTRATIONS 6-1. Limit Switch Wiring Diagram FIGURE 6-1. LIMIT SWITCH WIRING DIAGRAM, 3905, 6905 AC MINIPACTM ACTUATOR. See Table 1-2. 6-2. Limit Switch Assembly FIGURE 6-2. LIMIT SWITCH ASSEMBLY, 3905, 6905 AC MINIPACTM ACTUATOR.
NOTES 15
P.O. Box 7010 Charlotte, NC 28241-7010 © Duff-Norton 2006 General Office: 704-558-0510 Customer Service: 800-477-5002 Fax: 704-588-1994 Email: duffnorton@cmworks.com www.duffnorton.