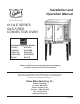
Installation and Operation Manual 613 & E SERIES GAS-FIRED CONVECTION OVEN POWER OVEN OFF COOL DOWN COOK LIGHT OFF OVEN READY TEMPERATURE TIME GAS SHUTOFF ON OFF Qualified Energy Star Models: 613-G1V 613-G2V 613-G1XX 613-G2XX 613Q-G1V 613Q-G2V 613Q-G1XX 613Q-G2XX E101-G E102-G Please read this manual completely before attempting to install, operate or service this equipment This manual is Copyright © 2011 Duke Manufacturing Co. All rights reserved.
Installation and Operation of 613 & E Series Gas Fired Convection Oven TABLE OF CONTENTS IMPORTANT WARNING AND SAFETY INFORMATION...................................................3 SPECIFICATIONS..............................................................................................................4 OVEN INPUT – STANDARD DEPTH..........................................................................4 OVEN INPUT – DEEP DEPTH.............................................................................
Installation and Operation of 613 & E Series Gas Fired Convection Oven MAINTENANCE INSTRUCTIONS...................................................................................18 A. Adjustments.........................................................................................................18 B. Door Adjustment..................................................................................................18 C. Door Switch Adjustment.................................................................
Installation and Operation of 613 & E Series Gas Fired Convection Oven SPECIFICATIONS NATURAL GAS PROPANE GAS HEATING VALUE SPECIFIC GRAVITY GAS PRESSURE AT MANIFOLD 1000 BTU 0.63 3.5" W.C. 37.3 MJ/m3 0.63 0.87 kPa 2550 BTU 1.53 10" W.C. 90.0 MJ/m3 1.53 2.49 kPa OVEN INPUT – STANDARD DEPTH PER BURNER 20,000 BTU/HR 5.9 kW 20.000 BTU/HR 5.9 kW PER OVEN 40,000 BTU/HR 11.8 kW 40,000 BTU/HR 11.8 kW PER BURNER 23,000 BTU/HR 6.8 kW 23.000 BTU/HR 6.
Installation and Operation of 613 & E Series Gas Fired Convection Oven INSTALLATION INSTRUCTIONS A. Qualified Personnel B. Delivery and Inspection These installation instructions are for the use of qualified installation and service personnel only. Installation or service by other than qualified personnel may result in damage to the oven and/or injury to the operator. Duke Manufacturing Co. does everything within its power to insure you received your oven in good condition.
Installation and Operation of 613 & E Series Gas Fired Convection Oven D. Gas Piping Each section of the “E” Series or 6/13-G Ovens (standard depth) is rated at 40,000 BTU’s per hour (11.7 kW) or (deep depth) 46,000 BTU’s per hour (13.5 kW). Therefore, 38-40 (standard), 44-46 (deep) cubic feet of natural gas or 16 (standard), 18.4 (deep) cubic feet of propane gas per hour must be supplied to each unit (stacked units count as two) when the oven is full on.
Installation and Operation of 613 & E Series Gas Fired Convection Oven your oven. To keep your warranty in force, a proper ventilation system must be employed, either direct vented or under a canopy. Shut Down Instructions: • Turn Power Switch to OFF Position • Wait 5 Minutes Before Relighting Oven Venting to a Canopy Exhaust Hood The best way to vent your oven is by placing it under a properly designed mechanically driven exhaust hood.
Installation and Operation of 613 & E Series Gas Fired Convection Oven NOTE: The casters with locking brakes are best mounted on the front side of the oven for easier access. No installation should be considered complete without proper inspection and, if necessary, any adjustments by qualified service or installation personnel.
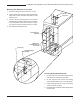
Installation and Operation of 613 & E Series Gas Fired Convection Oven Mounting Flue Extension to Top Oven 1. Remove existing flue trim from the top of oven. 2. Insert flue extension thru top opening first and then align holes on flue extension with holes on rear panel of oven. Screws (4) Flue Trim 3. Use 6 of the 8 screws (10-24x1/2") hex washer head that are provided to attach the flue extension to the rear panel of the oven as shown in figure. The other 2 screws are extras and are not used. 4.
Installation and Operation of 613 & E Series Gas Fired Convection Oven OPERATING INSTRUCTIONS The information in this section is intended for the use of qualified operating personnel. Qualified Operating Personnel are those individuals who have carefully read the information contained in this manual, are familiar with the function of the oven and/or have had experience with operating the equipment described.
Installation and Operation of 613 & E Series Gas Fired Convection Oven A. Oven Controls V-Controller 1 Electro-Mechanical 2 1. Power Switch - Controls power to ON or Cool Down Function. 2. Indicator Light - When lit indicates burners are operating. When the light goes out, the oven has reached its cooking temperature. 3 3. Cooking Thermostat - Controls the oven temperature. 4.
Installation and Operation of 613 & E Series Gas Fired Convection Oven Operating Instructions – V Controller Fan Speed Switch Timer Resolution The fan speed can be set to high or low speed by placing the FAN HI/LOW button to the desired setting. The Timer displays time from 0 to 60 minutes, in oneminute increments. Cooking Temperature Scale The Temperature Control displays the temperature in °F. The temperature range is from 150°F - 500°F, in 25°F increments.
Installation and Operation of 613 & E Series Gas Fired Convection Oven XX Controller – Oven Controls – Solid State Digital XX CONTROLLER POWER 1 1. Power Switch: Controls power to Cook or Cool Down functions. 2 2. Indicator Light: When lit indicates burners or elements are operating. When the light goes out, the oven has reached the desired temperature. OVEN OFF COOL DOWN COOK LIGHT OFF OVEN READY HR/MIN MIN/SEC HOLD START STOP 3 3.
Installation and Operation of 613 & E Series Gas Fired Convection Oven To Program Cook Mode do the following: 1. Turn the power switch ON. The power switch is located at the top of the Control Panel. 2. Set the desired cook temperature (150° to 500°F). Use the arrow keys located next to the temperature display. Up raises the temperature, down lowers the temperature. 3. Set the Fan Mode Switch to the Cook position. In the Cook position the fan will not run when the doors are open.
Installation and Operation of 613 & E Series Gas Fired Convection Oven • The oven will hold up to thirteen 18" x 26" (457mm x 660mm) sheet pans. Your product and pan height will determine how many racks can be loaded. • You may wish to experiment with leaving the oven OFF after pre-heating the oven and loading when baking light products such as light cake batter or custard so the product will have time to set.
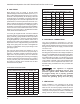
Installation and Operation of 613 & E Series Gas Fired Convection Oven C. Suggested Cook Times & Temperatures BEEF PORK VEAL LAMB POULTRY FISH SEAFOOD CHEESE POTATOES PIES BREADS CAKES COOKIES PRODUCT HAMBURGER PATTIES (3.3 OZ.) MEAT LOAF STEAMSHIP ROUND (80 LBS. QUART.) ROLLED BEEF ROAST (12-15 LBS.) STANDING RIB ROAST (20 LBS. RARE) SHELL STEAKS (100Z.) POT PIES STUFFED PEPPERS LASAGNA HOT DOGS BAKED, STUFFED PORK CHOPS BACON BONED VEAL ROAST (15 LBS.
Installation and Operation of 613 & E Series Gas Fired Convection Oven D. Cleaning of the Ovens The stainless steel on your oven can be kept clean with a good stainless steel cleaner, many of which are on the market. The painted surfaces should be wiped clean regularly with a MILD detergent. Moisten a cloth and wipe down the oven while it is COLD. Wiping down an oven while it is hot will cause streaking and otherwise unsatisfactory results. Once the oven is clean it can be wiped down with light oil.
Installation and Operation of 613 & E Series Gas Fired Convection Oven MAINTENANCE INSTRUCTIONS • Loosen the jam nut on both turnbuckles. • Make adjustments simultaneously to both turnbuckles. • Loosening or tightening the assembly will not allow the doors to work properly. Ideally, you should loosen one turnbuckle and tighten the other. Some experimentation will indicate which direction you will want to make your adjustments.
Installation and Operation of 613 & E Series Gas Fired Convection Oven To Calibrate the Ovens Door Set Screw Cam Door Switch • Remove the thermostat knob by loosening the setscrew and pull the knob forward. Take care not to rotate the thermostat stem, which will change the setting. • With a very small screwdriver, turn the screw located in the bottom of the hollow of the stem clockwise to lower the temperature or counterclockwise to raise the temperature.
Installation and Operation of 613 & E Series Gas Fired Convection Oven • Remove the Combustion Compartment Cover by removing the screws located in the bottom of the door opening. • Find the pressure tap located at the lower right hand corner of the unit on the Right hand side of a plumbing "Tee". The pressure tap is a 1/8" pipe plug with a hex head. • Remove the pressure tap plug and replace with the fitting for a gas pressure meter, slack tube or manometer. • Attach your meter.
Installation and Operation of 613 & E Series Gas Fired Convection Oven Repair Parts List Part # Description 153164 153738 Part # Description Baffle, 6/13, porcelain 153566 Mylar panel, “XX” model Baffle, 6/13, stainless steel 153139 Mylar panel, lower, 6/13 Model 153451 Baffle ASM, burner 155362 Mylar panel, lower gas panel, E-Series Model 153056 Bearing, door hinge 153154 Orifice, burner #44, natural – Standard depth 153093 Blower wheel, 9-3/8" x 2" 153155 Orifice, burner #55, propane
Installation and Operation of 613 & E Series Gas Fired Convection Oven 613 Door Assembly (Typical) 153237 Assy, Turnbuckle 153403 Finish Piece, Top 153416 Catch, Door 153801 Latch, Roller 153088 Assy, Glass 153084 Gasket, Top 153462 Door, Left 153083 Gasket, Side (2) 153285 Door,Right 153085 Gasket, Bottom 153071 Actuator 153114 Micro Switch, Door 153056 Bearing, Door 153045 Finish Piece, Bottom 22 153433 Handle, Door
Installation and Operation of 613 & E Series Gas Fired Convection Oven E Series & 613 V Controller Assembly 153460 Switch, Rotary 149403 Thermostat 153134 Mylar Panel, V Model 156015 Timer 1-Hr, 120V, 60Hz 153142 Knob 553925 Buzzer, 120V 153203 Light, Oven Ready, 120V 153142 Knob 153144 Switch, 2-Speed, Fan 153142 Knob 153146 Switch, Interior Lights 155362 Mylar, Gas 153178 Panel, Control Cook/Timer 23
Installation and Operation of 613 & E Series Gas Fired Convection Oven XX Gas Control Assembly 153460 Switch, Rotary 153564 XX Controller 153177 Probe, Temperature 153566 Mylar Panel, XX Model 159107 Keps Nut 4-40 153142 Knob 153203 Light, Oven Ready, 120V 153144 Switch, 2-Speed, Fan 153142 Knob 153146 Switch, Interior Lights 24 155362 Mylar, Gas 153569 Panel, Control XX Control
Installation and Operation of 613 & E Series Gas Fired Convection Oven ELECTRICAL SCHEMATIC
Installation and Operation of 613 & E Series Gas Fired Convection Oven CUSTOMER ASSISTANCE To aid in reporting this unit in case of loss or theft, please record below the model number and serial number located on the unit. We also suggest you record all the information listed and retain for future reference. MODEL NUMBER: SERIAL NUMBER: DATE OF PURCHASE: DEALER: TELEPHONE: SERVICER: TELEPHONE: FOR WARRANTY, PARTS & SERVICE: DUKE CORPORATE, CANADA, LATIN AMERICA DUKE ASIA PACIFIC 2305 N.
Installation and Operation of 613 & E Series Gas Fired Convection Oven NOTES 27
Duke Manufacturing Co. Duke Corporate, Canada, Latin America 2305 N. Broadway St. Louis, MO 63102 Phone: 314-231-1130 Toll Free: 800-735-3853 Fax: 314-231-5074 www.dukemfg.com Duke EMEA - Europe, Middle East, Africa, Russia Duke Manufacturing CR, s.r.o. Zdebradska 92 Jazlovice, Ricany Building number DC 4 on the ProLogis Park Prague D1 West Prague 251 01 Czech Republic Phone: +420 257 741 033 Fax: +420 257 741 039 Duke EMEA – UK, Ireland, Nordic Countries Duke Manufacturing UK Ltd.